1. Consignes de sécurité importantes
Veuillez lire et comprendre toutes les instructions avant le montage et l'utilisation. Conservez ce manuel pour toute consultation ultérieure.
- Avant l'assemblage, assurez-vous que tous les composants sont présents et non endommagés.
- Do not overtighten screws during assembly to prevent damage to the material.
- Place the night stand on a flat, stable surface to prevent tipping.
- Do not exceed the weight capacity of the tabletop (50 lbs) or drawers/shelf (30 lbs).
- Keep liquids away from the charging station and power outlets to prevent electrical hazards.
- Débranchez le cordon d'alimentation de la prise murale avant de nettoyer ou de déplacer l'appareil.
- Do not attempt to modify or repair the electrical components. Contact customer support for assistance.
2. Contenu du colis
Veuillez vérifier que toutes les pièces énumérées ci-dessous sont incluses dans votre colis. Si des pièces sont manquantes ou endommagées, veuillez contacter le service client.
- Panneau supérieur
- Panneaux latéraux (2)
- Panneau arrière
- Façades de tiroirs (2)
- Drawer Sides & Backs
- Fonds de tiroir
- Panneau d'étagère
- Jambes (4)
- Borne de recharge (préinstallée ou séparée)
- LED Light Strip with Human Sensor
- Hardware Kit (screws, dowels, drawer slides, handles, etc.)
- Manuel d'instructions
3. Instructions de montage
Follow these steps carefully for proper assembly. Each part is labeled with a number for easy identification.
- Déballer et identifier : Lay out all components on a clean, soft surface. Identify each part using the labels and the parts list.
- Assemblage du cadre : Attach the side panels to the bottom panel and back panel using the provided screws and dowels.
- Installer l'étagère : Insert the shelf panel into the designated slots or attach with screws.
- Assembler les tiroirs : Construct the two drawers by attaching the sides, back, and bottom to the drawer front. Install drawer slides.
- Insérer des tiroirs : Carefully slide the assembled drawers into the frame.
- Fixer le panneau supérieur : Fixez le panneau supérieur au cadre assemblé.
- Installer les pieds : Attach the four legs to the bottom of the night stand.
- Raccordement des composants électriques : If the charging station and LED light strip are not pre-installed, follow the specific instructions provided in the hardware kit to secure them and connect the necessary wiring. Ensure all connections are firm.
- Vérification finale : Ensure all screws are tightened and the night stand is stable.

Figure 3.1 : Product dimensions and weight capacities for tabletop, shelf, and drawers. Dimensions are 15.75"D x 17.72"W x 23.62"H. Tabletop capacity is 50 lbs, shelf/drawer capacity is 30 lbs.
4. Mode d'emploi
4.1 Système d'éclairage LED
The night stand features an integrated LED light strip with three color modes and a human sensor.
- Marche/Arrêt : Locate the control button for the LED lights. A short press typically turns the lights on or off.
- Changer le mode couleur : With the lights on, short press the control button repeatedly to cycle through the three available color modes: White light, Warm light, and Cold light.
- Régler la luminosité : To adjust brightness (0-100%), press and hold the control button. The brightness will cycle up or down. Release the button when the desired brightness is reached.
- Human Sensor Function: The integrated human body sensor automatically activates the LED lights when motion is detected within 2-3 meters. The lights will turn off after a period of inactivity. This feature provides convenient illumination without manual operation.
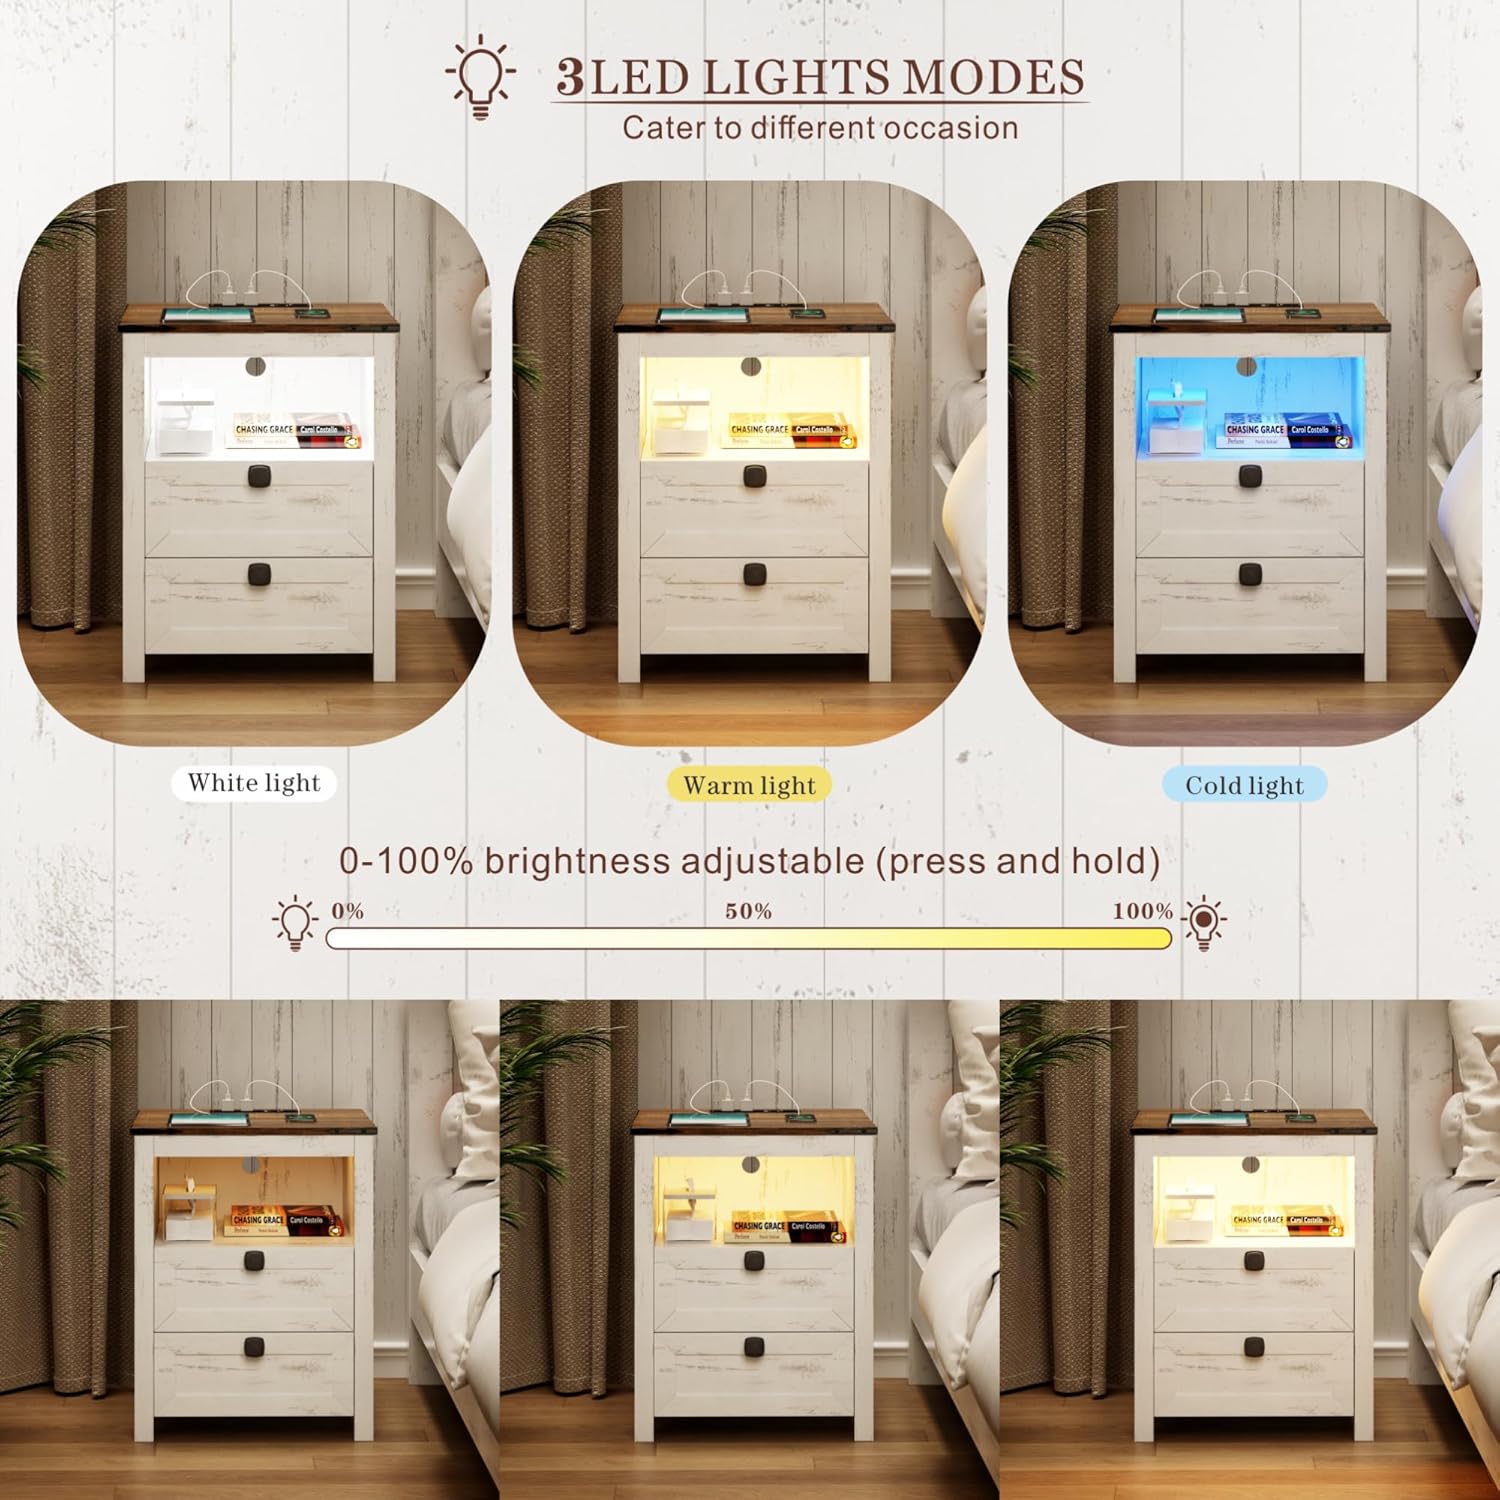
Figure 4.1 : Illustration of the three LED light modes (White, Warm, Cold) and the brightness adjustment range from 0% to 100% by pressing and holding the control button.

Figure 4.2 : Depiction of the human sensor's operation, showing it detects movement within a 2-3 meter range to automatically illuminate the night stand.
Station de recharge 4.2
La station de recharge intégrée offre un accès pratique à l'alimentation pour vos appareils électroniques.
- Connexion électrique : Ensure the night stand's main power cord is securely plugged into a standard 120V/12A wall outlet.
- Ports USB : Use the 1 x USB-A port (5V/2A) to charge compatible devices such as smartphones, tablets, or other USB-powered accessories.
- Port de type C: Use the 1 x Type-C port (5V/2A) for devices that utilize a USB-C connection.
- Prises secteur : The 2 x standard AC power outlets (120V/12A) can be used for larger electronics like laptops, lamps, or other appliances.
- Gestion des câbles: Route charging cables neatly to avoid clutter and potential hazards.

Figure 4.3 : Détaillé view of the charging station, highlighting the 1 USB port, 1 Type-C port, and 2 AC power outlets, along with their respective power specifications.
5. Entretien
Proper care will extend the life and appearance of your night stand.
- Nettoyage: Essuyez les surfaces avec un chiffon doux, damp Chiffon. Évitez les produits chimiques agressifs ou les nettoyants abrasifs, qui peuvent endommager la finition.
- Saupoudrage: Regularly dust the night stand, especially around the charging ports and LED light area, to prevent dust buildup.
- Déversements : Immediately wipe up any spills to prevent moisture damage to the wood and electrical components.
- Composants électriques : Ensure the charging station and LED lights remain dry. Do not immerse in water.
- Serrer les attaches : Vérifiez et resserrez périodiquement toutes les vis et fixations afin de maintenir l'intégrité structurelle.
6. Dépannage
Consultez cette section pour les problèmes courants et leurs solutions.
| Problème | Cause possible | Solution |
|---|---|---|
| Les lumières LED ne s'allument pas. | Non branché ; connexion desserrée ; coupure de couranttage; faulty LED strip. | Ensure power cord is securely plugged into a working outlet. Check LED strip connection. Test outlet with another device. Contact customer support if faulty. |
| La borne de recharge ne fonctionne pas. | Not plugged in; loose connection; device not compatible; overloaded circuit. | Verify power cord is plugged in. Check connections. Ensure device is compatible with USB/Type-C/AC specifications. Unplug some devices if overloaded. |
| Human sensor not detecting motion. | Obstruction; sensor dirty; out of range; sensor malfunction. | Ensure clear line of sight to the sensor. Clean sensor surface. Stand within 2-3 meter range. Contact customer support if malfunction persists. |
| Les tiroirs coincent ou ne coulissent pas correctement. | Improper assembly; debris in slides; damaged slides. | Review assembly steps for drawers and slides. Clear any debris. Contact customer support if slides are damaged. |
7. Spécifications
- Marque: FRÉDÉES
- Modèle: Smart LED Night Stand
- Dimensions du produit : 15.74"P x 17.71"L x 23.62"H
- Couleur: White (Farmhouse Style)
- Capacité de poids du plateau de table : 50 livres
- Shelf/Drawer Weight Capacity: 30 livres
- Lumières LED : 3 Color Modes (White, Warm, Cold), 0-100% Brightness Adjustable
- Human Sensor Range: 2-3 mètres
- Station de charge:
- 1 x USB Port (5V/2A)
- 1 x Type-C Port (5V/2A)
- 2 x AC Power Outlets (120V/12A)
- Longueur du cordon d'alimentation : 4.92 FT
8. Garantie et assistance
For warranty information, product support, or to report missing/damaged parts, please contact FREDEES customer service through the retailer where the product was purchased. Please have your purchase receipt and product model number (B0CSPDVKVP) available when contacting support.