Introduction
This manual provides detailed instructions for the installation, operation, and maintenance of your XTRONS IQ72DLRP Car Stereo GPS unit. Please read this manual thoroughly before using the product to ensure proper functionality and to prevent damage. Keep this manual for future reference.
Consignes de sécurité
- Do not attempt to operate the unit while driving. Distracted driving can lead to accidents.
- Ensure all wiring is correctly connected before powering on the unit to avoid short circuits or damage.
- Consult a professional for installation if you are unsure about any steps. Incorrect installation can void your warranty.
- Évitez d'exposer l'appareil à des températures extrêmes, à la lumière directe du soleil pendant des périodes prolongées ou à une humidité excessive.
- Do not disassemble the unit. This may cause damage and will void the warranty.
Contenu du colis
Vérifiez que tous les éléments sont présents dans l'emballage avant de procéder à l'installation.
- XTRONS IQ72DLRP Head Unit
- Antenne GPS
- Faisceau de puissance
- Câbles USB
- Câbles RCA
- Microphone externe
- Manuel de l'utilisateur (ce document)
- Other accessories as pictured below.

Figure 1 : Accessoires inclus
Installation
1. Installation terminéeview
The XTRONS IQ72DLRP is designed for specific integration with the Land Rover Freelander 2. Professional installation is recommended. Ensure the vehicle's battery is disconnected before starting any electrical work.
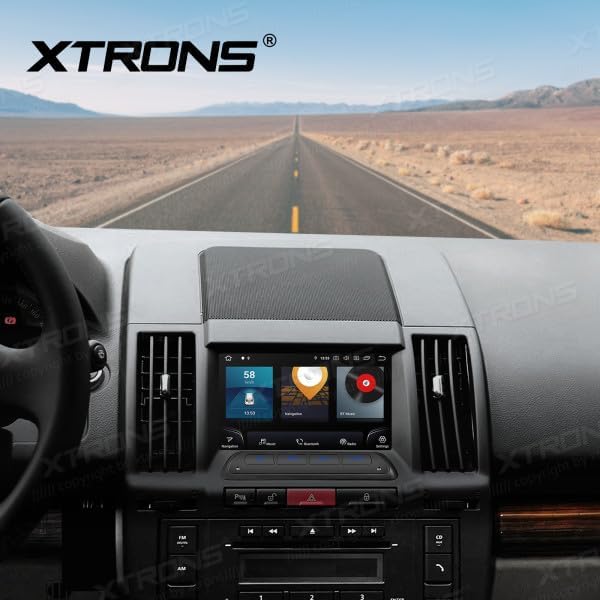
Figure 2: Unit installed in Land Rover Freelander 2 dashboard
2. Connexions de câblage
Connect the main power harness, speaker wires, and other auxiliary cables according to your vehicle's wiring diagram and the provided XTRONS harness. Pay close attention to the following connections:
- Pouvoir: Connect the yellow wire (constant 12V), red wire (accessory 12V), and black wire (ground).
- Intervenants : Connect the speaker wires to the corresponding vehicle speaker wires (e.g., Front Left +, Front Left -).
- Antenne GPS: Installez l'antenne GPS dans un endroit dégagé. view du ciel, généralement sur le tableau de bord ou sous le pare-brise.
- USB: Connectez les câbles USB pour le stockage externe ou la connexion smartphone.
- Micro externe : Connectez le microphone externe pour une meilleure qualité d'appel.
3. Mise sous tension initiale
After all connections are secure, reconnect the vehicle's battery. Turn on the ignition. The unit should power on automatically. Follow any on-screen prompts for initial setup, such as language selection and time zone.
Mode d'emploi
1. Fonctions de base
- Marche/Arrêt : Appuyez sur le bouton d'alimentation et maintenez-le enfoncé (s'il est disponible) ou mettez le contact du véhicule.
- Contrôle du volume : Utilisez le bouton de volume ou les commandes à l'écran pour régler les niveaux audio.
- Écran d'accueil : Appuyez sur l'icône d'accueil pour revenir à l'interface principale d'Android.

Figure 3: Main Android Home Screen
2. Navigation dans le système d'exploitation Android
The unit runs on Android 12. Navigate through menus and applications by tapping, swiping, and dragging on the touchscreen, similar to a smartphone or tablet.

Figure 4: Application Drawer
3. Fonctionnement radio
Access the "Radio" application from the home screen. You can scan for stations, save presets, and switch between AM/FM bands.
4. Connectivité Bluetooth
Pour jumeler votre téléphone :
- Aller à Paramètres > Bluetooth.
- Enable Bluetooth on both the head unit and your mobile device.
- Rechercher available devices on your mobile phone and select "XTRONS IQ72DLRP" (or similar name).
- Vérifiez le code d'appairage sur les deux appareils.
Une fois l'appairage effectué, vous pouvez passer des appels mains libres et diffuser de l'audio.
5. CarPlay / Android Auto
Connect your compatible smartphone via USB to use Apple CarPlay or Android Auto. The system will automatically detect and launch the respective interface, allowing access to navigation, music, messages, and more directly from your phone.
6. Navigation GPS
The unit comes with a built-in GPS module and antenna. You can use pre-installed navigation apps or download others from the Google Play Store. Ensure the GPS antenna is properly installed for optimal signal reception.
7. USB / Media Playback
Insert a USB drive into one of the provided USB ports. Use the "Music" or "Video" applications to browse and play media fileL'appareil prend en charge différents formats audio et vidéo.
8. Paramètres DSP
The Digital Sound Processor (DSP) allows for advanced audio customization. Access the "DSP" application to adjust equalizer settings, balance, fader, and other sound effects to optimize your listening experience.

Figure 5 : Interface des paramètres DSP
9. Wi-Fi and 4G Connectivity
Connect to a Wi-Fi network via Paramètres > Réseau et Internet > Wifi. For 4G connectivity, insert a compatible SIM card (if the unit supports it and a slot is available) or use a USB 4G dongle (sold separately) and configure network settings.
Entretien
1. Nettoyage de l'unité
Utilisez un chiffon doux et sec pour nettoyer l'écran et l'extérieur de l'appareil. Pour les taches tenaces, un chiffon légèrement plus sec peut être utile.amp cloth with a mild, non-abrasive cleaner can be used. Avoid spraying liquids directly onto the unit.
2. Mises à jour logicielles
Periodically check for software updates to ensure optimal performance and access to new features. Updates can usually be found in the system settings or on the official XTRONS website. Follow the instructions provided with the update package carefully.
Dépannage
| Problème | Cause possible | Solution |
|---|---|---|
| L'unité ne s'allume pas. | Câblage incorrect ; fusible grillé ; batterie du véhicule débranchée. | Vérifiez les connexions d'alimentation (fils jaune, rouge et noir). Inspectez les fusibles du véhicule. Assurez-vous que la batterie est bien connectée. |
| Aucun son des haut-parleurs. | Câbles des haut-parleurs mal connectés ; volume trop faible ; fonction muet activée. | Verify speaker wiring. Increase volume. Check if the unit is muted. |
| Signal GPS faible ou indisponible. | Antenne GPS mal installée ou obstruée. | Assurez-vous que l'antenne GPS a un signal clair. view du ciel. Vérifiez la connexion de l'antenne. |
| L'appairage Bluetooth échoue. | Bluetooth not enabled; Incorrect pairing code; Device out of range. | Enable Bluetooth on both devices. Re-enter pairing code. Ensure devices are close. |
| L'écran tactile ne répond plus. | Problème logiciel temporaire ; appareil bloqué. | Restart the unit (turn vehicle ignition off and on). If issue persists, perform a factory reset (refer to settings). |
Caractéristiques
- Numéro de modèle : IQ72DLRP
- Marque: Xtrons
- Système opérateur: Android 12
- Taille de l'écran : 7 pouces
- Connectivité : Bluetooth, Wi-Fi, 4G (optional), Apple CarPlay, Android Auto, USB
- Appareils compatibles : Téléphone mobile
- Couleur: Noir
- Processeur: Octa-core
- BÉLIER: 8 Go LPDDR4
- ROM: Disque SSD 256 Go
- Technologie d'affichage : QLED
- Sortie audio : Optical Coaxial, RCA Audio Out
Note: Specifications are subject to change without prior notice. Some product images may show Android 13, but the product title specifies Android 12.
Garantie et assistance
1. Informations sur la garantie
XTRONS products typically come with a limited warranty covering manufacturing defects. Please refer to the warranty card included with your product or visit the official XTRONS webConsultez ce site pour connaître les conditions générales de garantie détaillées spécifiques à votre région.
2. Assistance clientèle
If you encounter any issues not covered in the troubleshooting section or require further assistance, please contact XTRONS customer support. You can usually find contact information (email, phone, or support portal) on the official XTRONS website:
When contacting support, please have your product model number (IQ72DLRP) and purchase details ready.