Hikity 9-inch Android 15 Car Radio User Manual
Model: B0CQLNWC4S for Toyota Prius C (2012-2014)
1. Produit terminéview
This Hikity car radio is an advanced infotainment system designed for Toyota Prius C models from 2012 to 2014. It features a 9-inch Incell touchscreen, Android 15 operating system, 4GB RAM, and 128GB ROM, providing a smooth and responsive user experience. Key functionalities include wireless CarPlay and Android Auto, Bluetooth 5.0, FM/RDS radio, GPS navigation, Wi-Fi connectivity, steering wheel control support, and compatibility with an AHD backup camera.

Image 1.1: The Hikity 9-inch car radio seamlessly integrated into a Toyota Prius C dashboard, displaying navigation and media playback.
2. Contenu de la boîte
Veuillez vérifier que tous les composants sont présents avant de commencer l'installation :
- Android Stereo for Toyota Prius C
- Backup Camera/CAM-IN Cable
- Power Cable/RCA Cable
- Antenne GPS
- Microphone
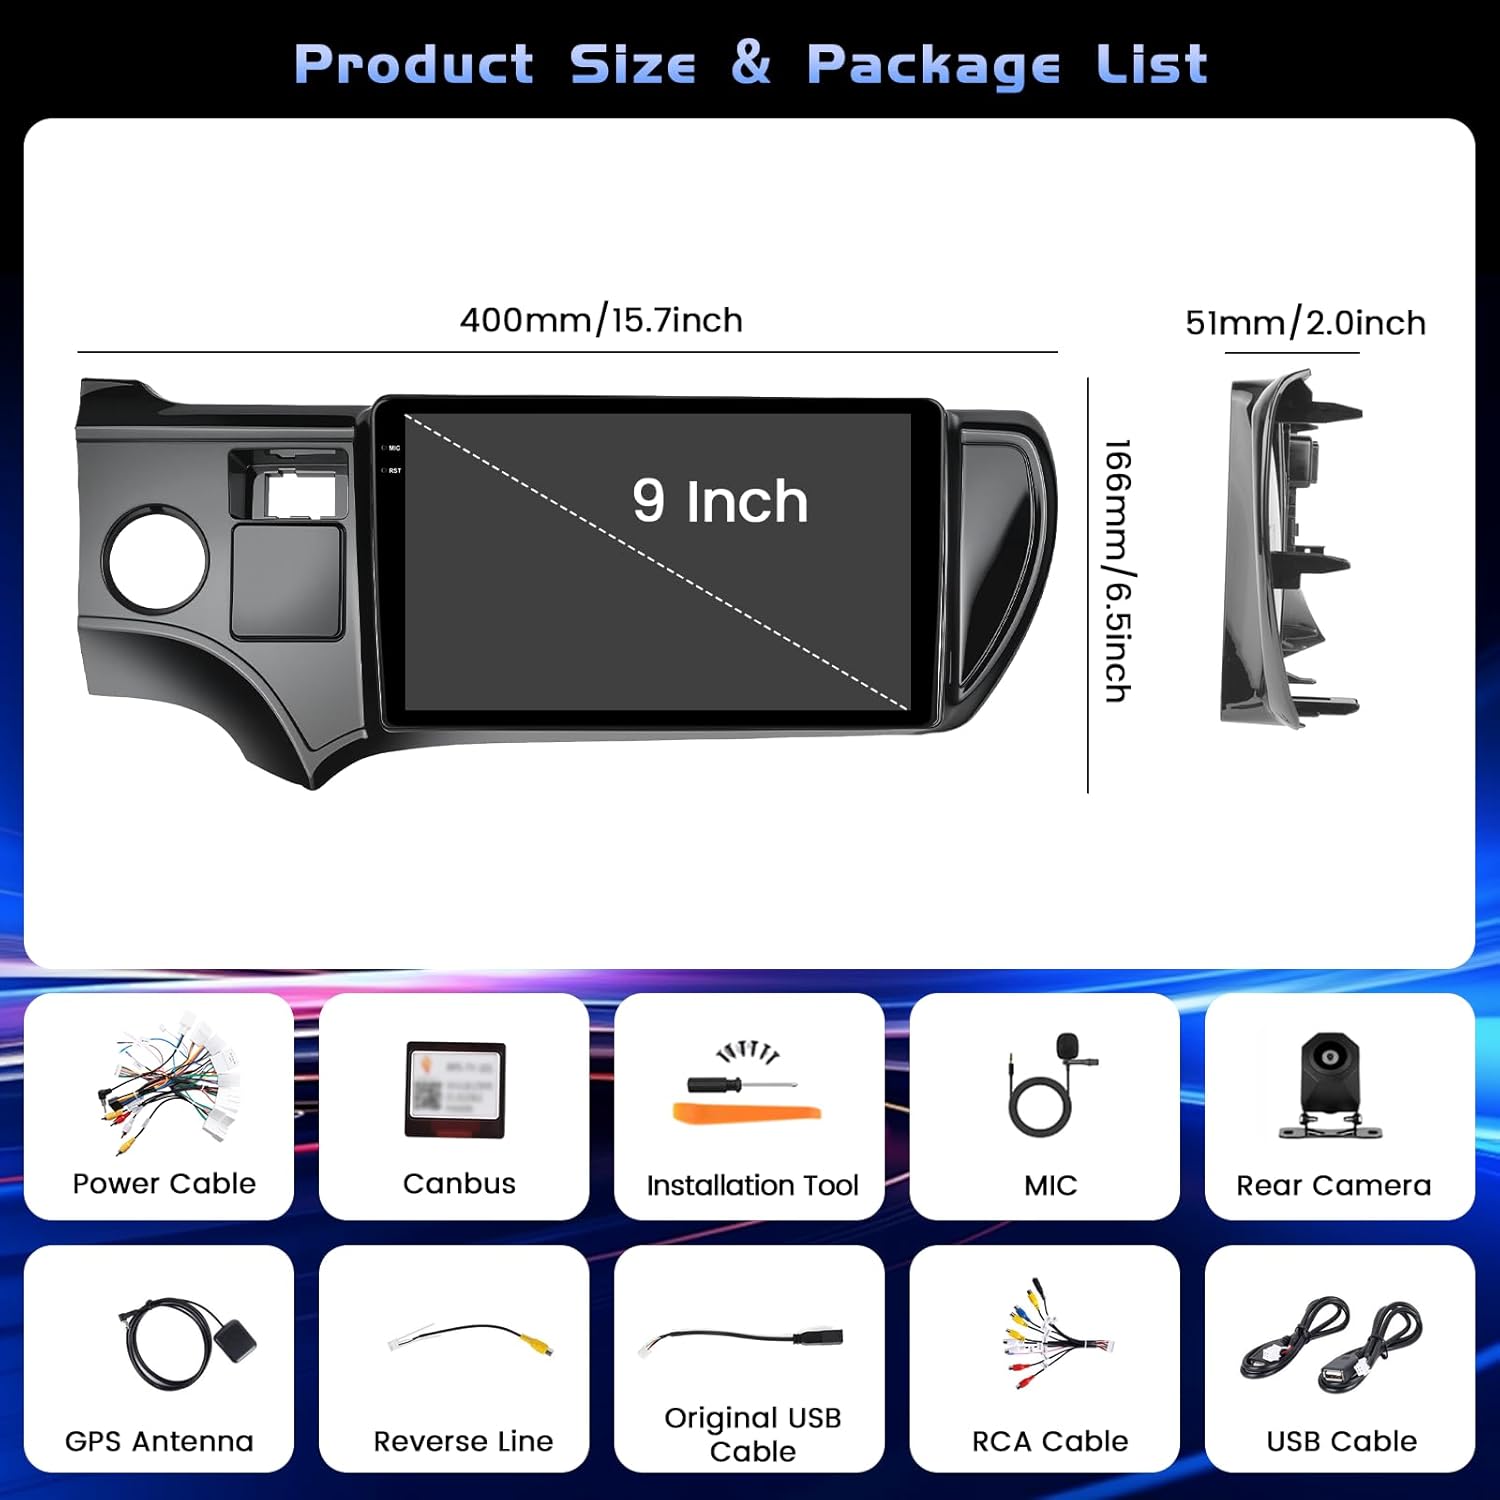
Image 2.1: All included components of the Hikity car radio system.
3. Configuration et installation
Professional installation is recommended for optimal performance and to avoid damage to your vehicle or the unit. Ensure the vehicle's power is disconnected before starting installation.
3.1 Connexions de câblage
Carefully connect all cables according to the provided wiring diagram. Pay close attention to the power and ground connections to prevent electrical issues. The backup camera requires specific wiring to function correctly.
Video 3.1: Detailed instructions on how to connect the backup camera to the car radio system.
For the backup camera, connect the 'BACK' line from the main harness to the positive pole of your car's reversing light. Connect the camera's power cable to the reversing light's positive and negative poles. The video signal cable from the camera connects to the 'CAM-IN' port on the head unit.

Image 3.2 : Schéma de câblage pour la connexion de la caméra de recul.
3.2 Mise sous tension initiale
After all connections are secure, reconnect the vehicle's power. The unit should power on automatically. Follow any on-screen prompts for initial setup, such as language selection and time zone.
4. Mode d'emploi
4.1 Navigation de base dans l'interface utilisateur
The system features an intuitive touchscreen interface. Swipe left or right to navigate between home screens and access various applications. The top bar displays status icons for Wi-Fi, Bluetooth, GPS, and time.

Image 4.1 : Terminéview of the user interface with various app icons and customizable themes.
4.2 Connexion Bluetooth
To connect your smartphone via Bluetooth for hands-free calls and audio streaming:
- Accédez au menu « Paramètres » de l’autoradio.
- Sélectionnez « Bluetooth » et assurez-vous qu'il est activé.
- Sur votre smartphone, activez le Bluetooth et recherchez les appareils disponibles.
- Select the car radio's Bluetooth name (e.g., 'BLINK_UNW2652') from your phone's list.
- Confirmez la demande de jumelage sur les deux appareils.

Image 4.2: Bluetooth dialing screen and connection status.
4.3 CarPlay sans fil et Android Auto
This unit supports both wireless CarPlay and Android Auto for seamless smartphone integration. Connect your mobile phone to the car infotainment system via Bluetooth first, then launch the 'S-Play' application on the car radio to initiate the connection.
Video 4.3: Guide on how to use CarPlay with the car radio.

Image 4.4: Wireless CarPlay and Android Auto interface.
4.4 Navigation GPS
The unit features a dual navigation system supporting both online and offline maps. Connect to Wi-Fi to download offline maps or use online navigation for real-time traffic updates.

Image 4.5: GPS navigation interface with online and offline map options.
4.5 Commande au volant (SWC)
The car radio supports your vehicle's original steering wheel controls. To configure them:
- Connect the SWC wires (KEY1/KEY2) from the car radio harness to the corresponding wires in your vehicle's wiring.
- Access the 'Steering Wheel Key Learning' function in the car radio's settings (usually under 'Factory Setup' with password 1234).
- Suivez les instructions à l'écran pour attribuer des fonctions à chaque bouton de votre volant.

Image 4.6 : Interface d'apprentissage des commandes au volant.
4.6 Fonctionnalité d'écran partagé
The unit supports split-screen mode, allowing you to run two applications simultaneously. This feature can be enabled or disabled in the 'Factory Setup' settings (password 1234) under 'Split screen function'. Once enabled, you can drag compatible apps to either side of the screen.
Radio FM/RDS 4.7 GHz
Access the FM/RDS application to listen to radio stations. The RDS (Radio Data System) feature displays station information where available.
5. Entretien
Pour garantir la longévité et les performances optimales de votre autoradio, suivez ces consignes d'entretien :
- Nettoyage de l'écran : Use a soft, lint-free cloth to gently wipe the touchscreen. Avoid abrasive cleaners or harsh chemicals that could damage the screen coating.
- Mises à jour logicielles : Periodically check for software updates through the system's settings to ensure you have the latest features and bug fixes.
- Conditions environnementales : Évitez d'exposer l'appareil à des températures extrêmes, à la lumière directe du soleil pendant des périodes prolongées ou à une humidité excessive.
- Intégrité du câble : Regularly inspect all visible cables for any signs of wear or damage.
6. Dépannage
If you encounter issues with your car radio, refer to the following common solutions:
- Pas d'alimentation : Check all power connections. Ensure the vehicle's fuse for the radio is intact.
- Écran blanc: Perform a soft reset by pressing the RST button (if available) or disconnecting and reconnecting the vehicle's battery for a few minutes.
- Caméra de recul non fonctionnelle : Verify all camera wiring, especially the 'BACK' trigger wire and power connections. Ensure the correct camera input type (AHD, CVBS-N, etc.) is selected in 'Factory Setup' > 'Backcar Source Settings'.
- Commandes au volant ne répondant pas : Re-perform the 'Steering Wheel Key Learning' procedure as described in Section 4.5. Ensure the SWC wires are correctly connected.
- Problèmes de connexion Bluetooth/CarPlay/Android Auto : Ensure Bluetooth is enabled on both devices. Forget the device on both the phone and car radio, then attempt to pair again. For CarPlay/Android Auto, ensure the 'S-Play' app is running and your phone is compatible.
- Pas de son : Check speaker connections and ensure the volume is not muted or set too low. Verify equalizer settings.
7. Spécifications
| Fonctionnalité | Détail |
|---|---|
| Marque | Hikité |
| Nom du modèle | Autoradio Android |
| Système opérateur | Android 15 |
| Mémoire | 4 Go de RAM + 128 Go de ROM |
| Taille de l'écran | 9 pouces |
| Type d'affichage | Incell Full Touchscreen LCD |
| Résolution | 1280*720 |
| Connectivité | Bluetooth 5.0, USB, Wi-Fi (5G), Wireless CarPlay, Android Auto |
| Navigation | Dual GPS (Online and Offline Maps) |
| Mode de sortie audio | Stereo (32-EQ) |
| Véhicules compatibles | Toyota Prius C 2012-2014 |
| Dimensions de l'article (L x l x H) | 15.94" x 10.24" x 2.36" |
| Poids de l'article | 1 kilogramme |

Image 7.1: Details of the Incell Full Lamination Screen technology.
8. Garantie et assistance
8.1 Informations sur la garantie
Cette autoradio Hikity est livrée avec un Garantie de 1 ans À compter de la date d'achat, la garantie couvre les défauts de fabrication et les dysfonctionnements dans des conditions normales d'utilisation. Veuillez conserver votre preuve d'achat pour toute réclamation au titre de la garantie.
8.2 Assistance clientèle
For technical assistance, troubleshooting, or warranty inquiries, please contact Hikity customer support through the retailer where the product was purchased. You may also find additional support resources on the official Hikity website.