Introduction
This manual provides detailed instructions for the installation, operation, and maintenance of your GREATHTEK HDMI KVM Switch. This device allows you to control up to four computers using a single monitor, keyboard, and mouse, enhancing workspace efficiency and reducing cable clutter. Please read this manual thoroughly before use to ensure proper functionality and to maximize your product experience.
Contenu du colis
Veuillez vérifier que tous les articles listés ci-dessous sont inclus dans votre colis. Si un article est manquant ou endommagé, veuillez contacter le service client.
- KVM Switch Unit x1
- Câble HDMI 2.0 x1
- Câble USB 3.0 x4
- USB C Power Cable x1
- Desktop Controller x1
- Manuel d'instructions x1
- Coussinet de pied x4

Caractéristiques du produit
- Fonctionnalités KVM à 4 ports : Control up to four computers (PCs) with a single set of keyboard, mouse, and monitor.
- Prise en charge haute résolution : Supports resolutions up to 4K@60Hz (3840x2160@60Hz), and is backward compatible with 2K and 1080P. Ensure your source devices, monitor, and HDMI cables all support 4K@60Hz for optimal performance.
- High-Speed USB 3.0 Ports: Equipped with 3 USB 3.0 ports and 1 USB C port, offering data transfer speeds up to 5 Gbit/s, which is ten times faster than USB 2.0. These ports can connect keyboards, mice, USB drives, printers, scanners, and other USB devices.
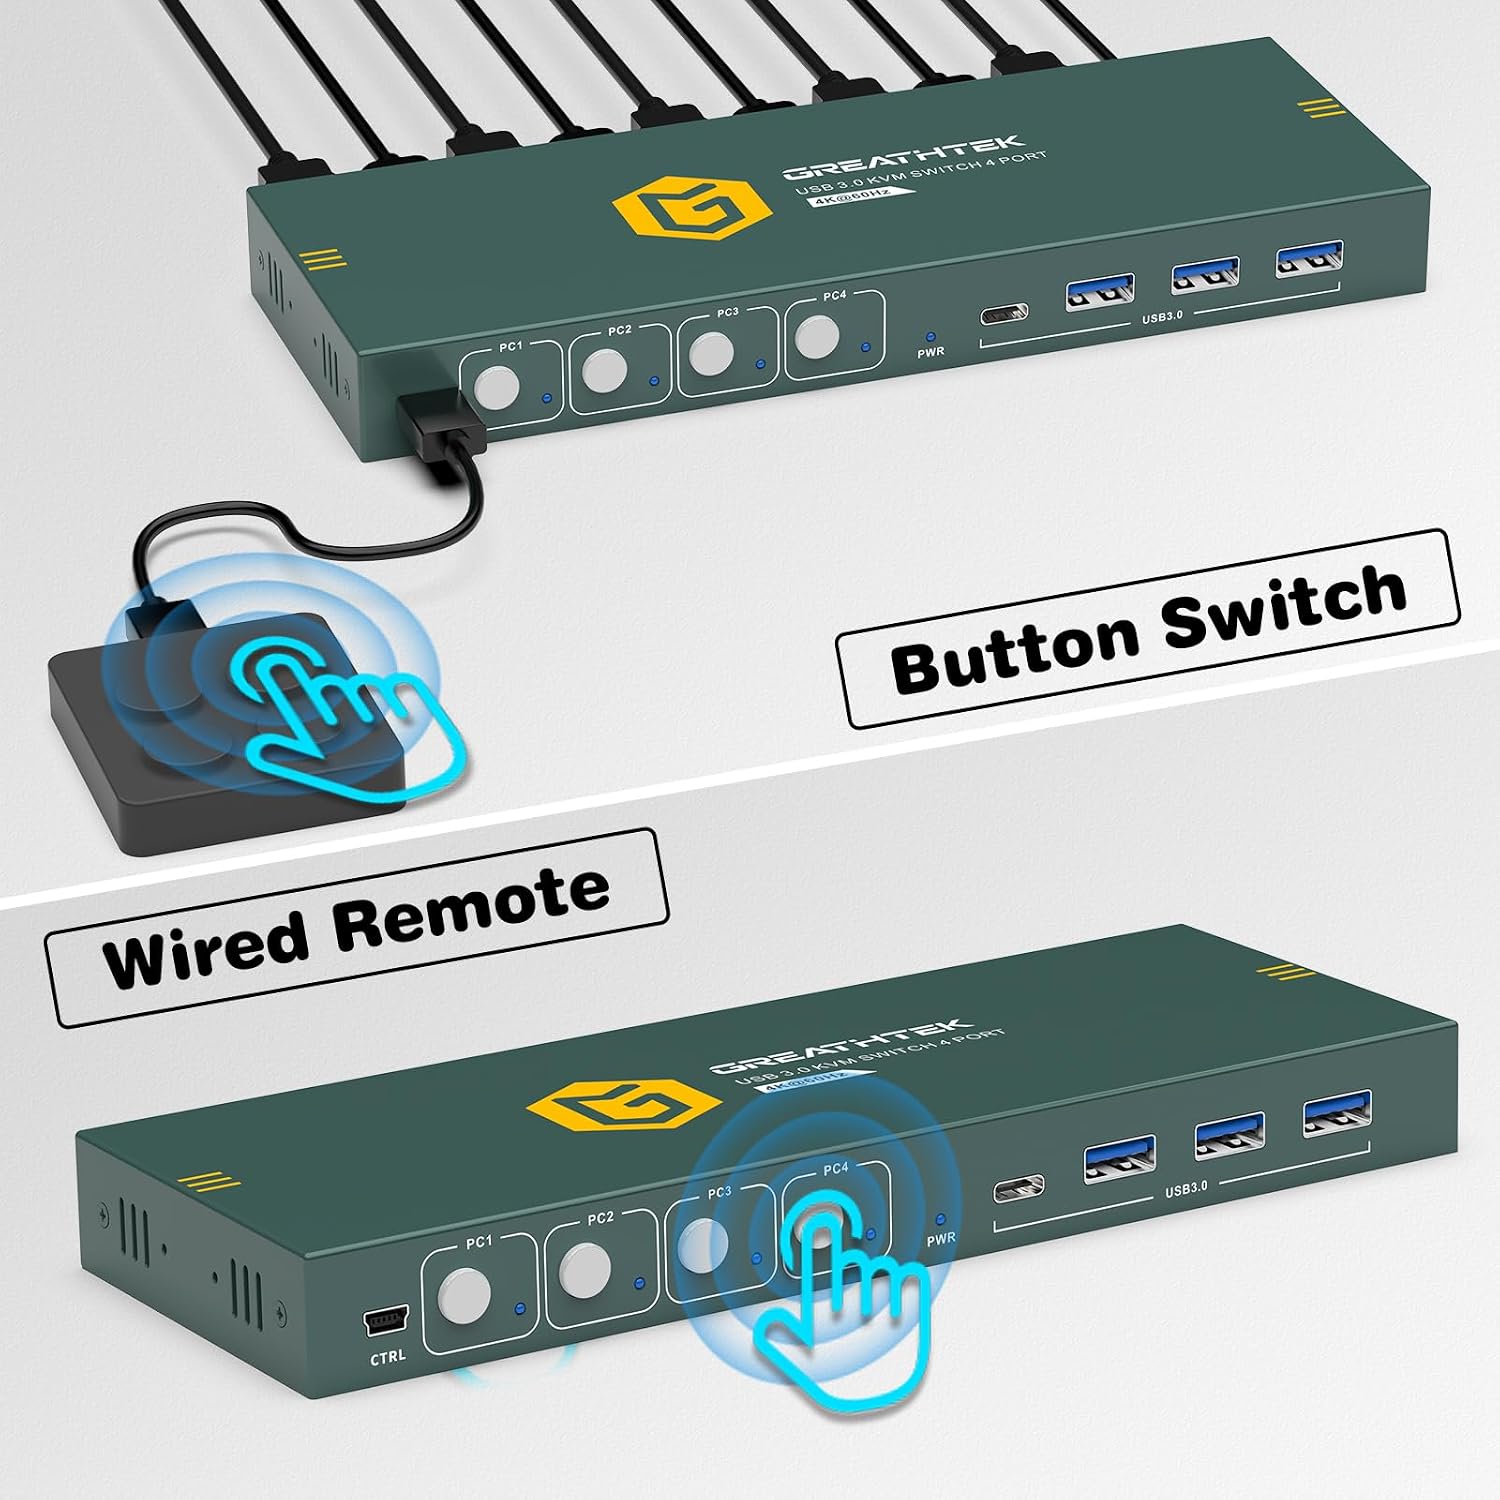
- Méthodes de commutation doubles : Easily switch between connected computers using either the physical button on the KVM switch or the included 1.5m wired desktop controller.
- EDID Adaptation: Features EDID adaptation to maintain consistent window and resolution settings when switching between computers, preventing display disruption.
- Large compatibilité : Compatible with various operating systems including Windows, Linux, Unix, and Mac.


Instructions d'installation
Follow these steps to properly set up your GREATHTEK HDMI KVM Switch:
- Éteignez tous les appareils : Before starting, ensure all computers and your monitor are powered off and unplugged from their power sources.
- Connectez le moniteur : Connect your monitor to the "HD OUT" port on the KVM switch using an HDMI cable.
- Connexion des ordinateurs (HDMI) : For each computer, connect an HDMI cable from the computer's HDMI output to an available "HD IN" port (PC1, PC2, PC3, PC4) on the KVM switch.
- Connexion des ordinateurs (USB) : For each computer, connect a USB 3.0 cable from the computer's USB port to the corresponding "USB 3.0" input port (PC1, PC2, PC3, PC4) on the KVM switch. These connections enable keyboard, mouse, and other USB device sharing.
- Connecter le clavier et la souris : Connect your keyboard and mouse to the dedicated USB 3.0 ports on the KVM switch. You can also connect other USB peripherals like a USB drive or printer to the remaining USB 3.0 ports.
- Connecter l'alimentation : Connect the USB C power cable to the KVM switch's power input and then to a suitable USB power adapter (not included) or a powered USB port.
- Mise sous tension : Power on the KVM switch, then your monitor, and finally your computers.

Mode d'emploi
Once the KVM switch is set up, you can easily switch between your connected computers.
Basculer entre les ordinateurs
The GREATHTEK HDMI KVM Switch offers two methods for switching:
- Bouton du panneau avant : Press the corresponding button (PC1, PC2, PC3, or PC4) on the front panel of the KVM switch to select the desired computer. The LED indicator next to the button will illuminate to show the active computer.
- Wired Desktop Controller: Use the included wired desktop controller. Press the button on the controller to cycle through the connected computers. This allows for convenient switching without reaching for the KVM unit itself.

Entretien
Pour garantir la longévité et les performances optimales de votre commutateur KVM, suivez ces consignes de maintenance :
- Nettoyage: Utilisez un chiffon doux et sec pour nettoyer l'extérieur de l'appareil. Évitez d'utiliser des nettoyants liquides ou des aérosols, qui pourraient endommager l'appareil.
- Ventilation: Veillez à placer le commutateur KVM dans un endroit bien ventilé afin d'éviter toute surchauffe. Ne bloquez aucune ouverture de ventilation.
- Gestion des câbles: Veillez à ce que les câbles soient bien rangés et exempts de nœuds ou de courbures excessives afin d'éviter les dommages et de garantir des connexions stables.
- Conditions environnementales : Évitez d'exposer l'appareil à des températures extrêmes, à l'humidité ou à la lumière directe du soleil.
Dépannage
Si vous rencontrez des problèmes avec votre commutateur KVM, consultez les problèmes et solutions courants suivants :
- Aucune sortie d'affichage :
- Assurez-vous que tous les câbles HDMI sont correctement connectés à la fois au commutateur KVM et aux ordinateurs/moniteurs.
- Vérifiez que le commutateur KVM est sous tension.
- Check if the correct input source is selected on your monitor.
- Essayez de redémarrer le commutateur KVM et les ordinateurs connectés.
- Confirm that your HDMI cables support the desired resolution (e.g., 4K@60Hz).
- Clavier/souris ne répondent pas :
- Ensure the USB 3.0 cables from the computers to the KVM switch are properly connected.
- Verify that the keyboard and mouse are connected to the dedicated USB 3.0 ports on the KVM switch.
- Essayez de connecter le clavier et la souris directement à l'ordinateur pour vérifier qu'ils fonctionnent.
- Some specialized gaming keyboards/mice may require direct connection or specific drivers; try a standard keyboard/mouse first.
- Display Resolution/Refresh Rate Issues:
- Ensure all connected devices (computers, monitor, HDMI cables) support the desired resolution and refresh rate (e.g., 4K@60Hz).
- Adjust display settings on your computer to match the capabilities of your monitor and KVM switch.
- Délai de commutation :
- A slight delay during switching is normal as the system re-establishes connections. Excessive delays might indicate a cable issue; try replacing HDMI or USB cables.
If these steps do not resolve your issue, please contact GREATHTEK customer support for further assistance.
Caractéristiques
| Fonctionnalité | Spécification |
|---|---|
| Numéro de modèle | GHT-S7415H-01 |
| Marque | GREATHTEK |
| Ports KVM | 4 Computers, 1 Monitor |
| Résolution vidéo | Up to 4K@60Hz (3840x2160@60Hz) |
| Ports USB | 3 x USB 3.0, 1 x USB C |
| USB Transfer Speed | Jusqu'à 5 Gbit/s |
| Méthodes de commutation | Button Switch, Desktop Controller |
| Desktop Controller Cable Length | 1.5 m |
| Compatibilité | Windows, Linux, Unix, Mac |
| Type de connecteur | HDMI, USB-A, USB-C |
| Matériel | Cuivre (matériau de contact) |
| Couleur | Noir |
| Dimensions (Colis) | 25.2 x 18.3 x 6.9 cm |
| Poids (colis) | 810 g |
Garantie et assistance
GREATHTEK products are designed for reliability and performance. This product comes with a standard manufacturer's warranty. For specific warranty details, please refer to the warranty card included in your package or contact GREATHTEK customer support.
If you encounter any issues or have questions regarding your KVM switch, please do not hesitate to contact our customer support team. We are committed to providing prompt and helpful assistance.