1. Introduction
This manual provides essential information for the safe installation, operation, and maintenance of your MODEBHD Contemporary Resin Bird Pendant Light. Please read this manual thoroughly before installation and retain it for future reference.
The pendant light features a unique design with a white resin bird accent and a hand-blown clear glass shade, offering adjustable hanging length to suit various ceiling heights and room configurations.
2. Consignes de sécurité
- AVERTISSEMENT: Risque de choc électrique. Coupez l'alimentation au niveau du tableau électrique ou du disjoncteur avant toute installation ou intervention.
- Tous les raccordements électriques doivent être conformes aux codes et règlements locaux, ainsi qu'au Code national de l'électricité (NEC). Consultez un électricien qualifié si vous n'êtes pas familiarisé avec le câblage électrique.
- Ne pas installer ce luminaire dans des endroits humides.
- Assurez-vous que le luminaire est solidement fixé à un élément structurel du plafond.
- Utilisez uniquement le type d'ampoule et l'eau spécifiés.tage pour éviter la surchauffe.
- Do not touch the bulb directly with bare hands during operation or immediately after turning off, as it may be hot.
3. Contenu du colis
Vérifiez que tous les composants sont présents avant de commencer l'installation :
- 1 x Pendant Light Fixture (including resin bird, glass shade, and wiring)
- 1 x Ceiling Canopy/Suction Cup
- Matériel de montage (vis, connecteurs de fils, etc.)
- Light bulb is NOT included.

Image 1 : Terminéview of the MODEBHD Contemporary Resin Bird Pendant Light, showcasing the white resin bird perched atop the clear glass shade and the hanging wire.
4. Spécifications
| Fonctionnalité | Détail |
|---|---|
| Nom du produit | Lampe suspendue |
| Style | Nordic, Contemporary |
| Couleur | Blanc |
| Matériel | Resin, Hand-Blown Glass |
| Diamètre du luminaire | 20 cm / 7.9 pouces |
| Hauteur du luminaire | 26 cm / 10.2 pouces |
| Longueur de suspension réglable | Up to 150 cm / 59 inches |
| Diamètre du plafond | 10 cm / 3.9 pouces |
| Light Source Base | E26 / E27 (1 bulb required, not included) |
| Max Vattage | 60W par ampoule |
| Voltage | AC110V (Compatible with 110-240V systems) |
| Certifications | ETL Listed, 3C, UL, CE |
| Zone de couverture recommandée | 5-10 mètres carrés |
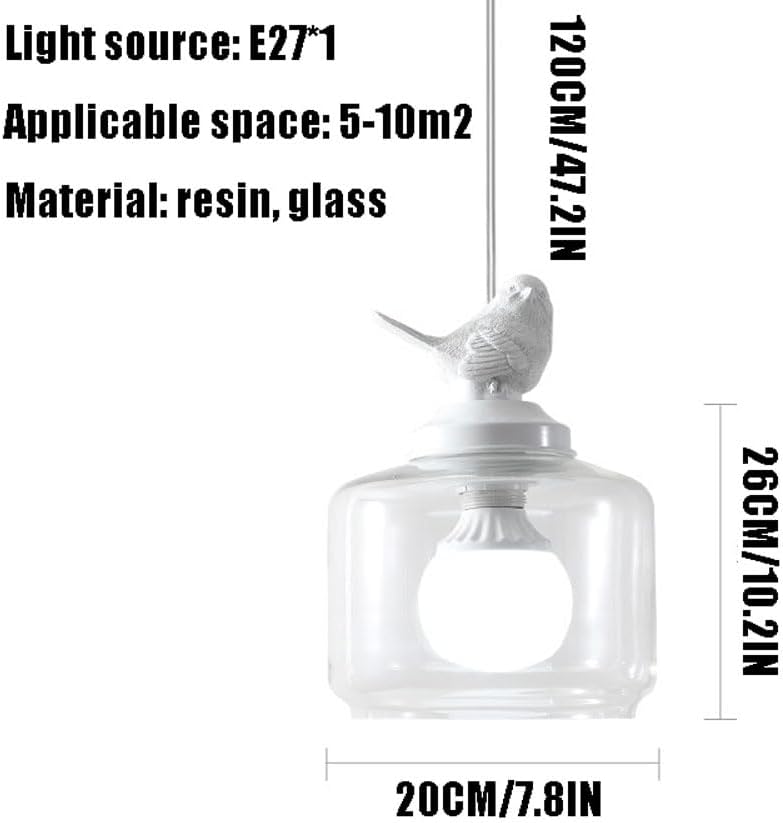
Image 2: Diagram illustrating the dimensions of the pendant light, including fixture diameter, height, and adjustable hanging wire length.
5. Configuration et installation
Avant de commencer : Ensure power is disconnected at the circuit breaker. Gather necessary tools (screwdriver, wire strippers, electrical tape, ladder).
- Préparation du câblage : Carefully unpackage the fixture. If necessary, strip approximately 1/2 inch of insulation from the ends of the fixture wires.
- Montage au plafond : Secure the ceiling canopy to the junction box in your ceiling using the provided mounting hardware. Ensure it is firmly attached.
- Ajuster la longueur de suspension : The pendant light features an adjustable hanging wire. To adjust the length, gently push the wire into the canopy or pull it out until the desired height is achieved. You may need to loosen a set screw on the canopy to facilitate adjustment, then tighten it once the length is set. The maximum hanging length is 59 inches (150 cm).
- Effectuer les connexions électriques : Connect the fixture's wires to your household electrical wires using wire nuts. Typically, connect the black fixture wire to the black (live) household wire, the white fixture wire to the white (neutral) household wire, and the bare copper or green fixture wire to the green or bare copper (ground) household wire. Ensure all connections are secure.
- Auvent sécurisé : Carefully push the wired canopy up to the ceiling, ensuring all wires are tucked inside the junction box. Secure the canopy to the mounting bracket with the provided screws.
- Installez l'ampoule : Screw an E26 or E27 base bulb (max 60W, not included) into the socket within the glass shade. Do not overtighten.
- Restaurer l'alimentation : Une fois l’installation terminée, rétablissez l’alimentation au disjoncteur.

Image 3: Two pendant lights installed in a modern dining or bar area, demonstrating their aesthetic integration into a contemporary space.
6. Mode d'emploi
Once installed and powered, the pendant light operates via your standard wall switch. Simply toggle the switch to turn the light on or off.

Image 4: A detailed close-up of the white resin bird accent, highlighting its intricate design and texture.
7. Entretien
- Nettoyage: Disconnect power before cleaning. Use a soft, dry cloth to wipe the fixture. For the glass shade, a slightly damp cloth with a mild glass cleaner can be used, then dry thoroughly. Avoid abrasive cleaners or solvents that may damage the finish.
- Remplacement de l'ampoule : Disconnect power before replacing the bulb. Allow the old bulb to cool completely. Unscrew the old bulb and screw in a new E26 or E27 base bulb (max 60W). Do not exceed the maximum wattage.
- Inspection: Periodically inspect the wiring and connections for any signs of wear or damage. If any issues are found, disconnect power and consult a qualified electrician.
8. Dépannage
| Problème | Cause possible | Solution |
|---|---|---|
| La lumière ne s'allume pas | 1. L'alimentation est coupée 2. Connexion de fil lâche 3. Ampoule défectueuse 4. Interrupteur mural défectueux | 1. Vérifiez le disjoncteur et l'interrupteur mural. 2. Disconnect power and check wiring connections. 3. Remplacez l'ampoule par une neuve. 4. Consult an electrician to check the switch. |
| La lumière scintille | 1. Ampoule desserrée 2. Connexion de fil lâche 3. Interrupteur variateur incompatible (le cas échéant) | 1. Serrez l'ampoule. 2. Disconnect power and check wiring connections. 3. Ensure dimmer switch is compatible with the bulb type. |
| Bruit de bourdonnement provenant du luminaire | 1. Incompatible bulb or dimmer switch | 1. Try a different bulb or ensure dimmer switch is compatible with the bulb type. |
9. Informations sur la garantie
Specific warranty details for this product are not provided in the available information. Please refer to your purchase documentation or contact the seller/manufacturer directly for warranty terms and conditions.
10. Assistance
If you have any questions, require assistance with installation, or encounter issues not covered in this manual, please contact the seller or manufacturer. You can typically find contact information on your purchase receipt or the product listing page.
For general inquiries, you may reach out via email or through the platform's question and answer feature. Responses are typically provided within 24 hours.