Vetroo AL800
Vetroo AL800 Mid Tower ATX PC Computer Case
Manuel d'instructions
Introduction
This manual provides detailed instructions for the assembly, operation, and maintenance of your Vetroo AL800 Mid Tower ATX PC Computer Case. Please read this manual thoroughly before beginning installation to ensure proper setup and optimal performance.

Figure 1: Vetroo AL800 Mid Tower ATX PC Computer Case (Black)
Consignes de sécurité
- Débranchez toujours l'alimentation électrique de la prise murale avant d'installer ou de retirer un composant.
- Manipulez les composants avec précaution afin d'éviter tout dommage dû aux décharges électrostatiques. Pensez à utiliser un bracelet antistatique.
- Keep the case and components away from liquids and excessive humidity.
- Assurer une ventilation adéquate pour éviter la surchauffe.
- N’essayez pas de modifier le boîtier ou ses composants, car cela pourrait annuler votre garantie et présenter des risques pour votre sécurité.
Contenu du colis
Vérifiez que tous les éléments sont présents dans le colis :
- Vetroo AL800 Mid Tower ATX PC Computer Case
- Accessory Box (screws, standoffs, cable ties)
- Pre-installed 1x 120mm PWM/ARGB Fan (rear)
- Manuel de l'utilisateur (ce document)
Caractéristiques principales
- ARGB LED Strip: Integrated LED lighting and ARGB case fans can be synchronized with compatible motherboards via a 5V 3-pin interface.
- Door Opening Design: Features a 4mm thick tempered glass side panel with a convenient door-opening mechanism for easy access to internal components.
- High Performance Airflow: A mesh front panel and strategically placed dust filters ensure optimal airflow and system cooling.
- Large compatibilité : Supports ATX, M-ATX, and ITX motherboards. Accommodates GPUs up to 340mm in length and CPU coolers up to 165mm in height.
- Prise en charge du refroidissement liquide : Front panel supports up to a 360mm liquid cooling radiator.
- Soutien des fans : Supporte jusqu'à 8 ventilateurs de 120 mm.
- Gestion simple des câbles : Includes two soft silicone cord grommets for organized cable routing.
- Powerful I/O Panel: Features 1x USB 3.2 Type-C port, 2x USB 3.0 ports, and a combined microphone/headphone jack.
Configuration et installation
1. Préparation générale
- Placez l'étui sur une surface plane et stable.
- Open the tempered glass side panel by gently pulling it open. It is hinged for easy access.
- Remove the tempered glass panel if necessary for easier installation by lifting it off its hinges once open.

Figure 2: Tempered Glass Door Opening Design
2. Installation de la carte mère
- Installez le panneau d'E/S (le cas échéant) dans l'ouverture arrière du boîtier.
- Align your ATX, M-ATX, or ITX motherboard with the pre-installed standoffs.
- Fixez la carte mère à l'aide des vis fournies dans la boîte d'accessoires.
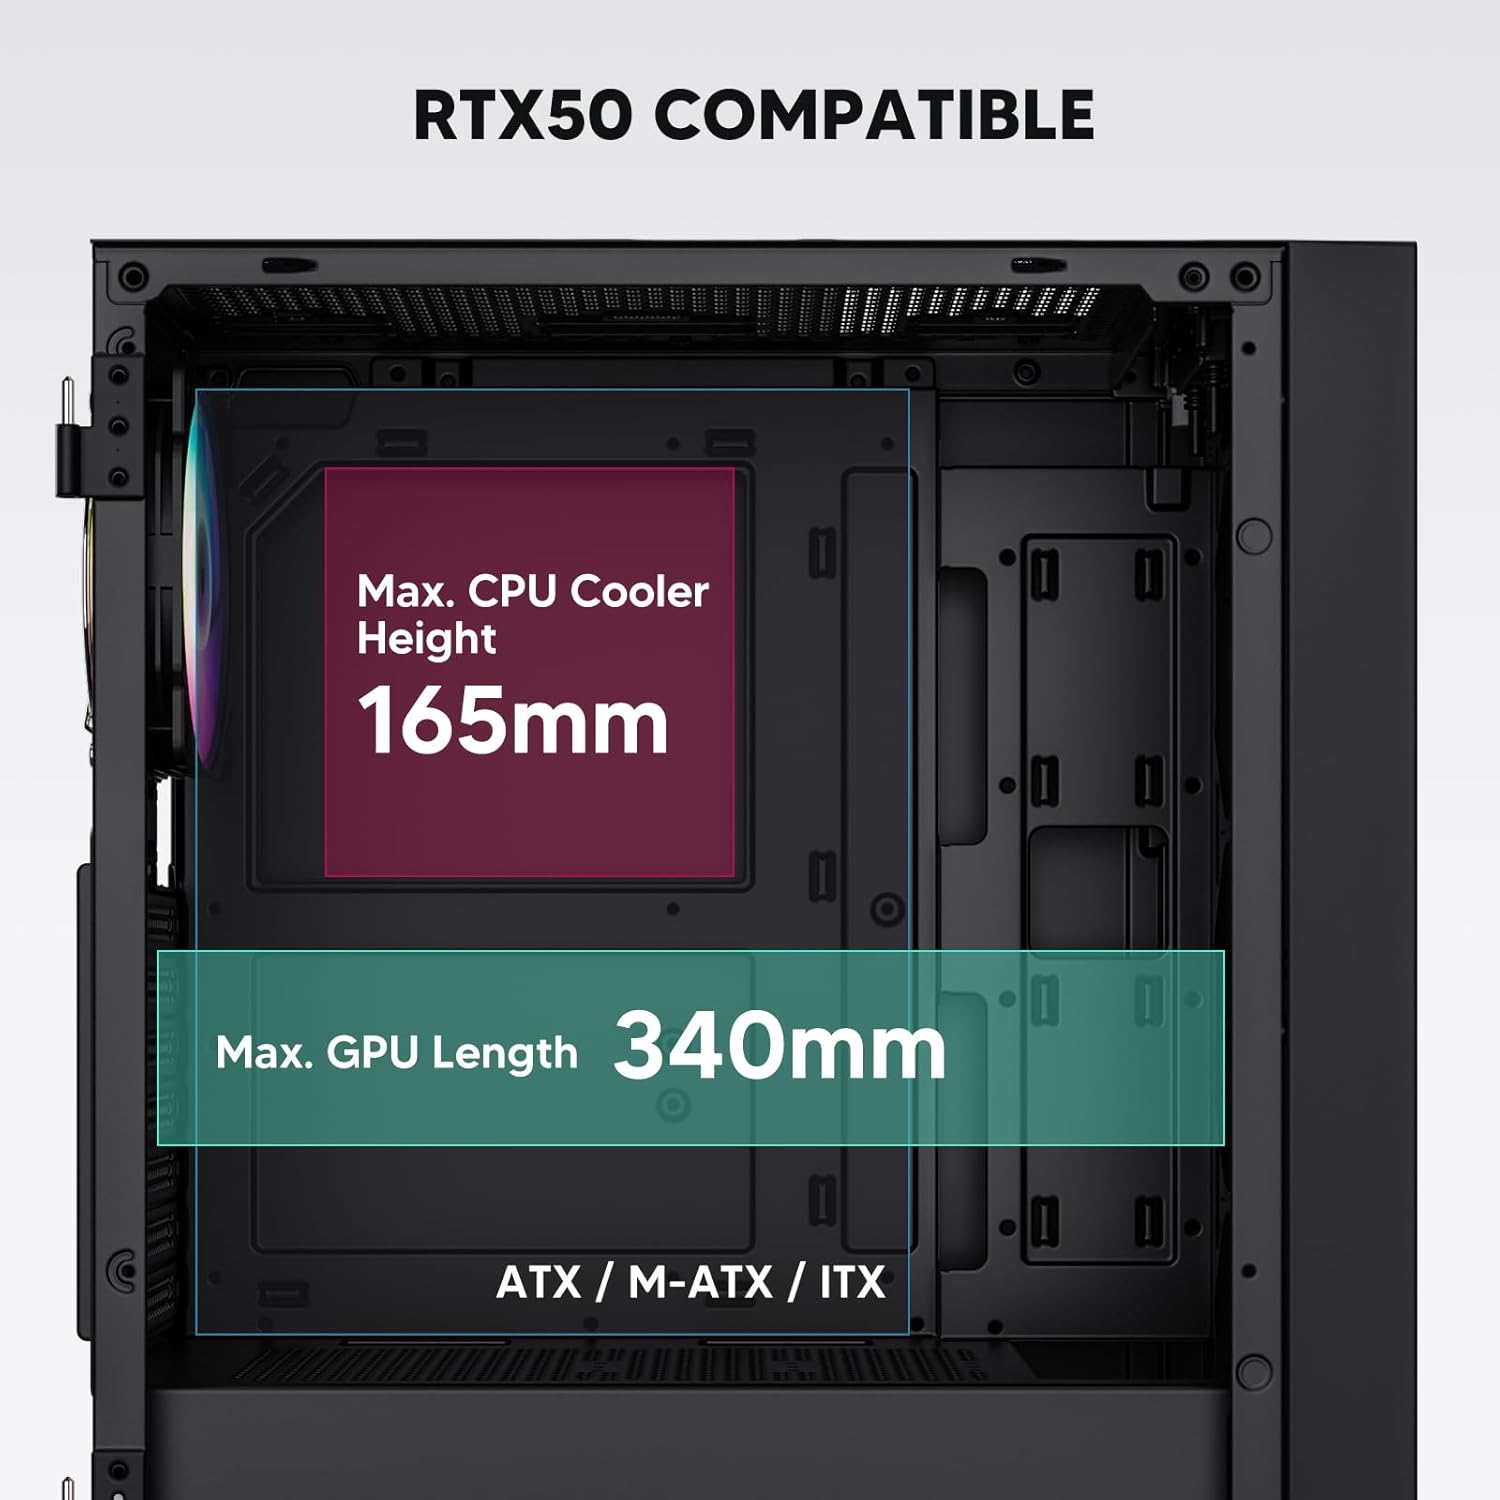
Figure 3: Motherboard and Component Clearance (Max CPU Cooler Height 165mm, Max GPU Length 340mm)
3. Storage Device Installation (HDD/SSD)
- Locate the dedicated mounting points for SSDs and HDDs.
- Install 2.5" SSDs onto the SSD trays or mounting brackets.
- Install 3.5" HDDs into the drive cage located at the bottom of the case.
- Fixez tous les disques durs avec les vis appropriées.

Figure 4: Internal Layout with Drive Bay Locations (SSD, HDD, Power Supply)
4. Installation de l'alimentation
- Mount your power supply unit (PSU) in the dedicated compartment at the bottom rear of the case.
- Ensure the PSU fan faces downwards (if the case has a bottom vent) or upwards, depending on your cooling preference.
- Secure the PSU with screws from the rear of the case. The case supports PSUs up to 200mm in length.
5. Installation de la carte d'extension (GPU)
- Retirez les caches des emplacements PCI-E nécessaires à l'arrière du boîtier.
- Insérez votre carte graphique ou autres cartes d'extension dans les emplacements PCI-E de la carte mère.
- Fixez les cartes à l'aide de vis. Le boîtier supporte les cartes graphiques jusqu'à 340 mm de longueur.
6. Cooling System Installation (Fans/Radiators)
- The case comes with one pre-installed 120mm PWM/ARGB fan at the rear.
- Additional fans (120mm or 140mm) can be installed at the front, top, and bottom.
- Liquid cooling radiators up to 360mm can be installed at the front, and up to 240mm at the top.
- Refer to the diagram for supported fan and radiator configurations.

Figure 5: Fan and Liquid Radiator Support Diagram
7. Connexions du panneau avant
- Connect the front panel cables (Power, Reset, USB 3.0, USB Type-C, HD Audio) to the corresponding headers on your motherboard.
- Consult your motherboard manual for the exact pin layout of these headers.
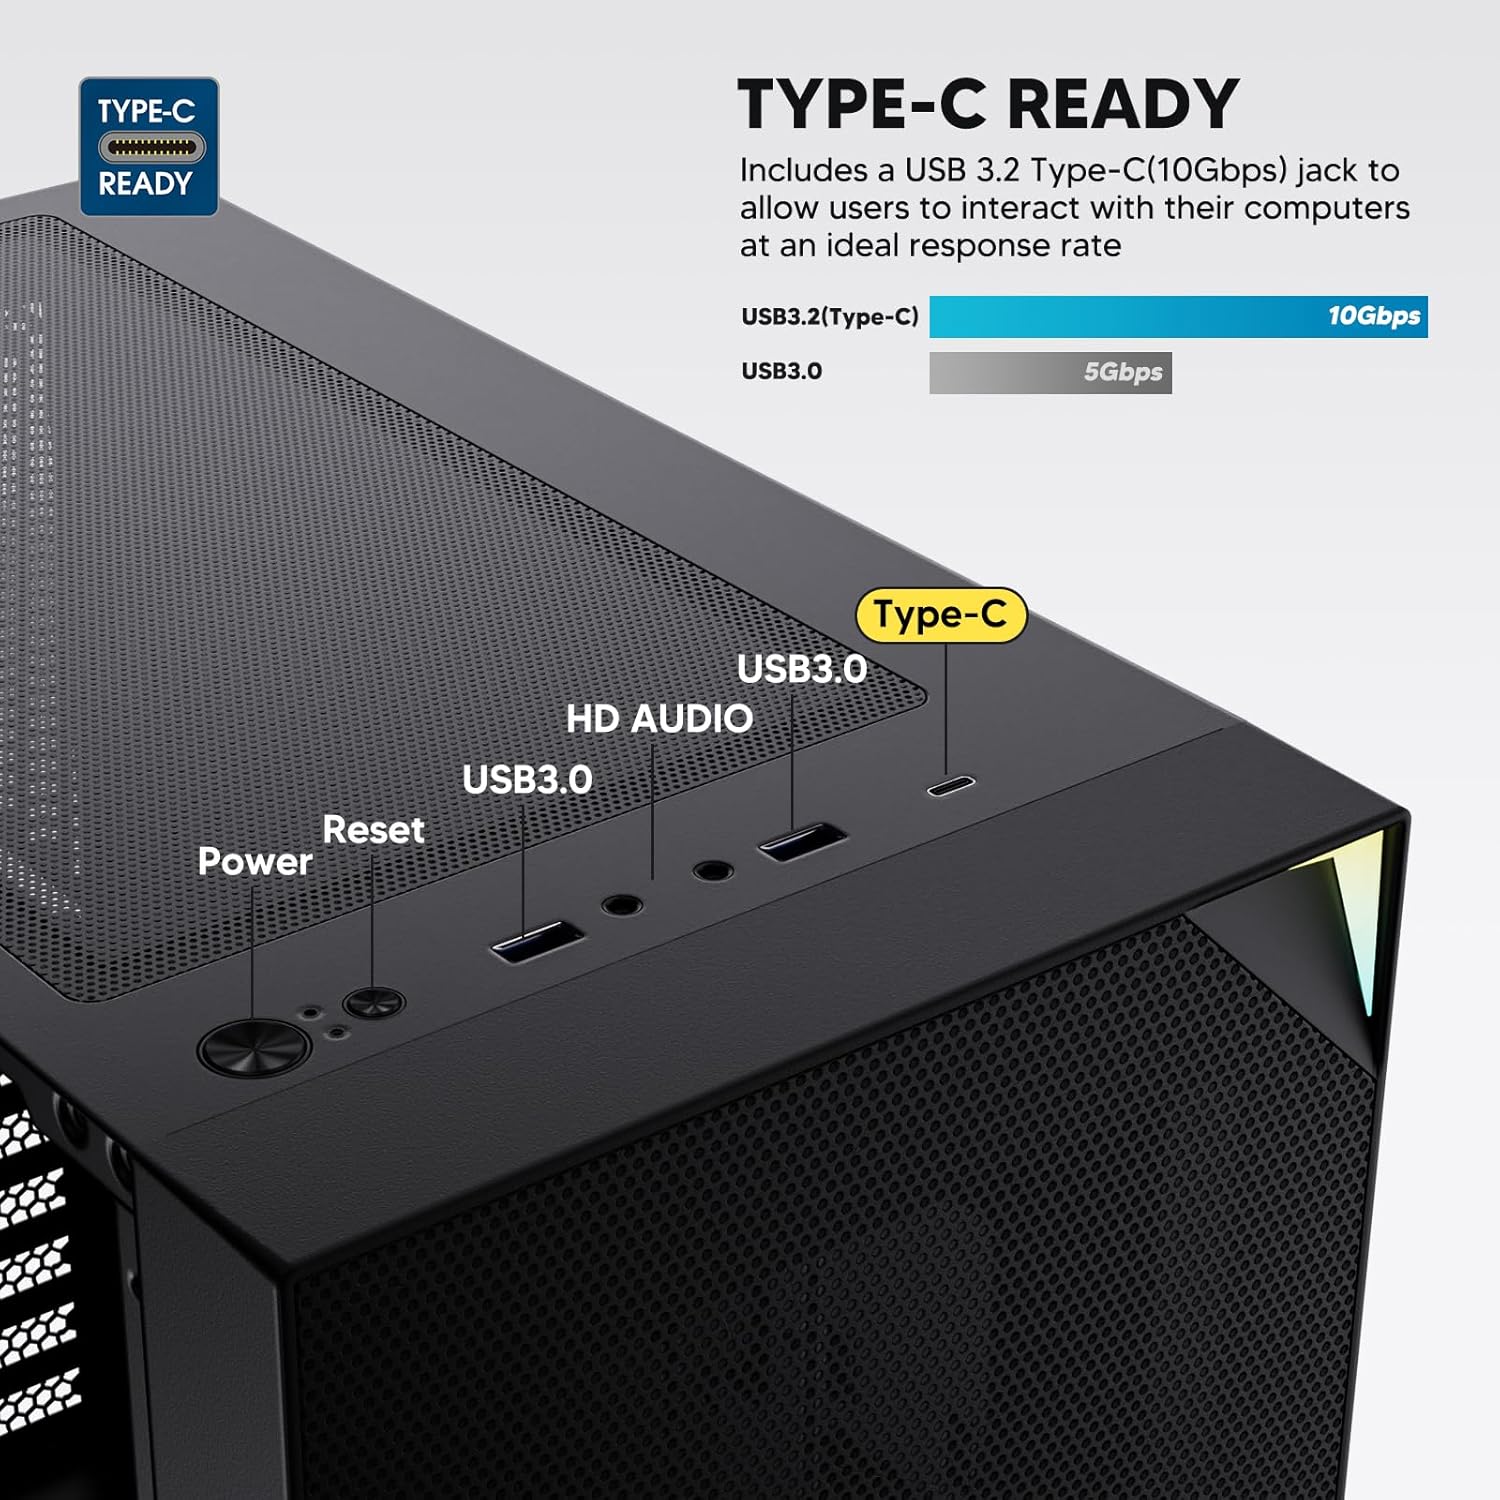
Figure 6: Top I/O Panel Connections
8. ARGB and PWM Connections
- The pre-installed fan and ARGB LED strip require connection to your motherboard.
- Connect the 4-pin PWM connector from the fan to a compatible fan header on your motherboard for speed control.
- Connect the 3-pin ARGB connector from the fan and LED strip to a 5V 3-pin ARGB header on your motherboard for lighting synchronization. Ne pas connecter à un connecteur RGB 12V, car cela endommagerait les LED.
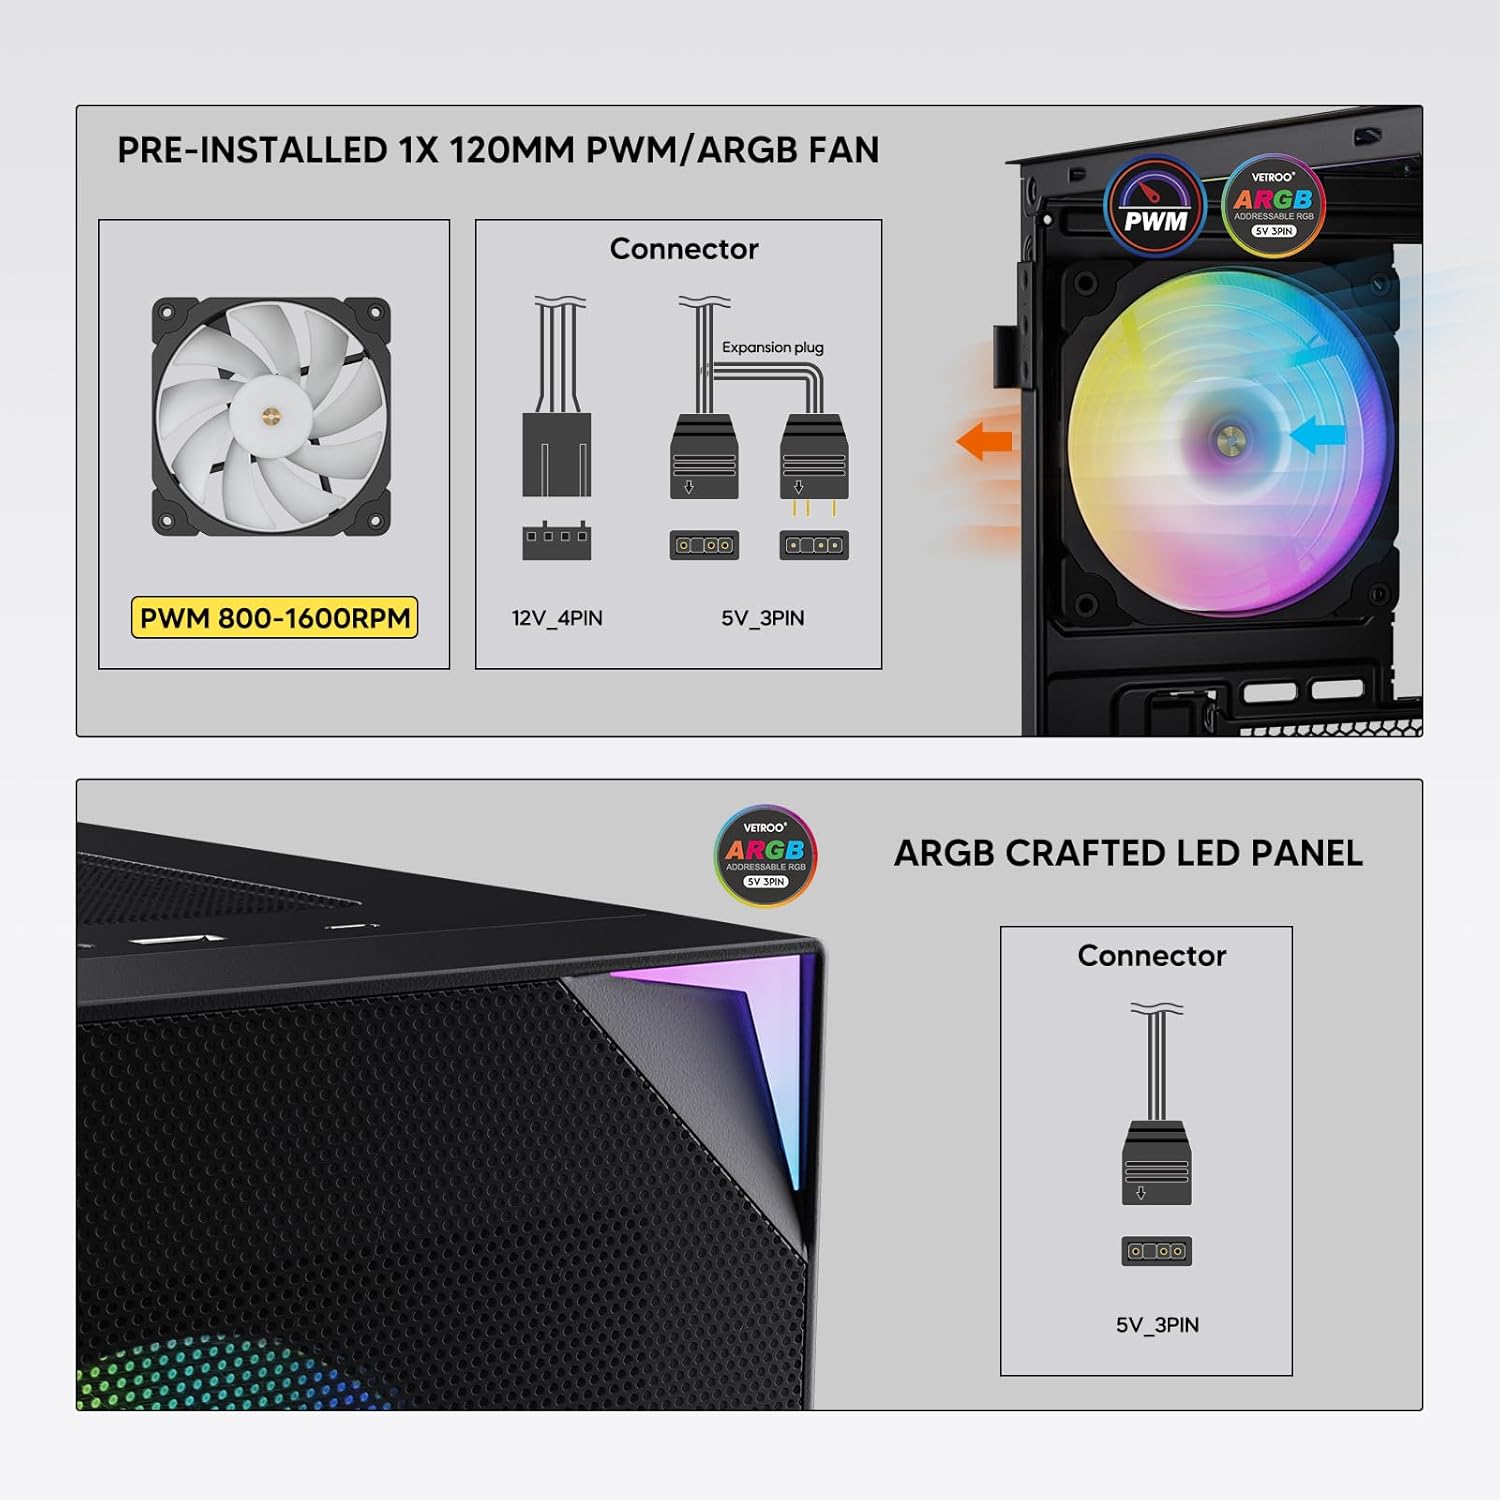
Figure 7: PWM and ARGB Connector Details
9. Gestion des câbles
- Utilisez les ouvertures et les points de fixation prévus pour le passage des câbles derrière le plateau de la carte mère afin d'organiser ces derniers.
- The soft silicone grommets help protect cables and provide a clean look.
- Une bonne gestion des câbles améliore la circulation de l'air et l'esthétique.
Opération
1. Mise sous tension initiale
- After all components are securely installed and cables connected, close the tempered glass side panel.
- Connectez votre moniteur, votre clavier, votre souris et votre câble d'alimentation à l'ordinateur.
- Mettez l'interrupteur d'alimentation de votre bloc d'alimentation sur la position « ON ».
- Press the power button on the top I/O panel of the case to start your system.
2. Contrôle de l'éclairage ARGB
- If connected to a compatible motherboard's 5V 3-pin ARGB header, the lighting of the pre-installed fan and LED strip can be controlled via your motherboard's RGB software (e.g., ASUS Aura Sync, MSI Mystic Light Sync, Gigabyte RGB Fusion, ASRock Polychrome Sync).
- Refer to your motherboard's manual for specific instructions on using its ARGB control software.
3. Airflow Management
- The mesh front panel is designed for optimal air intake.
- Ensure that intake fans (typically front and bottom) and exhaust fans (typically rear and top) are configured to create positive or neutral air pressure for efficient cooling and dust prevention.

Figure 8: Airflow Diagram with Dust Filters
Entretien
1. Nettoyage du filtre à poussière
- The case is equipped with dust filters on the top and bottom panels.
- Regularly check and clean these filters to maintain optimal airflow and prevent dust buildup inside the system.
- Gently remove the magnetic dust filters and clean them with compressed air or by rinsing with water (ensure they are completely dry before re-installation).
2. Tempered Glass Panel Care
- Nettoyez la vitre en verre trempé avec un chiffon doux non pelucheux et un nettoyant pour vitres non abrasif.
- Avoid harsh chemicals or abrasive materials that could scratch or damage the glass.
Dépannage
- Le système ne s'allume pas :
- Assurez-vous que le câble d'alimentation est correctement connecté à la fois au bloc d'alimentation et à la prise murale.
- Vérifiez que l'interrupteur du bloc d'alimentation est en position « ON ».
- Vérifiez que le câble du bouton d'alimentation du panneau avant est correctement connecté au connecteur de la carte mère.
- Confirm all power cables (24-pin ATX, CPU, GPU) are properly seated in the motherboard and components.
- Ventilateurs non fonctionnels / Voyants ARGB non allumés :
- Check that the fan's PWM connector is securely plugged into a motherboard fan header.
- Verify the ARGB 3-pin connector is correctly attached to a 5V 3-pin ARGB header on the motherboard (not 12V RGB).
- Vérifiez que le logiciel ARGB de votre carte mère est installé et configuré correctement.
- Ports USB non fonctionnels :
- Confirm the USB 3.0 and USB Type-C front panel cables are correctly connected to their respective motherboard headers.
- Check your motherboard manual for correct header locations.
- For other component-specific issues, refer to the instruction manuals for your motherboard, CPU, GPU, and other installed hardware.
Caractéristiques
| Marque | Verre |
| Nom du modèle | AL800 |
| Numéro de modèle de l'article | VT-CASE-AL800-BK (FBA) |
| Type de cas | Mid Tower |
| Compatibilité de la carte mère | ATX, M-ATX, ITX |
| Couleur | Noir |
| Matériel | Métal, verre trempé |
| Poids de l'article | 12.37 livre (environ 5.61 kg) |
| Dimensions du produit (L x l x H) | 18.4 x 8.6 x 17.9 pouces (environ 46.7 x 21.8 x 45.5 cm) |
| Longueur maximale du GPU | 340 mm |
| Hauteur maximale du refroidisseur de processeur | 165 mm |
| Longueur maximale du bloc d'alimentation | 200 mm |
| Ports d'E / S avant | 1x USB 3.2 Type-C, 2x USB 3.0, HD Audio (Mic/Headphone), Power, Reset |
| Soutien des fans | Front: 3x 120mm or 2x 140mm; Top: 2x 120mm or 2x 140mm; Rear: 1x 120mm; Bottom: 2x 120mm |
| Support de radiateur | Front: 120/140/240/280/360mm; Top: 120/140/240mm; Rear: 120mm |
| Ventilateurs préinstallés | 1x 120mm PWM/ARGB (Rear) |
Garantie et assistance
For warranty information, technical support, or to inquire about replacement parts, please visit the official Vetroo webConsultez leur site web ou contactez directement leur service client. Conservez votre preuve d'achat pour toute réclamation au titre de la garantie.
Official Vetroo Store: Vetroo Amazon Store
Ask a question about this manual
Ask about setup, troubleshooting, compatibility, parts, safety, or missing instructions. Manuals+ will review the question and use this page’s manual context to help answer it.