1. Introduction
Thank you for choosing the WORKPRO 1500W Rotary Hammer Drill. This heavy-duty tool is designed for demanding tasks such as drilling in concrete, wood, and steel, as well as chiseling applications. This manual provides essential information for the safe and efficient operation, maintenance, and troubleshooting of your rotary hammer drill. Please read it thoroughly before first use and keep it for future reference.

Image 1.1: WORKPRO 1500W Rotary Hammer Drill and included accessories.
2. Consignes générales de sécurité
Respectez toujours les consignes de sécurité élémentaires afin de réduire les risques d'incendie, d'électrocution et de blessures. Le non-respect de ces instructions peut entraîner des blessures graves.
- Sécurité de la zone de travail : Maintenez votre zone de travail propre et bien éclairée. Les zones encombrées ou sombres augmentent les risques d'accidents. N'utilisez pas d'outils électriques dans des atmosphères explosives, notamment en présence de liquides, de gaz ou de poussières inflammables.
- Sécurité électrique : Les fiches des outils électriques doivent être compatibles avec les prises de courant. Ne modifiez jamais la fiche. Évitez tout contact corporel avec les surfaces mises à la terre. N'exposez pas les outils électriques à la pluie ou à l'humidité.
- Sécurité personnelle : Always wear eye protection. Use hearing protection when operating the tool for extended periods. Wear a dust mask if drilling in dusty conditions. Dress properly; avoid loose clothing or jewelry.
- Utilisation et entretien des outils : N’utilisez pas l’outil électrique de force. Utilisez l’outil électrique adapté à votre application. Débranchez la prise de la source d’alimentation avant tout réglage, changement d’accessoires ou rangement de l’outil électrique.
- Entretien: Entretenir les outils électriques. Vérifiez qu'il n'y a pas de désalignement ou de grippage des pièces mobiles, de bris de pièces et de toute autre condition pouvant affecter le fonctionnement de l'outil électrique.
3. Product Components and Included Items
Familiarize yourself with the parts of your WORKPRO Rotary Hammer Drill and the accessories provided.

Image 3.1: Key components of the rotary hammer drill, including SDS-PLUS Chuck, Four Functions Switch, Grease Pot, Shock Absorber, On/Off Switch, Cushioned Handle, Variable Speed Control, 360° Rotatable Handle, and Heat Outlet.
Accessoires inclus :

Image 3.2: The complete set of accessories includes a carrying case, rotary hammer drill, SDS-plus point flat bit (250mm), SDS-plus point chisel bit (250mm), wrench, grease, SDS-plus drill bits (8mm, 10mm, 12mm), and a dust collector.
- 1 x Heavy-duty Rotary Hammer Drill
- 3 x SDS-plus Drill Bits (8 mm, 10 mm, 12 mm)
- 1 x Round Shank Chisel (Φ14 × 250 mm)
- 1 x Flat Chisel (Φ14 × 250 mm)
- 1 x Grease container
- 1 x Carbon Brush set
- 1 x cache-poussière
- 1 x clé
- 1 x étui de transport
4. Configuration et assemblage
4.1 Fixation de la poignée auxiliaire
The 360° rotatable handle provides better control and comfort. Loosen the handle clamp, position the handle to your desired angle, and tighten the clamp en toute sécurité.
4.2 Inserting and Removing SDS-plus Bits
The SDS-plus chuck allows for quick and secure bit changes.
- Insertion : Clean the bit shank. Pull back the chuck collar, insert the bit into the chuck until it clicks into place. Release the collar. Pull on the bit to ensure it is securely locked.
- Suppression : Pull back the chuck collar and pull the bit out.

Image 4.1: Illustration of the auto-lock SDS-plus chuck for secure bit clamping.
4.3 Attaching the Dust Collector
For cleaner operation and to protect the user, attach the dust collector to the front of the tool when drilling.

Image 4.2: The anti-dust cover protects users and the machine from dust and debris.
5. Mode d'emploi
The WORKPRO Rotary Hammer Drill features four operating modes and variable speed control for versatile applications.
5.1 Sélection du mode
Use the four-function switch located on the side of the tool to select the desired operating mode:
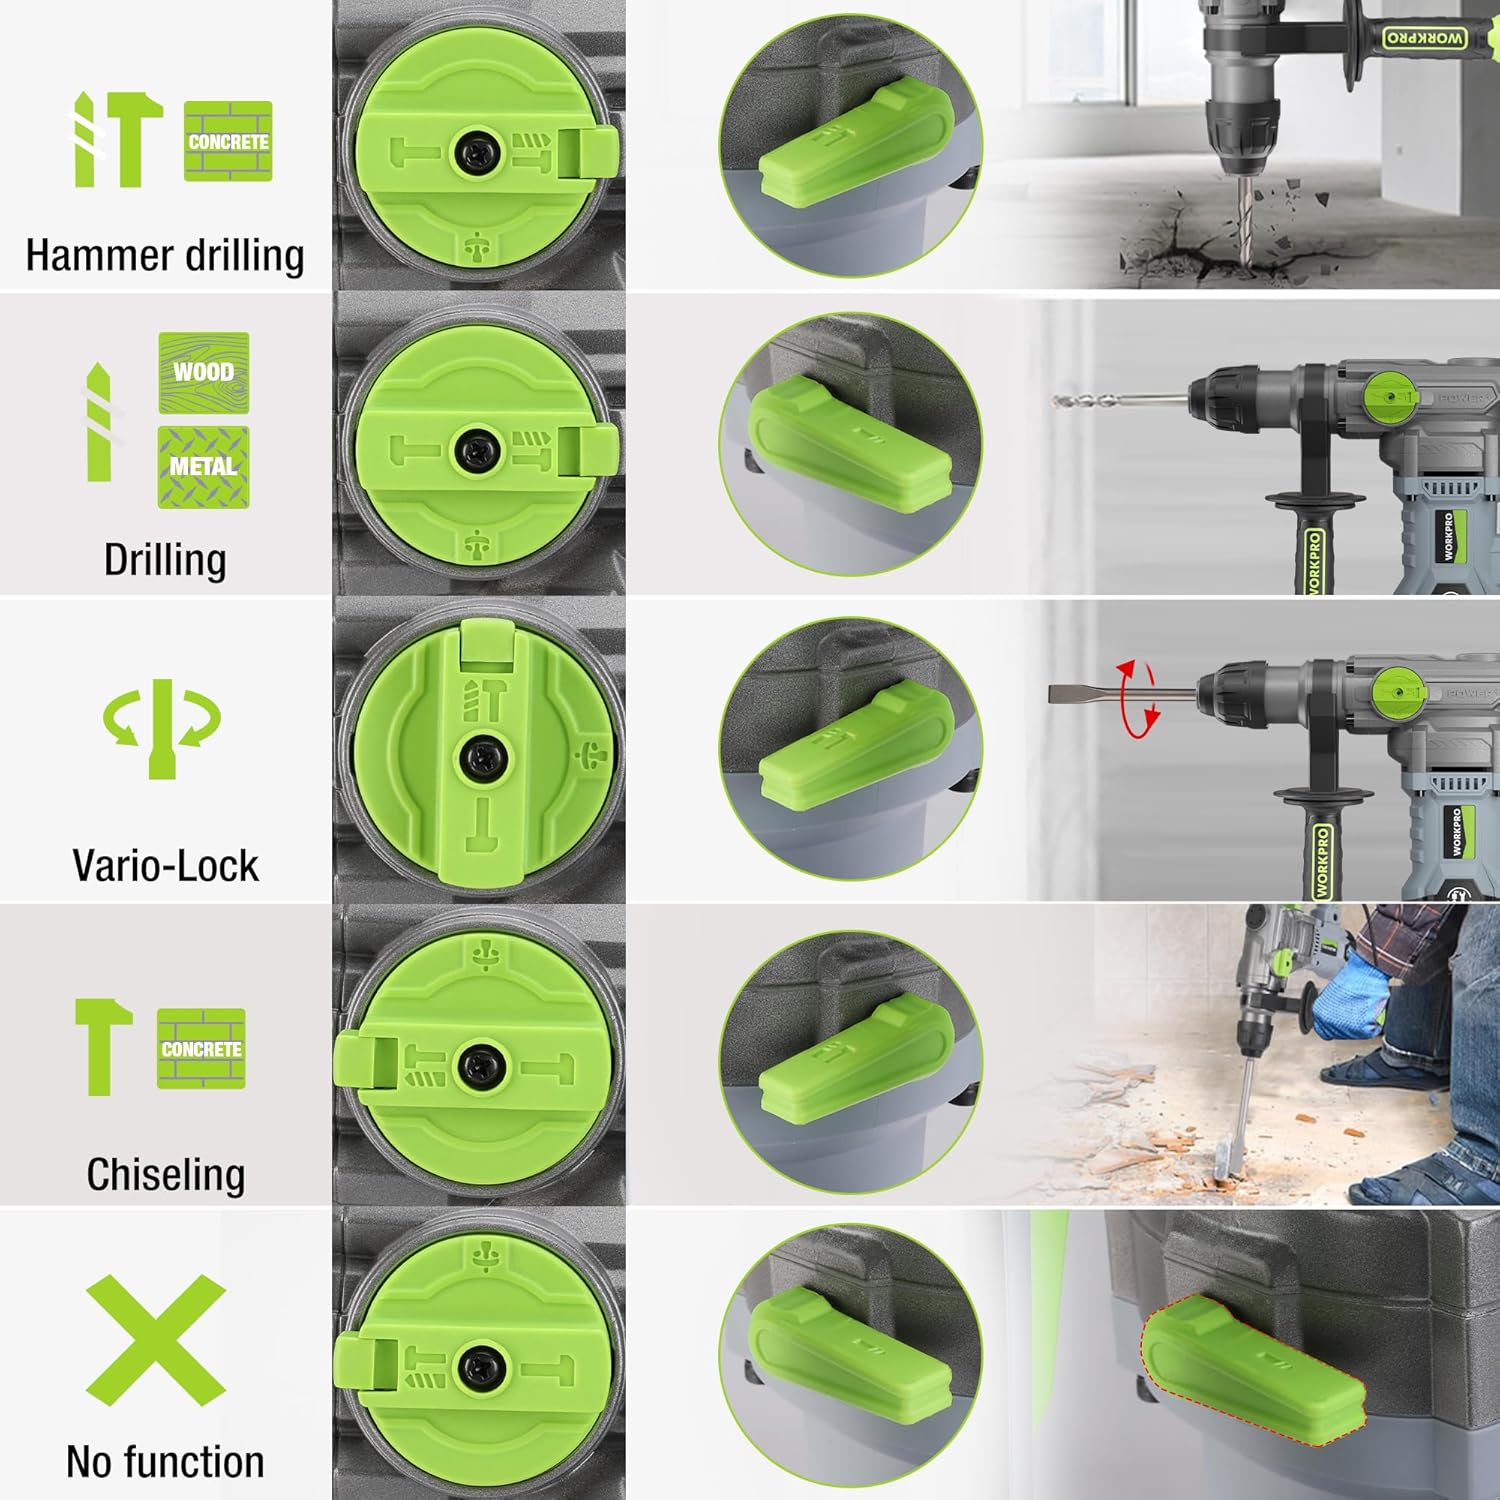
Image 5.1: The four-function switch allows selection between Hammer Drilling, Drilling, Vario-Lock (Chisel Adjust), and Chiseling modes.
- Forage au marteau : Pour le perçage du béton et de la maçonnerie par percussion.
- Forage: Pour percer le bois, le métal et le plastique sans percussion.
- Burinage (marteau uniquement) : For light chiseling work in concrete and masonry.
- Vario-Lock (Chisel Adjust): Allows you to rotate and lock the chisel in various positions to optimize the working angle.

Image 5.2: Visual representation of the hammer drilling, drilling, hammer, and chisel adjust modes.
5.2 Commande de vitesse variable
The variable speed control allows you to adjust the rotation speed (0-930 RPM) and impact frequency (0-4300 BPM) to match the material and application.
- Rotate the speed adjustment dial to increase or decrease the speed.
- Start with a lower speed for precise drilling and increase as needed.
5.3 Drilling Capacities
The tool offers excellent drilling performance across various materials:
- Béton: Jusqu'à 32 mm
- Bois: Jusqu'à 42 mm
- Acier: Jusqu'à 13 mm

Image 5.3: The 1500W motor provides sufficient power for drilling in steel, wood, and concrete.
5.4 Ex d'applicationamples

Image 5.4: The tool is suitable for various tasks including chiseling concrete, removing tiles, concrete drilling, and floor breaking.
6. Entretien
Un entretien régulier garantit la longévité et les performances optimales de votre outil.
6.1 Nettoyage
- Always disconnect the tool from the power supply before cleaning.
- Clean the ventilation slots regularly to prevent overheating.
- Essuyez le boîtier de l'outil avec un chiffon doux et sec.amp tissu. N'utilisez pas de produits chimiques agressifs ou de nettoyants abrasifs.
- The tool features a dust-proof design and anti-dust bottom structure to extend its service life.
6.2 Grease Replenishment
To maintain optimal performance and durability, replenish the grease every 30-40 hours of cumulative use.
- Use the provided wrench to open the grease pot.
- Apply the advanced lubricant (grease) as instructed.
- Securely close the grease pot after replenishment.
Image 6.1: Instructions for grease replenishment using the provided spanner and grease.
6.3 Remplacement des balais de charbon
Carbon brushes are wear parts and should be checked periodically. Replace them when they are worn down to their limit to ensure consistent motor performance.
7. Dépannage
Cette section aborde les problèmes courants que vous pourriez rencontrer. Pour tout autre problème, veuillez contacter le service client.
| Problème | Cause possible | Solution |
|---|---|---|
| L'outil ne démarre pas | Absence d'alimentation ; interrupteur défectueux ; balais de charbon usés | Vérifier la connexion électrique ; tester l’interrupteur ; remplacer les balais de charbon |
| Performances de forage réduites | Dull drill bit; Incorrect mode selected; Insufficient grease | Replace or sharpen drill bit; Select correct mode; Replenish grease |
| Vibrations/bruit excessifs | Loose components; Damaged bit; Internal issue | Check all connections; Replace bit; Contact service center |
| Surchauffe | Blocked ventilation slots; Prolonged heavy use | Clean ventilation slots; Allow tool to cool down |
8. Spécifications techniques
| Fonctionnalité | Spécification |
|---|---|
| Numéro de modèle | W125244A |
| Vol d'entréetage | 230-240 V |
| Fréquence | 50 Hz |
| Puissance d'entrée nominale | 1500 W |
| Vitesse à vide | 0-930 rpm ±10% |
| Fréquence d'impact | 0-4300 bpm ±10% |
| Force d'impact unique | 5.5 J |
| Capacité de forage (béton) | 32 mm |
| Capacité de forage (bois) | 42 mm |
| Capacité de forage (acier) | 13 mm |
| Type de mandrin | SDS-plus |
| Dimensions du produit (L x l x H) | 38.6 x 10.4 x 26.4 cm |
| Poids | 8.34 kg |
| Source d'énergie | Électrique avec fil |
| Nombre de vitesses | 6 (Vitesse variable) |
9. Informations sur la garantie et l'assistance
For warranty details, product support, or service inquiries, please refer to the warranty card included with your purchase or contact WORKPRO customer service directly. Keep your proof of purchase for any warranty claims.