Introduction
Thank you for choosing the DinoFire Rechargeable Presentation Clicker, Model X17. This device is designed to enhance your presentations with its wireless control, integrated laser pointer, and user-friendly features. This manual provides detailed instructions for setup, operation, maintenance, and troubleshooting to ensure optimal performance.
Contenu du colis
Veuillez vérifier que tous les articles sont présents dans votre colis :
- DinoFire Rechargeable Presentation Clicker (X17)
- USB Receiver (stored inside the clicker)
- Câble de chargement micro USB
- Manuel de l'utilisateur (ce document)
Produit terminéview
The DinoFire X17 Presentation Clicker features an ergonomic design with intuitive controls for seamless presentation delivery. Familiarize yourself with the device's components and button functions.
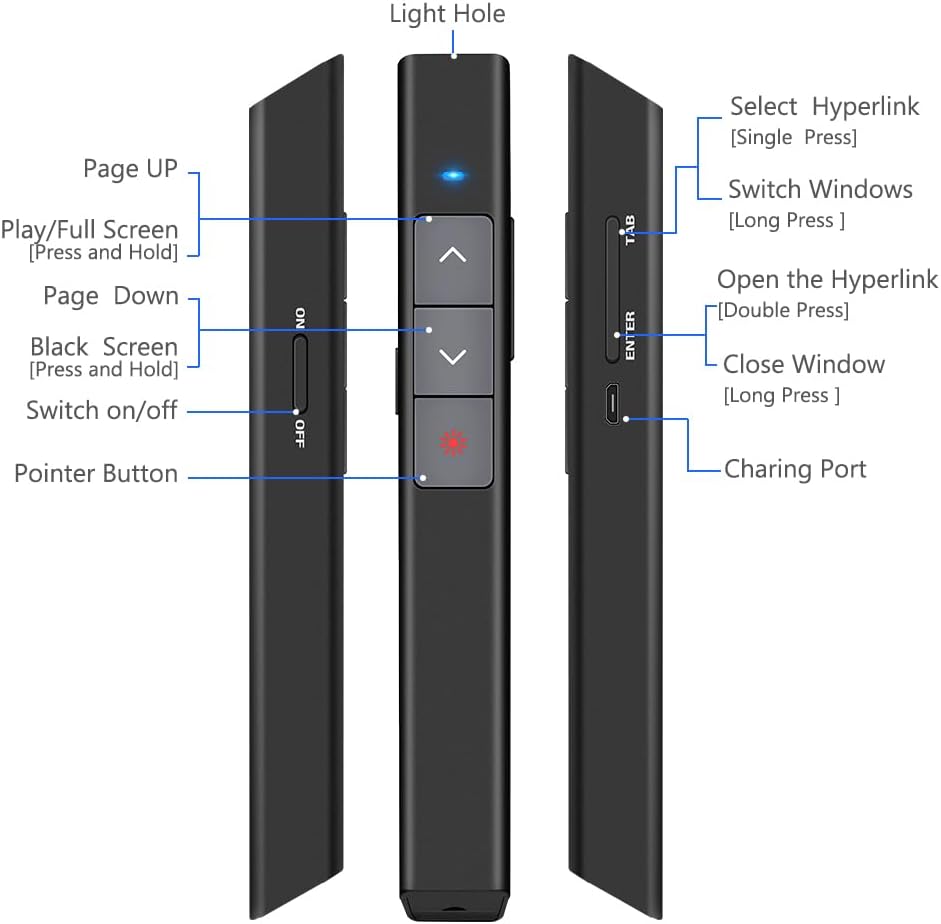
Figure 1 : Détaillé view of the DinoFire X17 Presentation Clicker showing button functions and port locations.
Fonctions des boutons :
- Page Up (▲): Advances to the previous slide.
- Page Down (▼): Passe à la diapositive suivante.
- Pointer Button: Active le pointeur laser rouge.
- Play/Full Screen (Press and Hold): Initiates or exits full-screen presentation mode.
- Black Screen (Press and Hold): Toggles a black screen during presentation.
- Allumer/éteindre : Interrupteur marche/arrêt de l'appareil.
- Select Hyperlink (Single Press): Selects a hyperlink on the slide.
- Open the Hyperlink (Double Press): Opens the selected hyperlink.
- Switch Windows (Long Press): Cycles through open application windows.
- Close Window (Long Press): Closes the active window.
- Port de charge : Micro USB port for recharging the device.
- Light Hole: Location of the laser emitter.
Guide d'installation
1. Charging the Presenter
Before initial use, fully charge the presentation clicker. A full charge typically takes approximately one hour and provides power for over one week of use.
- Connect the provided Micro USB charging cable to the charging port on the side of the presenter.
- Connectez l'autre extrémité du câble à une source d'alimentation USB (par exemple, un port USB d'ordinateur, un adaptateur secteur USB).
- The charging indicator light will illuminate (refer to "Low Power Indicator" section for details).
- Une fois complètement chargé, débranchez le câble.

Figure 2 : The presentation clicker being charged via its Micro USB port, connected to a laptop.
2. Connexion du récepteur USB
The USB receiver is stored magnetically within the presentation clicker for convenience and to prevent loss.
- Gently pull out the USB receiver from the bottom end of the presentation clicker.
- Insert the USB receiver into an available USB port on your computer (laptop or desktop).
- Le système détectera et installera automatiquement les pilotes nécessaires. Aucune installation manuelle de pilotes n'est requise.

Figure 3 : The magnetic storage for the USB receiver, demonstrating its removal and insertion into a computer's USB port.
3. Mise sous/hors tension
- Locate the "Switch on/off" button on the side of the clicker.
- Faites glisser l'interrupteur sur la position « ON » pour allumer l'appareil.
- Pour économiser la batterie, faites glisser l'interrupteur sur la position « ARRÊT » lorsque l'appareil n'est pas utilisé.
4. System and Software Compatibility
The DinoFire X17 is widely compatible with various operating systems and presentation software.
- Systèmes pris en charge : Windows 2003, XP, Windows Vista, Windows 7, 8, 10, Linux, Android, Mac OS.
- Logiciels pris en charge : Keynote, Prezi, MS Word, Excel, PowerPoint, ACD See, website browsers, iWork, Google Slides, etc.
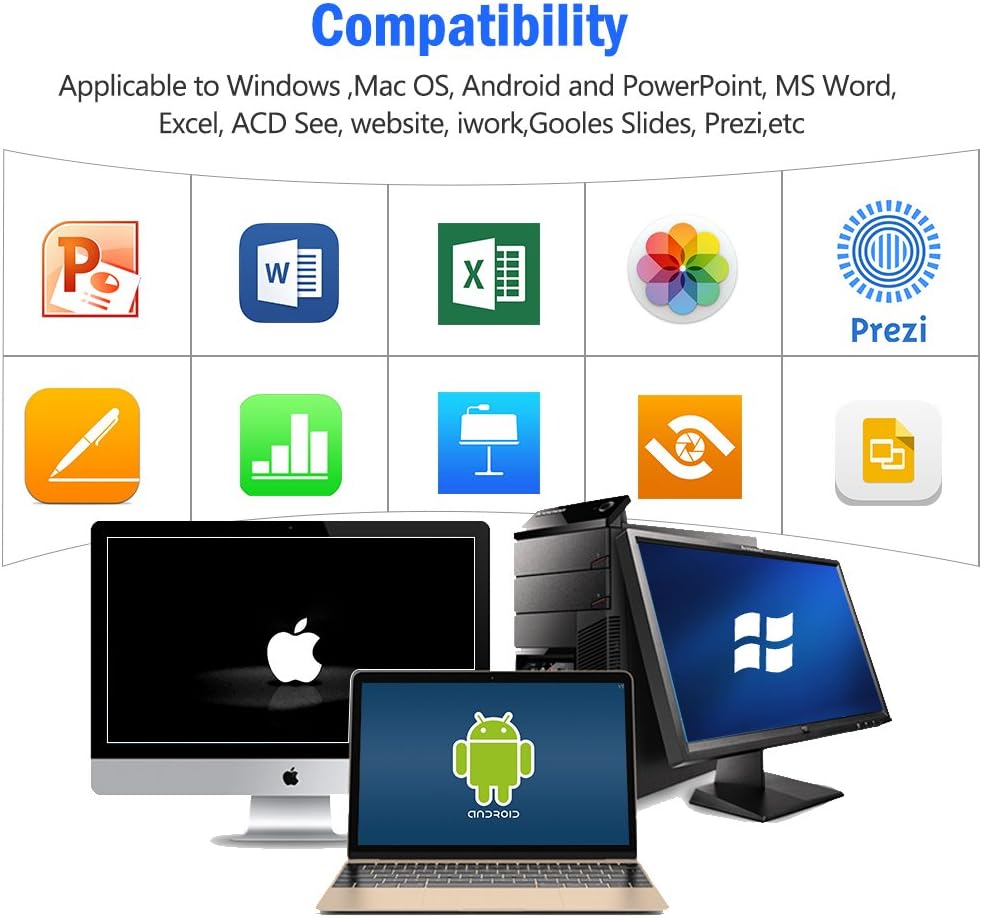
Figure 4 : Visual representation of the broad compatibility of the presentation clicker with different operating systems and presentation applications.
Mode d'emploi
Basic Presentation Control
- Diapositive suivante : Press the "Page Down" (▼) button.
- Diapositive précédente : Press the "Page Up" (▲) button.
- Start/Exit Full Screen: Press and hold the "Page Up" (▲) button.
- Écran noir: Press and hold the "Page Down" (▼) button to toggle a black screen.
Utilisation du pointeur laser
The integrated red laser pointer allows you to highlight specific content on your screen or projection.
- Press and hold the "Pointer Button" (red dot icon) to activate the laser.
- Relâchez le bouton pour éteindre le laser.
- The laser has a range of up to 300 feet (91 meters).
- Prudence: Do not point the laser directly at people's eyes or at highly reflective surfaces.

Figure 5 : The red laser pointer in operation, highlighting its visibility and including a safety warning.
Fonctions avancées
- Select Hyperlink: Single press the "ENTER" button.
- Open Hyperlink: Double press the "ENTER" button.
- Changer de fenêtre : Long press the "TAB" button to cycle through open applications.
- Fermer la fenêtre : Long press the "ENTER" button to close the active window.
Portée de contrôle sans fil
The DinoFire X17 offers a wireless control range of up to 100 feet (30 meters), allowing you freedom of movement during your presentation.

Figure 6 : Illustration of the presentation clicker's effective long control range in a presentation setting.
Entretien
Directives de recharge
- Charge the device when the low power indicator flashes continuously.
- Avoid overcharging by disconnecting the cable once fully charged.
- Use the provided Micro USB cable or a certified equivalent for charging.
Stockage du récepteur USB
Always store the USB receiver inside the magnetic compartment of the clicker when not in use to prevent loss and damage.
Nettoyage
Essuyez l'appareil avec un chiffon doux et sec. N'utilisez pas de nettoyants liquides ni de produits abrasifs.
Dépannage
| Problème | Cause possible | Solution |
|---|---|---|
| L'appareil ne répond pas. | Low battery; USB receiver not connected; Device is off. | Charge the device; Ensure USB receiver is securely plugged in; Turn on the device. |
| Le pointeur laser ne fonctionne pas. | Low battery; Laser button not pressed correctly. | Charge the device; Press and hold the laser button firmly. |
| Portée de contrôle réduite. | Obstructions ; Interférences ; Batterie faible. | Ensure clear line of sight to the receiver; Move away from sources of interference; Charge the device. |
| Hyperlink function not working. | Software specific issue; Hyperlink not properly selected. | Ensure the hyperlink is active and selected (single press ENTER) before attempting to open (double press ENTER). Check software settings. |
Indicateur de faible puissance
The device features a low power indicator to alert you when charging is needed. When the indicator flashes continuously, please charge the device. The device will enter auto-sleep mode after approximately 5 minutes of inactivity to save energy.

Figure 7 : Explanation of the indicator light states for working, charging, and fully charged conditions.
Caractéristiques
- Modèle: X17
- Marque: DinoFeu
- Technologie sans fil : 2.4GHz RF
- Plage de contrôle : Jusqu'à 100 pieds (30 mètres)
- Type de laser : Laser rouge
- Portée des lasers : Jusqu'à 300 pieds (91 mètres)
- Type de batterie : 1 batterie Lithium Polymère (incluse)
- Temps de charge : Environ 1 heure
- Durée d'utilisation : Over one week (on a single charge)
- Dimensions: 6.42 x 1.61 x 1.14 pouces (16.3 x 4.1 x 2.9 cm)
- Poids de l'article : 1.6 onces (45 grammes)
- Systèmes compatibles: Windows 2003/XP/Vista/7/8/10, Linux, Android, Mac OS
- Logiciel compatible: Keynote, Prezi, MS Word, Excel, PowerPoint, ACD See, web browsers, iWork, Google Slides
Garantie et assistance
Informations sur la garantie
The DinoFire Rechargeable Presentation Clicker X17 typically comes with a 3-year warranty. Please refer to your purchase documentation or the manufacturer's official webConsultez le site pour connaître les conditions générales de garantie spécifiques.
Assistance clientèle
For technical assistance, troubleshooting beyond this manual, or warranty claims, please contact DinoFire customer support through their official webConsultez le site web ou le détaillant où vous avez acheté le produit. Conservez votre reçu ou votre numéro de commande pour un traitement plus rapide.