Hyper 5785587
Manuel d'utilisation du hub USB-C HyperDrive Next à 10 ports
Modèle: 5785587
Marque: Hyper
Introduction
The HyperDrive Next 10 Port USB-C Hub is a versatile connectivity solution designed to expand the capabilities of your Mac, PC, or Chromebook. This hub provides a comprehensive array of ports, including 4K60Hz HDMI, multiple USB-A and USB-C ports with 10Gbps data transfer, 140W Power Delivery, SD and microSD card readers, Gigabit Ethernet, and a 3.5mm audio jack. It is engineered to enhance productivity, streamline workflows, and offer robust connectivity for various devices and peripherals.
Contenu du colis
- Concentrateur USB-C HyperDrive Next à 10 ports
- Manuel de l'utilisateur (ce document)
Ports surview
The HyperDrive Next 10 Port USB-C Hub features a comprehensive set of ports to meet diverse connectivity needs. Understanding each port's function is essential for optimal use.

Description de l'image : A detailed diagram illustrating the layout and labeling of all 10 ports on the HyperDrive Next USB-C Hub. This includes USB-A 10Gbps, USB-A 5Gbps, 2x USB-C 10Gbps, SD 312MB/s, microSD 312MB/s, USB-C 140W PD 3.1, 4K60Hz HDMI, 3.5mm Audio Jack Combo, and Gigabit Ethernet.
- 4K60Hz HDMI Port: Connect an external monitor for extended display at up to 4K resolution at 60Hz.
- USB-A 10Gbps Port: Pour le transfert de données à haute vitesse avec les périphériques USB-A.
- USB-A 5Gbps Port: Pour le transfert de données standard avec les périphériques USB-A.
- 2 x USB-C 10Gbps Ports: Pour le transfert de données à haute vitesse avec les périphériques USB-C.
- USB-C 140W PD 3.1 Port: For power delivery to charge your host device (up to 125W) while using the hub. Requires a 140W PD 3.1 charger.
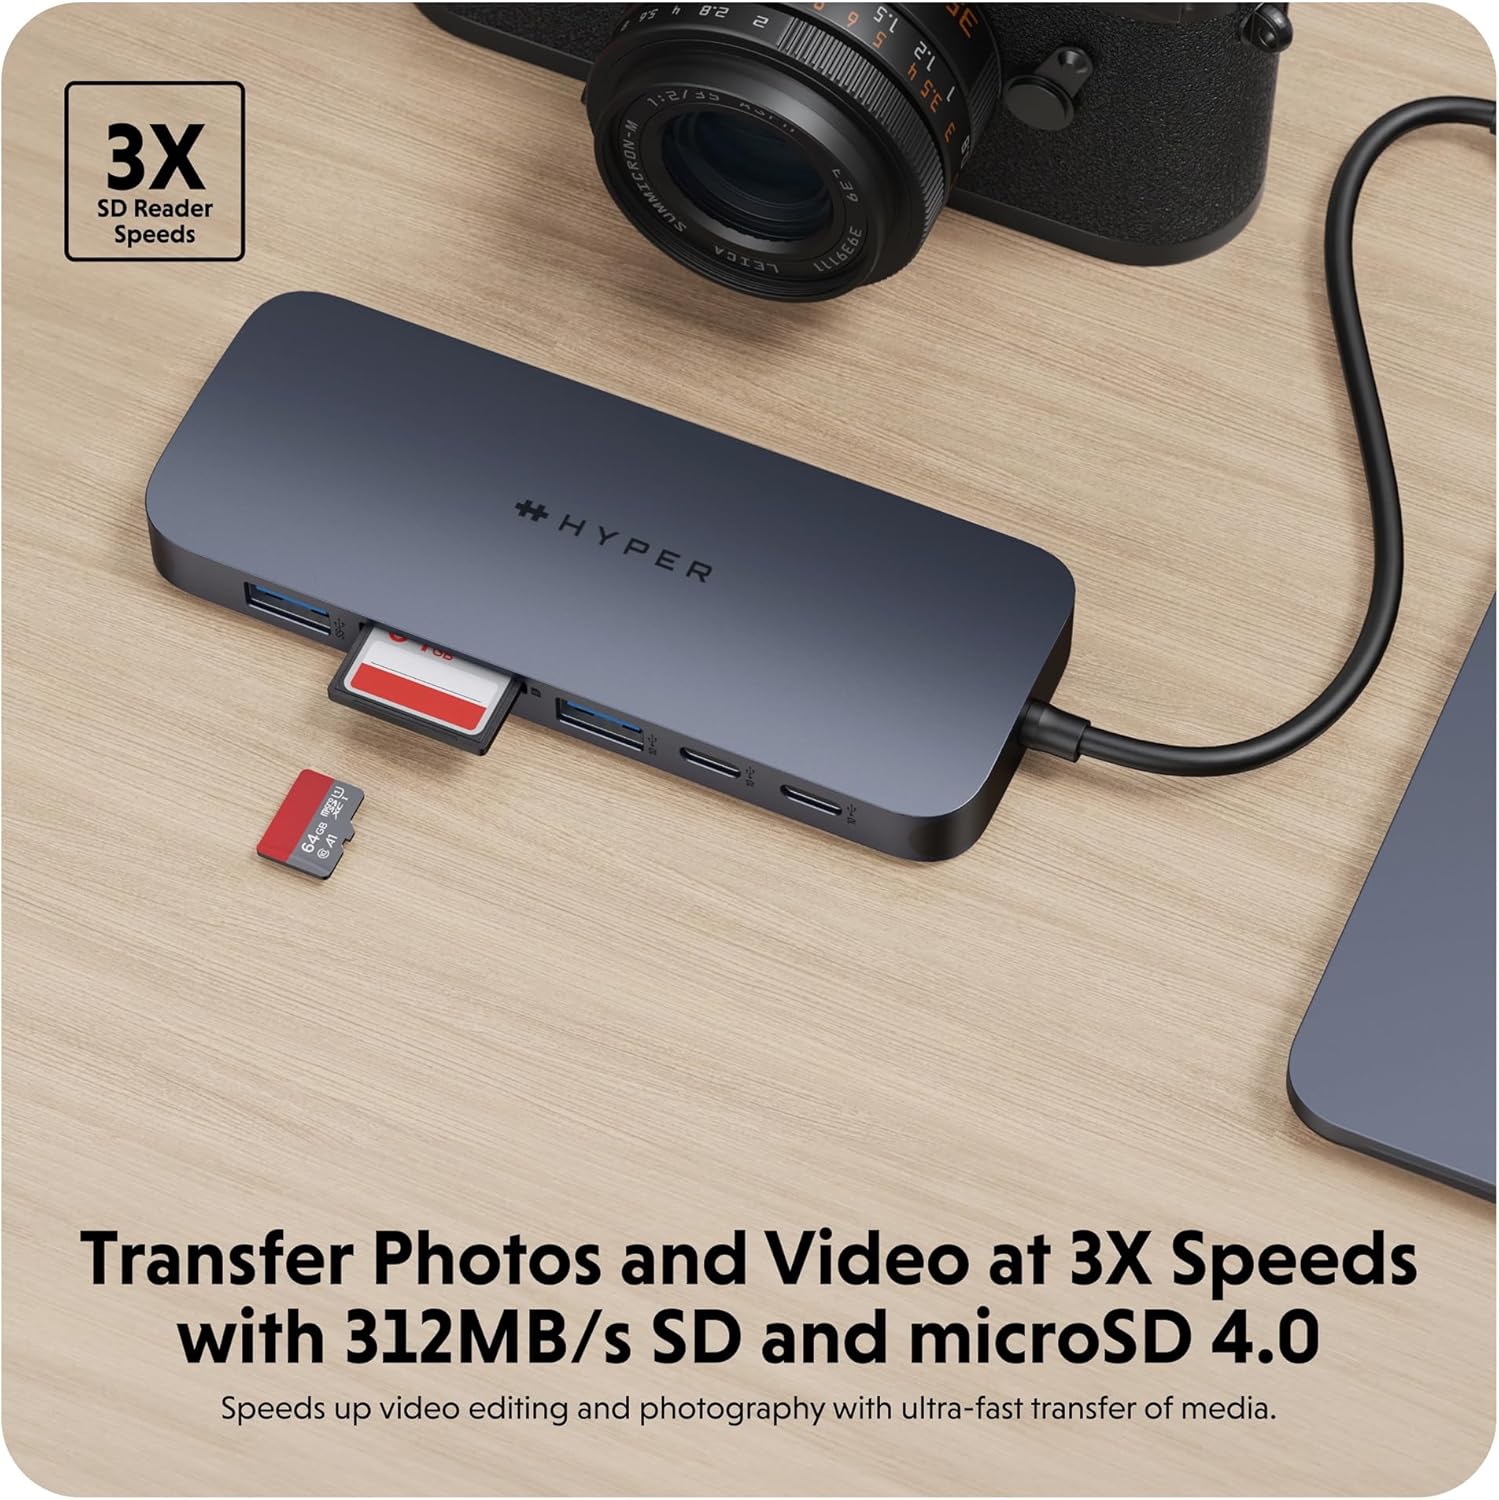
- SD Card Reader (312MB/s): For high-speed data transfer from SD memory cards.
- microSD Card Reader (312MB/s): For high-speed data transfer from microSD memory cards.
- Port Ethernet Gigabit : Fournit une connexion Internet filaire stable et rapide.
- 3.5mm Audio Jack Combo: Pour connecter des écouteurs ou des microphones.
Instructions d'installation
- Connectez le Hub à votre appareil : Insert the integrated USB-C cable of the HyperDrive Next 10 Port USB-C Hub into an available USB-C port on your Mac, PC, or Chromebook.
- Connexion électrique (facultative mais recommandée) : For optimal performance and to charge your host device, connect a compatible USB-C Power Delivery charger (up to 140W PD 3.1) to the USB-C 140W PD 3.1 port on the hub. This allows pass-through charging up to 125W.
- Connectez les périphériques : Once the hub is connected, you can begin connecting your peripherals to the respective ports on the hub.
- For external displays, use the HDMI port.
- For USB devices (flash drives, external hard drives, keyboards, mice), use the USB-A or USB-C data ports.
- For memory cards, insert them into the SD or microSD card slots.
- Pour une connexion Internet filaire, connectez un câble Ethernet au port Gigabit Ethernet.
- For audio, plug your headphones or microphone into the 3.5mm audio jack.
- Prêt à l'emploi : The HyperDrive Next hub is designed for plug-and-play functionality. No additional drivers or software installation are typically required for basic operation on compatible operating systems.

Description de l'image : Un gros plan view of the HyperDrive Next 10 Port USB-C Hub, showcasing its compact design and the integrated USB-C cable ready for connection to a host device. This image highlights the hub's sleek appearance and port accessibility.
Mode d'emploi
Sortie d'affichage (HDMI)
Connect an HDMI cable from the hub's HDMI port to your external monitor. Your device should automatically detect the display. You may need to adjust display settings (resolution, mirroring/extending) in your operating system's display preferences.

Description de l'image : A laptop connected to an external monitor through the HyperDrive Next USB-C Hub, demonstrating the extended display functionality. The image shows a workspace setup with the hub facilitating multi-monitor use.
Data Transfer (USB-A, USB-C, SD/microSD)
Insert your USB devices (flash drives, external hard drives) into the appropriate USB-A or USB-C data ports. For SD or microSD cards, insert them into the corresponding slots. Files can then be accessed and transferred via your computer's file explorateur.
Description de l'image : The HyperDrive Next USB-C Hub connected to an external hard drive, illustrating its capability for high-speed data transfer via USB 3.2. The image emphasizes the efficiency of moving large files.

Description de l'image : The HyperDrive Next USB-C Hub with an SD card and a microSD card inserted into their respective slots, demonstrating the hub's fast media transfer capabilities for photographers and videographers.
Power Delivery (USB-C PD 3.1)
To charge your host device through the hub, connect a USB-C power adapter (140W PD 3.1 recommended) to the dedicated USB-C PD port on the hub. The hub will then pass through up to 125W of power to your connected laptop or device.

Description de l'image : The HyperDrive Next USB-C Hub connected to a wall charger, illustrating its 140W Power Delivery 3.1 pass-through charging capability. This image shows the hub providing power to a connected device.
Network Connection (Gigabit Ethernet)
Plug an Ethernet cable from your router or modem into the Gigabit Ethernet port on the hub. Your device should automatically establish a wired network connection, providing stable and high-speed internet access.
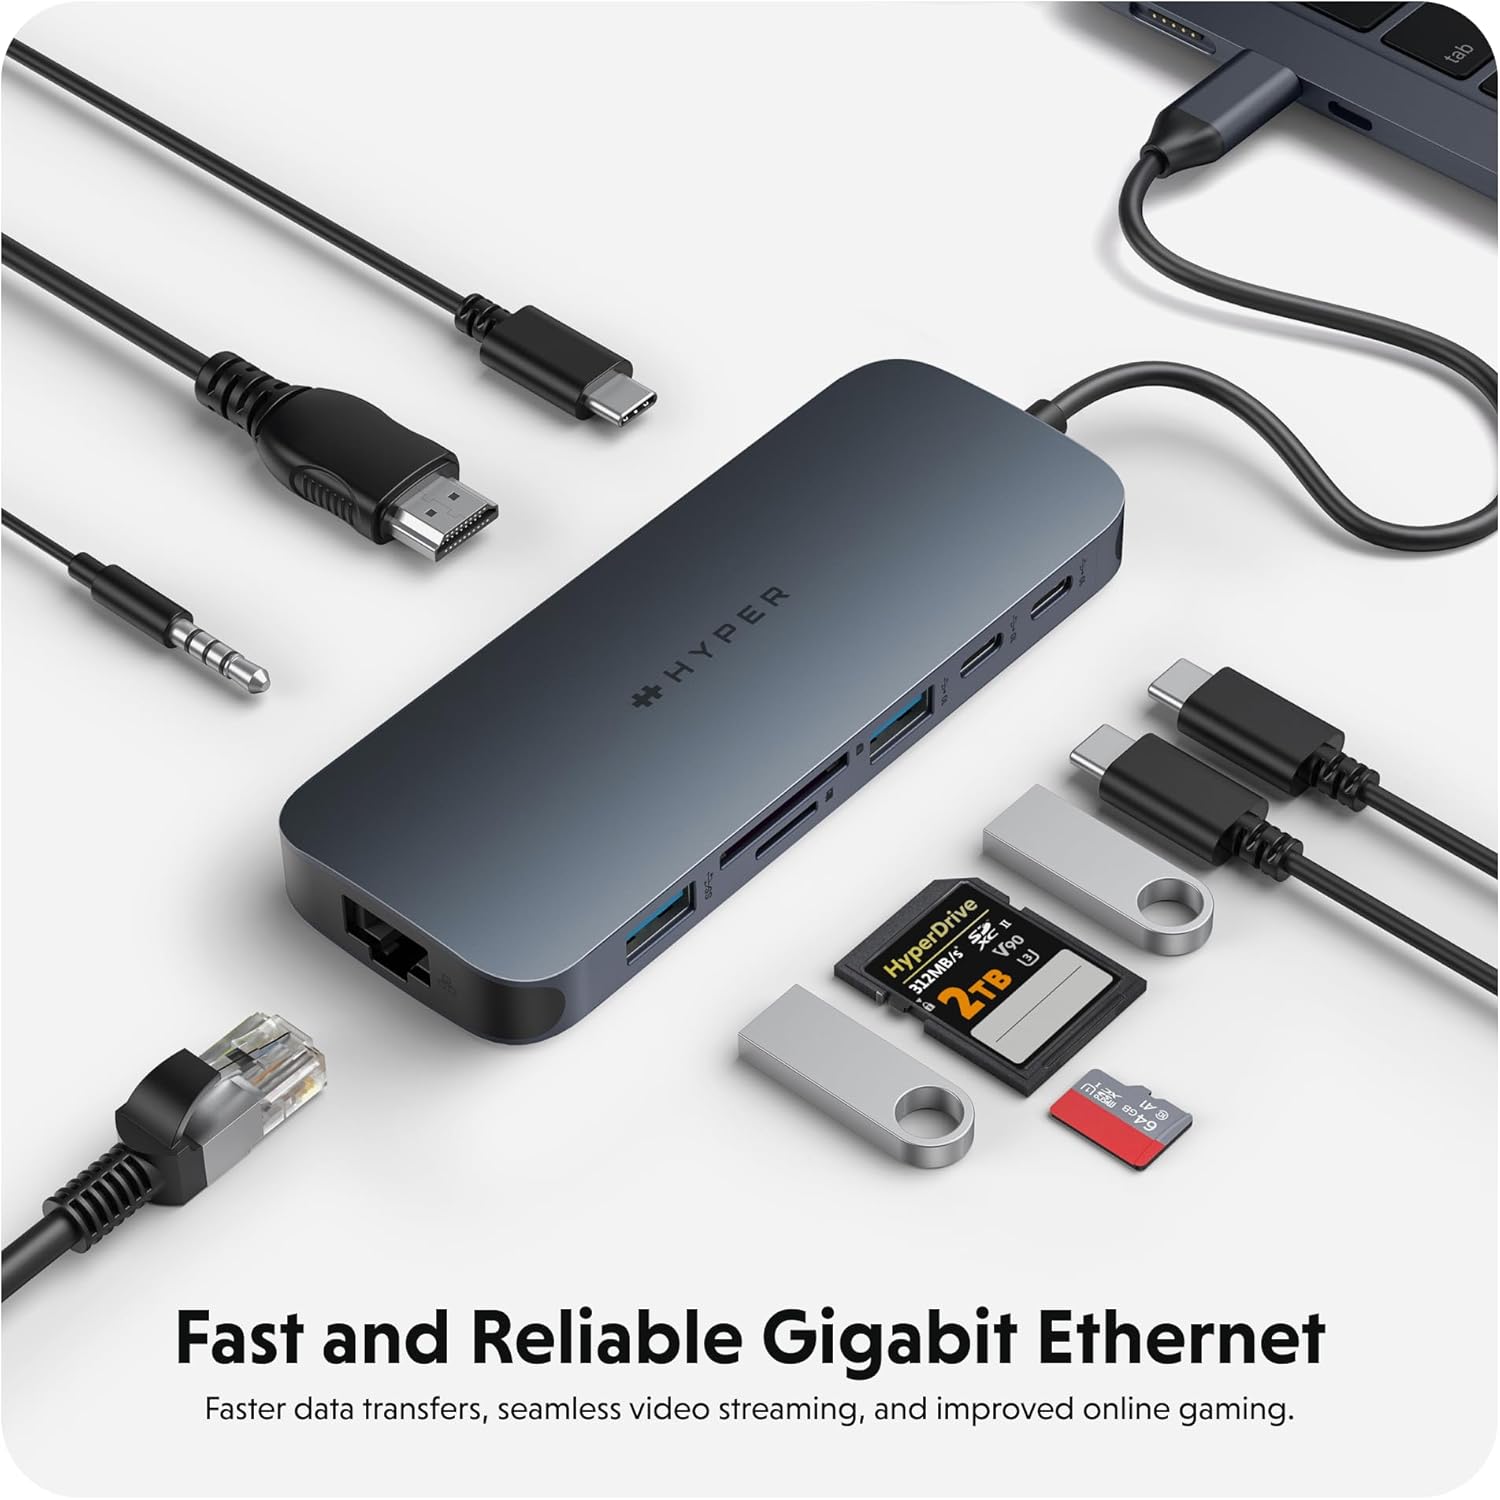
Description de l'image : The HyperDrive Next USB-C Hub with an Ethernet cable connected, highlighting its Gigabit Ethernet port for fast and reliable wired internet access. The image also shows other cables and accessories, emphasizing the hub's comprehensive connectivity.
Audio Connection (3.5mm Audio Jack)
Connect your headphones or microphone to the 3.5mm audio jack. Ensure your device's audio output/input settings are configured to use the hub's audio port if it doesn't switch automatically.

Description de l'image : A pair of headphones connected to the 3.5mm audio jack of the HyperDrive Next USB-C Hub, demonstrating its support for wired audio peripherals.
Compatibilité
The HyperDrive Next 10 Port USB-C Hub is compatible with a wide range of devices that feature a USB-C port with DisplayPort Alternate Mode (Alt Mode) and Power Delivery capabilities. This includes:
- Mac: MacBook Pro, MacBook Air, iMac, Mac mini, and other Mac models with USB-C/Thunderbolt 3/4 ports.
- PC Windows : Laptops and desktops with USB-C ports supporting DisplayPort Alt Mode and Power Delivery.
- Chromebook : Devices with USB-C ports supporting DisplayPort Alt Mode and Power Delivery.
For optimal performance, ensure your device's USB-C port supports the necessary features for video output and power delivery.
Entretien et soins
- Nettoyage: Utilisez un chiffon doux et sec pour nettoyer la surface du moyeu. Évitez d'utiliser des nettoyants liquides ou des aérosols.
- Stockage: Rangez le moyeu dans un endroit frais et sec, à l'abri de la lumière directe du soleil et des températures extrêmes.
- Manutention: Évitez de laisser tomber le moyeu ou de le soumettre à des chocs violents. Ne tentez pas de démonter l'appareil.
- Protection des ports : When not in use, consider using port covers (if available) to prevent dust and debris from entering the ports.
Dépannage
- Aucun affichage via HDMI :
- Assurez-vous que le port USB-C de votre appareil hôte prend en charge le mode alternatif DisplayPort.
- Vérifiez la connexion du câble HDMI au niveau du hub et du moniteur.
- Essayez un autre câble HDMI ou un autre moniteur si possible.
- Redémarrez votre appareil hôte.
- Modifiez les paramètres d'affichage de votre système d'exploitation.
- Périphériques USB non détectés :
- Assurez-vous que le hub est correctement connecté à votre appareil hôte.
- Essayez de connecter le périphérique USB directement à votre appareil hôte pour confirmer son bon fonctionnement.
- If using a high-power USB device (e.g., external hard drive), ensure the hub is connected to a power source via the PD port.
- Essayez un autre port USB sur le hub.
- Vitesses de transfert de données lentes :
- Ensure you are using the correct USB 3.2 (10Gbps) ports for maximum speed.
- The speed is also dependent on the connected device's capabilities.
- Évitez de transférer plusieurs gros volumes de données. files simultaneously if performance is critical.
- L'appareil hôte ne se charge pas via le port PD :
- Ensure your USB-C power adapter is connected to the hub's 140W PD 3.1 port.
- Vérifiez que votre adaptateur secteur est fonctionnel et fournit une puissance suffisante.tage (140W recommended for full pass-through).
- Vérifiez que votre appareil hôte prend en charge la technologie USB-C Power Delivery.
Caractéristiques
| Fonctionnalité | Détail |
|---|---|
| Numéro de modèle | 5785587 |
| Ports | 1x 4K60Hz HDMI, 1x USB-A 10Gbps, 1x USB-A 5Gbps, 2x USB-C 10Gbps, 1x USB-C 140W PD 3.1, 1x SD Card Reader (312MB/s), 1x microSD Card Reader (312MB/s), 1x Gigabit Ethernet, 1x 3.5mm Audio Jack Combo |
| Sortie HDMI | Jusqu'à 4K @ 60Hz |
| Vitesse de transfert de données USB | Jusqu'à 10 Gb/s (USB 3.2) |
| Distribution d'énergie | 140W PD 3.1 pass-through (up to 125W to host) |
| Vitesse du lecteur de cartes | 312MB/s (SD 4.0 and microSD 4.0) |
| Ethernet | Gigabit Ethernet (10/100/1000 Mbit/s) |
| Appareils compatibles | Mac, Windows PC, Chromebook with USB-C (DisplayPort Alt Mode & PD) |
| Dimensions | 7.83 x 4.06 x 1.42 pouces |
| Poids de l'article | 5.7 onces |
| Matériel | 100% Recycled Aluminum, 85% Recycled Plastic |
Garantie et assistance
Hyper products are designed with quality and reliability in mind. For information regarding warranty coverage, technical support, or to register your product, please visit the official Hyper webconsultez le site ou contactez directement leur service client.
Official Hyper Website: www.hyper.com
For additional assistance, refer to the product's Amazon listing or contact Amazon customer support.
Ask a question about this manual
Ask about setup, troubleshooting, compatibility, parts, safety, or missing instructions. Manuals+ will review the question and use this page’s manual context to help answer it.