1. Introduction
This manual provides essential information for the safe and efficient operation of your BETOPPER LM0910N LED Spider Moving Head Light. Please read this manual thoroughly before installation, operation, or maintenance. Keep this manual for future reference.
2. Consignes de sécurité
- Ensure the product is connected to a power supply within the specified voltage range (AC 100–240V; 50–60Hz).
- Débranchez toujours l'alimentation électrique avant de procéder au nettoyage, à l'entretien ou lorsque l'appareil n'est pas utilisé.
- This product is designed for indoor use only. Avoid exposure to rain, moisture, or extreme temperatures.
- Assurez une ventilation adéquate autour de l'appareil pour éviter toute surchauffe. Ne bloquez pas les ouvertures de ventilation.
- Évitez l'exposition directe des yeux à la source lumineuse.
- Installation should be performed by qualified personnel, ensuring secure mounting and proper electrical connections.
- N’essayez pas de réparer l’appareil vous-même. Confiez toute réparation à un technicien qualifié.
3. Contenu du colis
Lors du déballage, assurez-vous que tous les éléments énumérés ci-dessous sont présents et en bon état :
- 1 x LED Spider Moving Head Light (LM0910N)
- 1 x câble d'alimentation
- 1 x Support de montage
- 2 x vis
- 1 x Manuel d'utilisation (anglais)
4. Produit terminéview
The BETOPPER LM0910N is a compact and lightweight LED Spider Moving Head Light designed for various entertainment venues. It features a unique triangular design with 9 individual 4-in-1 RGBW LEDs, offering a wide range of color mixing and dynamic beam effects. The unit supports infinite rotation on the X-axis and 90° movement on the Y-axis, allowing for versatile lighting patterns.

Figure 4.1 : Divers views of the BETOPPER LM0910N LED Spider Moving Head Light, illustrating its compact design and dimensions.
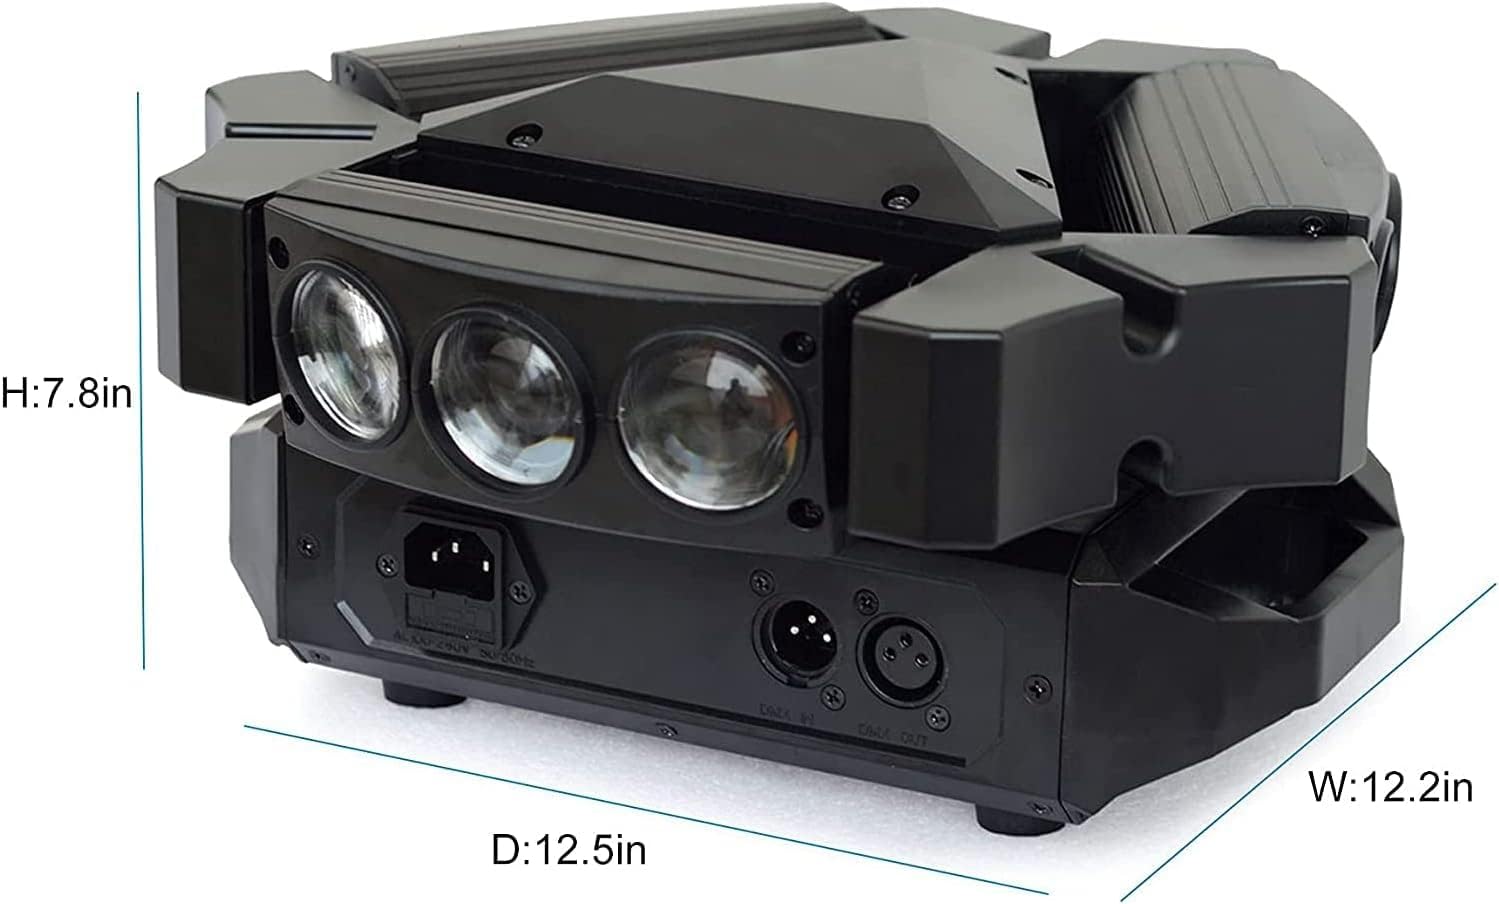
Figure 4.2: Detailed dimensions of the BETOPPER LM0910N LED Spider Moving Head Light.
5. Installation
The LM0910N can be installed in various positions:
- Pendaison: Use the provided mounting bracket to securely attach the light to a truss or ceiling. Ensure all clamps and safety cables are properly secured.
- Montage mural : The bracket can also be used to mount the light on a wall. Ensure the wall material can support the weight of the fixture.
- Emplacement au sol : The unit can be placed directly on a flat, stable surface. Ensure it is not easily knocked over.
After mounting, connect the power cable to a suitable power outlet. For DMX control, connect DMX cables from your DMX controller to the DMX IN port, and from DMX OUT to the next fixture in the chain (if applicable).
6. Modes de fonctionnement
The LM0910N offers four primary control modes:
- Mode automatique : The light operates through integrated pre-programmed sequences, changing effects automatically.
- Mode activé par le son : The light reacts to sound frequencies from music, creating dynamic effects synchronized with the audio.
- Mode DMX512 : Allows professional control over all functions of the light using a DMX console. This mode offers precise control over color, movement, strobe, and dimming.
- Mode maître-esclave : Connect multiple LM0910N units. Designate one unit as the master, and the others will follow its programming, moving and changing effects synchronously.

Figure 6.1: The light projecting green beams, demonstrating its dynamic capabilities.
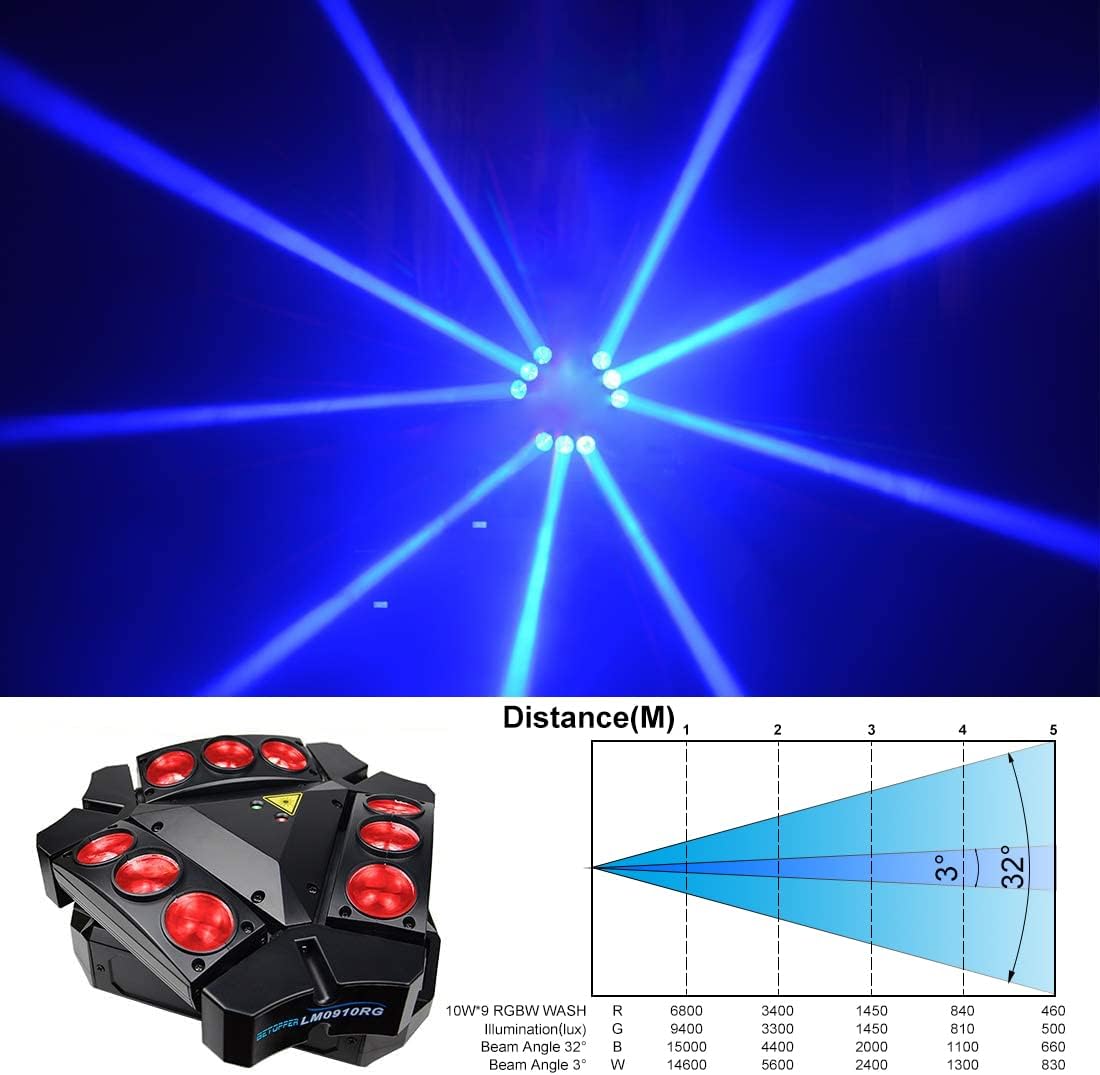
Figure 6.2: The light projecting blue beams, showcasinoptions de couleur g.

Figure 6.3: The light projecting various colored beams simultaneously.
7. DMX Channel Modes
The LM0910N supports two DMX channel modes for varying levels of control:
- Mode 9 canaux : Provides basic control over essential functions.
- Mode 11 canaux : Offers extended control, allowing for more intricate programming and effects.
Refer to the DMX chart in the separate DMX protocol document (if provided) for detailed channel assignments and values.
8. Spécifications techniques
| Fonctionnalité | Spécification |
|---|---|
| Source de lumière | 9 LED RGBW 10W |
| Puissance nominale | 35 W |
| Vol d'entréetage | AC 100–240V; 50–60Hz |
| Modes du canal DMX | 9/11 canaux |
| Modes de contrôle | Automatique, activation sonore, DMX512, maître-esclave |
| X-Axis Scan Angle | Rotation infinie |
| Y-Axis Scan Angle | 90° |
| Atténuation | Gradation linéaire de 0 à 100 % |
| Durée de vie | 5000 ~ 10000 heures |
| Dimensions du produit | 17.5 x 14.6 x 28.6 cm (6.9 x 5.7 x 11.3 pouces) |
| Poids du produit | 3.5 kg (7.7 lb) |
| Environnement de travail | Indoor 10–40 °C (50–105 °F) |
| Matériel | Plastique |
| Certifications | CE, RoHS, FCC |
9. Entretien
Regular maintenance ensures optimal performance and extends the lifespan of your light:
- Nettoyage: Nettoyez régulièrement les lentilles et le boîtier extérieur avec un chiffon doux non pelucheux. N’utilisez pas de nettoyants abrasifs ni de solvants.
- Inspection: Vérifiez régulièrement les câbles d'alimentation, les câbles DMX et le matériel de montage pour détecter tout signe d'usure, de dommage ou de connexion desserrée.
- Ventilation: Veillez à ce que les ouvertures de ventilation soient dégagées de poussière et de débris afin d'éviter toute surchauffe.
10. Dépannage
En cas de problème, veuillez consulter la liste des problèmes courants et leurs solutions ci-dessous :
- Pas d'alimentation :
- Vérifiez que le câble d'alimentation est bien connecté à la fois à l'appareil et à la prise de courant.
- Vérifiez que la prise de courant est fonctionnelle.
- Check the fuse (if accessible and replaceable).
- Aucune sortie lumineuse :
- Vérifiez que l'appareil est bien alimenté.
- In DMX mode, check DMX signal and channel settings. Ensure the dimmer channel is not set to 0.
- In Auto or Sound mode, ensure the mode is correctly selected.
- Aucun mouvement/Mouvement incorrect :
- In DMX mode, verify DMX signal and pan/tilt channel settings.
- Ensure the unit is not physically obstructed.
- Recalibrate the unit by power cycling it.
- DMX Control Issues:
- Check DMX cable connections and ensure they are 3-pin XLR (or 5-pin if applicable).
- Vérifiez que l'adresse DMX du projecteur correspond à l'adresse définie sur votre contrôleur.
- Ensure the DMX controller is sending a valid signal.
- Essayez un autre câble DMX.
Si les problèmes persistent après avoir essayé ces solutions, contactez le service client.
11. Garantie et assistance
BETOPPER products are manufactured to high-quality standards. For warranty information, please refer to the warranty card included with your purchase or contact BETOPPER customer support directly. For technical assistance or service inquiries, please visit the official BETOPPER website ou contactez leur service client.