1. Introduction
This manual provides detailed instructions for the installation, operation, and maintenance of your Gravity Audio 1200W 12" Premium Car Subwoofer Kit. This comprehensive package includes a Gravity 12-inch subwoofer, an Audiobank 3000W Class D amplifier, an Audiotek single 12-inch vented subwoofer enclosure, and a complete amplifier installation kit. Please read this manual thoroughly before attempting installation or operation to ensure proper use and maximum performance.

Figure 1.1 : Plusview of the Gravity Audio 1200W 12" Premium Car Subwoofer Kit components.
2. Consignes de sécurité
Respectez toujours les consignes de sécurité suivantes lors de l'installation et du fonctionnement :
- Installation professionnelle recommandée : If you are unsure about any aspect of installation, consult a qualified car audio technician.
- Déconnecter la batterie : Always disconnect the vehicle's negative battery terminal before starting any electrical work to prevent short circuits and electrical shock.
- Câblage approprié : Use appropriate gauge wiring as specified in this manual and ensure all connections are secure and insulated to prevent shorts.
- Ventilation: Assurez-vous que amplifier is mounted in a location with adequate airflow to prevent overheating.
- Éviter les obstructions : Do not mount components in locations that obstruct airbags, driver visibility, or vehicle controls.
- Protection auditive : Une exposition prolongée à des niveaux sonores élevés peut causer des dommages auditifs permanents. Soyez prudent lorsque vous réglez le volume.
3. Contenu du colis
Vérifiez que tous les éléments sont présents dans votre colis :
- Gravity 12" 1200W Peak Power Subwoofer (GR-12PW)
- Audiobank 3000W Class D Monoblock Amplifier (P3001)
- Audiotek Single 12 Inch Vented Subwoofer Enclosure (CA-12SP)
- Complet Amplifier Installation Kit (Power Cable, Ground Cable, Remote Turn-On Wire, RCA Interconnects, Speaker Wire, Fuse Holder, Fuse, Terminals, Zip Ties)

Figure 3.1 : Contenu du amplifier installation kit, including various cables, fuse, and terminals.
4. Configuration et installation
Follow these steps for proper installation of your car audio system. Ensure the vehicle's battery is disconnected before proceeding.
4.1 Subwoofer Installation into Enclosure
- Carefully place the Gravity 12" subwoofer into the opening of the Audiotek vented enclosure. Ensure the mounting holes align.
- Secure the subwoofer using appropriate screws (not included, typically self-tapping wood screws) through the mounting holes into the enclosure. Do not overtighten.
- Connect speaker wire from the subwoofer's terminals to the enclosure's internal terminals. Observe polarity: positive (+) to positive, negative (-) to negative.

Figure 4.1 : Face avant view of the Gravity 12-inch subwoofer, showing the cone and surround.

Figure 4.2 : Face avant view of the Audiotek single 12-inch vented subwoofer enclosure.
4.2 AmpMontage lifier
Choose a secure, well-ventilated location for the Audiobank amplifier, such as the trunk or under a seat. Ensure it is away from moisture and direct sunlight.
- Mark the mounting holes on the chosen surface.
- Drill pilot holes if necessary, taking care not to damage any vehicle components.
- Sécuriser le ampamplificateur en utilisant les vis appropriées.

Figure 4.3 : Haut view of the Audiobank 3000W Class D Monoblock Amplifier.
4.3 Connexions de câblage
Se référer à la amplifier's rear panel for terminal locations. Use the provided ampkit d'installation du lificateur.
- Power Cable (+12V): Run the thick red power cable from the vehicle's positive battery terminal to the amplifier's +12V terminal. Install the fuse holder within 18 inches of the battery and insert the fuse.
- Câble de terre (GND) : Connect the thick black ground cable from the ampConnectez la borne GND de l'amplificateur à une surface métallique propre et non peinte du châssis du véhicule. Assurez-vous d'une connexion solide et à faible résistance.
- Fil de mise en marche à distance (REM) : Connect the blue remote wire from your head unit's remote output to the ampborne REM de l'amplificateur. Cela active le ampAllumer/éteindre l'amplificateur avec votre autoradio.
- Interconnexions RCA : Connect the RCA cables from your head unit's subwoofer or full-range pre-outs to the ampPrises d'entrée RCA de lifier.
- Sortie haut-parleur : Connect the speaker wire from the enclosure's external terminals to the ampBornes de sortie haut-parleur de l'amplificateur. Vérifiez la polarité.

Figure 4.4: Rear panel of the Audiobank ampAmplificateur présentant les bornes d'alimentation, de masse, de télécommande et de sortie haut-parleur.

Figure 4.5: Speaker terminal on the Audiotek subwoofer enclosure for connecting to the amplifier.
5. Mode d'emploi
Once all connections are made and verified, reconnect the vehicle's negative battery terminal.
5.1 Mise sous tension initiale et paramètres de base
- Mettez le contact de votre véhicule et allumez l'autoradio. ampLe voyant d'alimentation de l'amplificateur devrait s'allumer.
- Commencez par le amplifier's GAIN control set to minimum (fully counter-clockwise).
- Set the head unit's volume to about 75% of its maximum.
- Augmentez lentement le amplifier's GAIN control until you hear distortion, then back it off slightly. This sets the maximum clean output.
5.2 AmpContrôles de lifier
The Audiobank P3001 amplifier features several controls for fine-tuning your subwoofer's performance:
- GAIN: Adjusts the input sensitivity to match the output of your head unit. (See 5.1)
- LPF (filtre passe-bas) : This control sets the upper frequency limit for the subwoofer. Typically set between 80Hz and 120Hz. Frequencies above this setting will be filtered out.
- RENFORCEMENT DES BASSES: Provides an increase in bass output at a specific frequency. Use sparingly to avoid distortion and potential damage.
- PHASE: Allows you to adjust the phase of the subwoofer output (0 or 180 degrees) to ensure it blends seamlessly with your main speakers. Experiment with both settings to find the best sound.
6. Entretien
Your Gravity Audio Subwoofer Kit requires minimal maintenance to ensure long-term performance.
- Nettoyage: Essuyez périodiquement le amplifier and subwoofer enclosure with a soft, dry cloth. Avoid using harsh chemicals or abrasive cleaners.
- Vérifications de connexion : Annually, inspect all wiring connections for tightness and corrosion. Re-tighten any loose connections.
- Ventilation: Assurez-vous que ampLes ailettes de refroidissement de l'amplificateur restent exemptes de poussière et de débris afin de maintenir une dissipation thermique adéquate.
7. Dépannage
If you experience issues with your subwoofer kit, consult the following table before seeking professional assistance:
| Problème | Cause possible | Solution |
|---|---|---|
| Aucun son provenant du caisson de basses |
|
|
| Son déformé |
|
|
| AmpSurchauffe de l'amplificateur |
|
|
8. Spécifications
Gravity 12" Subwoofer (GR-12PW)
- Type de haut-parleur : Caisson de basses
- Diamètre du caisson de basses : 12 pouces
- Voice Coil Configuration: Double 4 ohms
- Puissance de crête: 1200 watts chacun
- Puissance RMS : 600 watts chacun
- Réponse en fréquence : 30 - 2.5kHz
- Sensibilité: 90 dB
- Matériel de cône: Competition Grade Pressed Paper Cone
- Entourer: Mousse haute densité
- Circuit de refroidissement: Système de refroidissement à flux d'air avancé
Audiobank 3000W Class D Amplifier (P3001)
- Taper: Monobloc classe D Amplifier
- Puissance de crête: 3000 Watts (Total Package)
- Contrôles : Gain, LPF, Bass Boost, Phase
Audiotek Single 12 Inch Vented Enclosure (CA-12SP)
- Conception: Vented (Ported)
- Matériel: High Quality Gray Carpet
- Dimensions: Approximately 18"W x 16"D x 14"H (External)
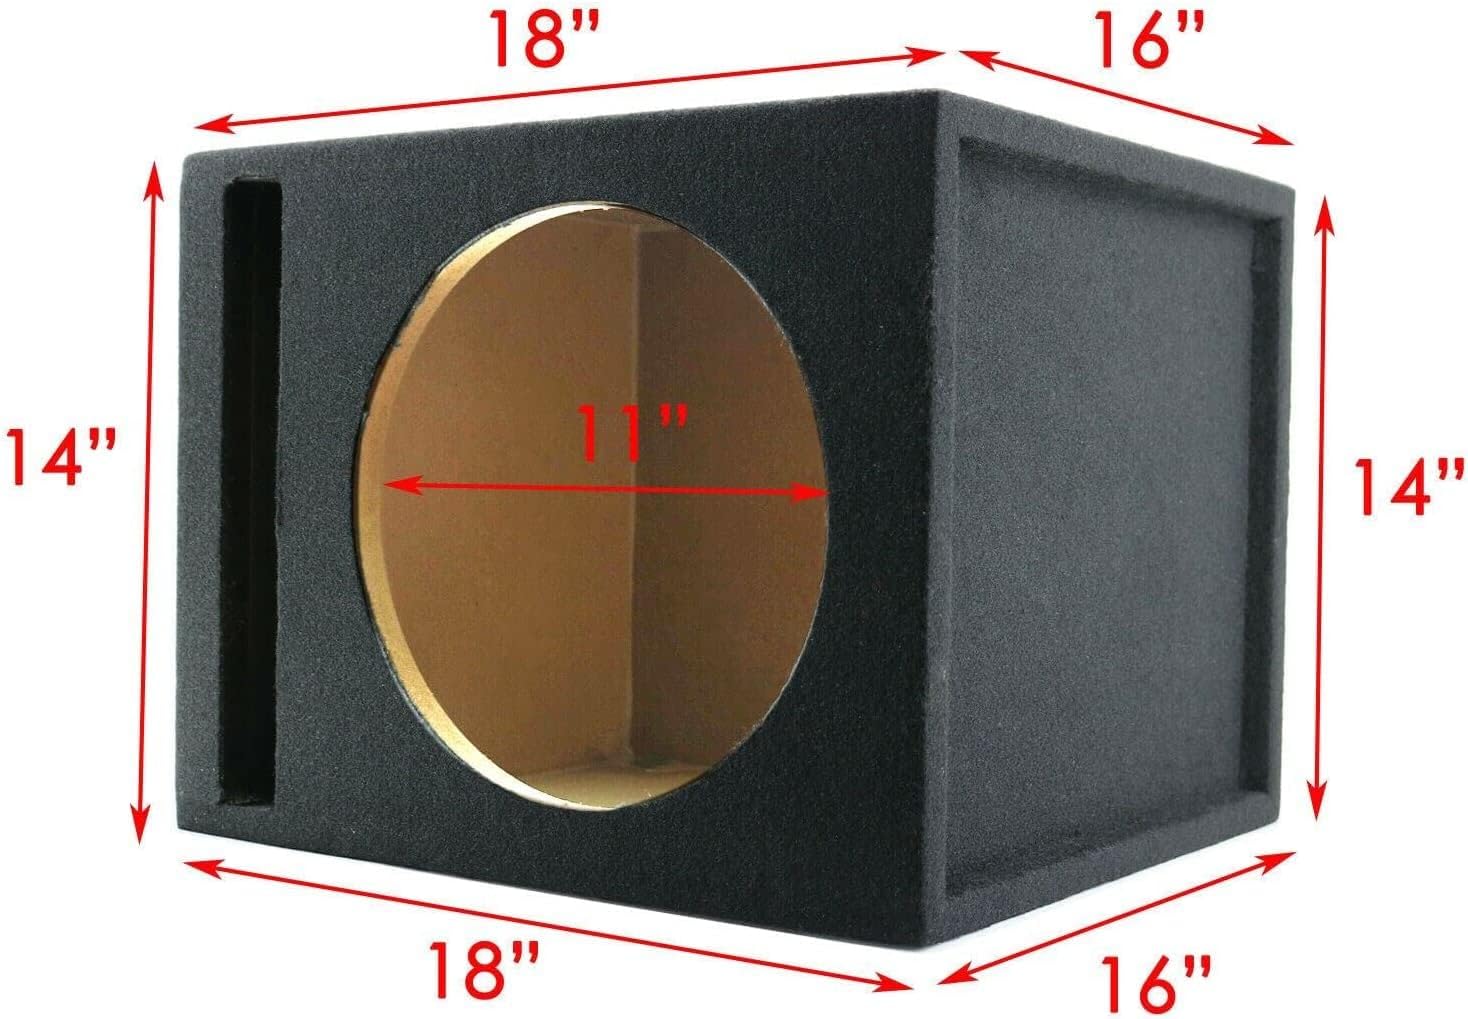
Figure 8.1: Dimensions of the Audiotek single 12-inch vented subwoofer enclosure.
9. Garantie et assistance
This product comes with a Limited Warranty. For specific details regarding warranty coverage, duration, and terms, please refer to the warranty card included with your purchase or contact Gravity Audio customer support directly.
Assistance clientèle
For technical assistance, troubleshooting not covered in this manual, or warranty claims, please contact your retailer or Gravity Audio customer service. Have your product model number (GR-12PW + P3001 + CA-12SP + Kit) and purchase date available when contacting support.