1. Introduction
Thank you for choosing the Goshyda Portable Multimedia 1080P Projector. This compact and versatile device is designed to provide a personal cinema experience, supporting various multimedia inputs for entertainment, presentations, and more. Please read this manual carefully before using the projector to ensure proper operation and to maximize its lifespan.

Image 1.1: The Goshyda YG300 Mini Portable Projector in a home entertainment setting.
2. Consignes de sécurité
- Alimentation: Use only the specified 5V 2A power adapter or a compatible power bank. Incorrect voltagCela pourrait endommager l'appareil.
- Ventilation: Ne pas obstruer les ouvertures de ventilation. Assurer une circulation d'air suffisante autour du projecteur afin d'éviter toute surchauffe.
- Environnement: Avoid exposing the projector to water, moisture, dust, or extreme temperatures. Operate in a clean, dry environment.
- Nettoyage: Débranchez l'appareil avant de le nettoyer. Utilisez un chiffon doux et sec. N'utilisez pas de nettoyants liquides ni en aérosol.
- Démontage: N’essayez pas de démonter ou de réparer le projecteur vous-même. Confiez toute intervention à un personnel qualifié.
- Protection des yeux : Ne regardez pas directement l'objectif du projecteur lorsque le lamp est allumé.
3. Contenu du colis
Veuillez vérifier le contenu du colis à l'ouverture. Si des articles sont manquants ou endommagés, contactez votre revendeur.
- Goshyda Portable Projector
- Télécommande
- Câble AV
- Adaptateur secteur
- Manuel de l'utilisateur (ce document)

Image 3.1: Included accessories with the Goshyda Portable Projector.
4. Produit terminéview
4.1. Caractéristiques du projecteur
- Prise en charge de la résolution 1080p : Fournit des images claires et détaillées.
- Conception compacte et portable : Weighing approximately 290g, it is easy to carry.
- Connectivité multiport : Includes USB, HDMI, AV, memory card slot, and audio output.
- Haut-parleurs intégrés : Offre un système audio intégré pour plus de commodité.
- Puissance flexible : Can be powered by a 5V 2A wall charger or power bank.

Image 4.1: Visual representation of the projector's main features.
4.2. Projector Ports and Controls
Familiarisez-vous avec les différents ports et commandes de votre projecteur.
- Lentille: Objectif de projection frontal.
- Bague de mise au point : Ajuste la netteté de l'image.
- Entrée d'alimentation (DC IN) : Connects to the 5V 2A power adapter.
- Port HDMI: Pour connecter des appareils via un câble HDMI.
- Port USB : Pour connecter des périphériques de stockage USB.
- Port AV : For connecting devices via AV cable.
- Emplacement pour carte MicroSD : Pour insérer une carte mémoire.
- Sortie audio : Pour connecter des haut-parleurs externes ou des écouteurs.
- Boutons de contrôle : On the top panel for basic navigation and selection.

Image 4.2 : Côté view of the projector highlighting its connectivity ports.

Image 4.3: Close-up of the projector lens.
5. Installation
5.1. Connexion électrique
- Branchez l'adaptateur secteur fourni au port DC IN du projecteur.
- Branchez l'adaptateur secteur sur une prise électrique standard.
- Alternatively, for portable use, connect a 5V 2A power bank to the DC IN port.

Image 5.1: Powering the projector via wall adapter or power bank.
5.2. Placement et projection
Place the projector on a stable, flat surface. The optimal projection distance is between 1 to 2.5 meters, allowing for a screen size of up to 60 inches.
- For a 24-inch screen, place the projector approximately 0.8 meters away.
- For a 47-inch screen, place the projector approximately 1.2 meters away.
- For a 60-inch screen, place the projector approximately 1.6 meters away.
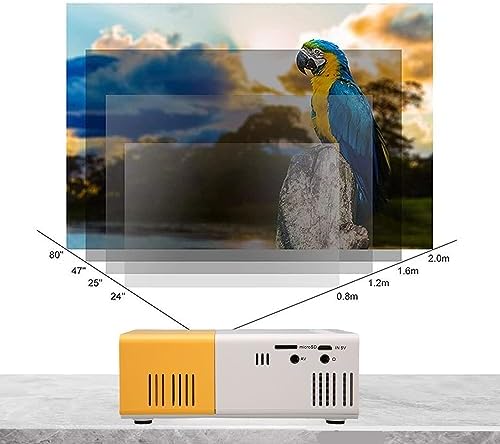
Image 5.2: Projection distance guidelines for various screen sizes. Note: Maximum recommended projection size is 60 inches.
5.3. Réglage de la mise au point
After placing the projector and powering it on, rotate the focus ring located around the lens until the projected image appears clear and sharp.
6. Mode d'emploi
6.1. Marche/Arrêt
- Mise sous tension : Appuyez sur le bouton d'alimentation du projecteur ou de la télécommande.
- Éteindre: Appuyez de nouveau sur le bouton d'alimentation. Le projecteur s'éteindra.
6.2. Sélection de la source d'entrée
Use the 'Source' button on the remote control or the projector's control panel to cycle through available input sources (HDMI, USB, AV, MicroSD).
6.3. Navigation dans les menus
Use the arrow buttons on the remote control or projector to navigate through menus. Press 'OK' or 'Enter' to confirm selections. Use the 'Return' or 'Back' button to go back to the previous menu.
7. Connectivité
Le projecteur offre de multiples options de connectivité pour différents appareils.

Image 7.1: Connectivity options for the Goshyda projector.
7.1. Connexion HDMI
Connect devices such as laptops, TV Sticks, game consoles (e.g., for Xbox One), or Blu-ray players using an HDMI cable. Select 'HDMI' as the input source.
7.2. Connexion USB
Insérez une clé USB dans le port USB pour lire des fichiers multimédias. files directly. Select 'USB' as the input source and navigate through your files.
7.3. Connexion AV
Use the provided AV cable to connect older devices like DVD players. Select 'AV' as the input source.
7.4. Smartphone/Tablet Connection
To connect directly to your smartphone or tablet, you will need an appropriate adapter (e.g., Micro USB to HDMI, Type-C to HDMI, or a dedicated HD multimedia interface device), depending on your device's operating system (OS X or Android) and available ports. These adapters are sold separately.
7.5. Sortie audio
Connect external speakers or headphones to the audio output port for enhanced sound.
8. Entretien
- Nettoyage des lentilles : Use a soft, lint-free cloth specifically designed for optical lenses to gently wipe the projector lens. Do not use abrasive materials or harsh chemicals.
- Nettoyage extérieur : Essuyez l'extérieur du projecteur avec un chiffon doux et sec.
- Stockage: Lorsqu'il n'est pas utilisé pendant une période prolongée, rangez le projecteur dans un endroit frais et sec, à l'abri de la lumière directe du soleil et de la poussière.
9. Dépannage
| Problème | Cause possible | Solution |
|---|---|---|
| Pas de courant | Power adapter not connected or faulty; insufficient power supply. | Ensure the 5V 2A power adapter is securely connected and plugged into a working outlet. Try a different power source or power bank. |
| Aucune image | Incorrect input source selected; cable not connected properly; device not outputting signal. | Select the correct input source (HDMI, USB, AV). Check all cable connections. Ensure the connected device is powered on and outputting a signal. |
| L'image est floue | Mise au point incorrecte ; projecteur trop près/trop loin de l’écran. | Rotate the focus ring to sharpen the image. Adjust the projection distance within the recommended range (1-2.5m). |
| Pas de son | Volume too low or muted; external speakers not connected; audio format not supported. | Increase the volume on the projector and the source device. Check if external speakers are properly connected. Ensure the audio format is supported. |
10. Spécifications
| Fonctionnalité | Détail |
|---|---|
| Marque | Goshyda |
| Numéro de modèle | Goshyda89pkbg17g0 |
| Résolution d'affichage | 1920 x 1080 (Prise en charge 1080p) |
| Luminosité | 200 lumens |
| Rapport hauteur/largeur | 4:3 |
| Distance de projection | 1 à 2.5 mètres |
| Taille de la projection | Jusqu'à 60 pouces |
| Technologie de connectivité | HDMI, USB, AV, MicroSD, Audio Out |
| Puissance d'entrée | 5V 2A |
| Type d'affichage | Écran LCD |
| Dimensions du produit | 12L x 8.5W x 4.6H cm (Approx. 4.7 x 3.3 x 1.8 inches) |
| Facteur de forme | Portable |
| Type de montage | Support de table |
11. Garantie et assistance
For warranty information and customer support, please refer to the documentation provided with your purchase or contact your retailer directly. Keep your proof of purchase for warranty claims.