Introduction
This manual provides essential information for the safe and efficient operation, installation, and maintenance of your Cecotec Bolero Dresscode Serie 50 Inverter A 7 Kg integrated front-load washing machine. Please read these instructions carefully before using the appliance and retain them for future reference.
Consignes de sécurité
Respectez toujours les consignes de sécurité de base lors de l'utilisation d'appareils électriques afin de réduire les risques d'incendie, d'électrocution et de blessures. Cet appareil est destiné à un usage domestique uniquement.
- Vérifiez que l'alimentation électrique corresponde aux caractéristiques indiquées sur l'appareil.
- N’utilisez pas la machine à laver si le cordon d’alimentation ou la prise est endommagé.
- Gardez les enfants et les animaux domestiques éloignés de l'appareil pendant son fonctionnement.
- N’ouvrez pas le distributeur de détergent ni la porte pendant un cycle de lavage, surtout lorsque le niveau d’eau est élevé ou que la température est élevée.
- Débranchez l'appareil avant de le nettoyer ou d'effectuer toute opération d'entretien.
- N’installez pas l’appareil dans des zones exposées à la lumière directe du soleil ou à des températures extrêmes.
Configuration et installation
1. Déballage et placement
Carefully remove all packaging materials. Ensure all transit bolts are removed from the rear of the machine before use. Failure to do so can cause severe vibration and damage.
Place the washing machine on a firm, level surface. This integrated model is designed to fit within standard kitchen cabinetry.

Figure 1 : Face avant view of the washing machine with approximate dimensions: Width 60cm, Depth 55cm, Height 82cm.

Figure 2: The washing machine seamlessly integrated into a kitchen environment, demonstrating its design for built-in installation.
2. Mise à niveau de l'appareil
Adjust the leveling feet at the bottom of the machine to ensure it is perfectly stable and level. A level appliance reduces noise and vibration during operation.
3. Raccordements d'eau et d'évacuation
- Raccordez le tuyau d'arrivée d'eau à un robinet d'eau froide muni d'un filetage de 3/4 de pouce. Assurez-vous que les raccords sont bien serrés pour éviter les fuites.
- Position the drain hose into a standpipe or over the edge of a sink, ensuring it is securely fastened to prevent dislodgement during draining.
4. Connexion électrique
Branchez le cordon d'alimentation à une prise électrique mise à la terre. N'utilisez pas de rallonges ni d'adaptateurs.
Mode d'emploi
1. Panneau de configuration terminéview
The control panel features a program selector dial, a digital display, and various function buttons for customizing your wash cycle.
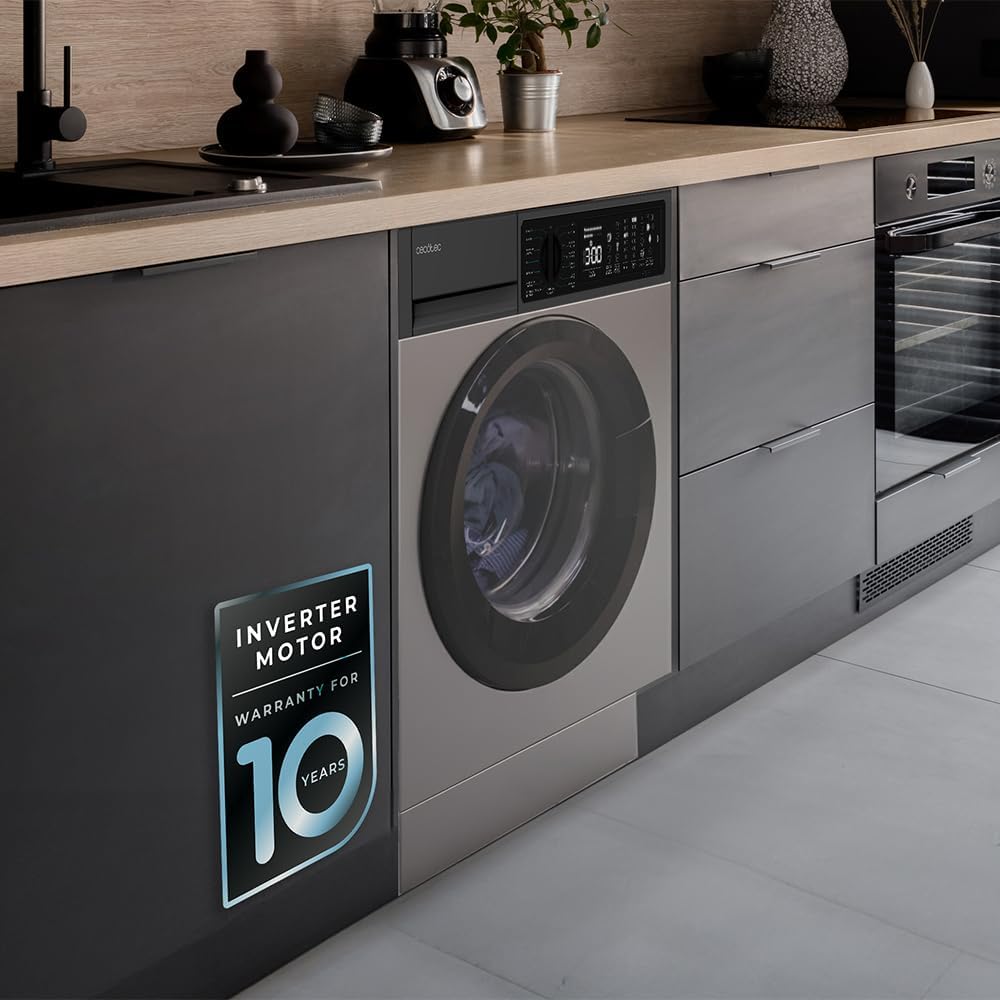
Figure 3 : Détaillé view of the control panel, showing the digital display, program options, temperature settings, and spin speeds.

Figure 4: The program selector dial allows you to choose from various wash cycles, including Jeans, Eco 40-60, Cotton, and specialized programs.
2. Chargement du linge
Open the washing machine door and load laundry, ensuring not to overload the drum. The maximum capacity for this model is 7 Kg. Distribute items evenly to prevent imbalance during spinning.

Figure 5: Prepare your laundry by sorting and placing it into the machine, ensuring the drum is not overfilled.
3. Ajout de détergent et d'adoucissant
Pull out the detergent dispenser drawer. Add the appropriate amount of detergent to the main wash compartment and softener to the designated compartment. Close the drawer gently.
4. Program Selection and Customization
Turn the program selector dial to choose one of the 15 available programs. Use the function buttons to adjust settings such as temperature, spin speed, and activate special features.
- Programmes disponibles : Jeans, Eco 40-60, Cotton, Cotton 20°C, Colors, Wool, Hand Wash, Spin/Drain, Anti-Allergy Care, Rinse, Express 15, Rapid 60', Dark/Wash, Mix, Sportswear.
- Contrôle de la température : Select from 20°C, 30°C, 40°C, 60°C, 90°C.
- Vitesse d'essorage: Choose from 400, 600, 800, 1000, 1200 rpm.
5. Fonctions spéciales
- SteamMax : This program uses added steam to penetrate fabrics, sterilizing and eliminating odors.
- Stain Match Plus: Select the type of stain and its intensity level (up to 3 levels) for optimized stain removal.
- Soins contre les allergies : Sterilizes laundry with steam at 99.9% before each wash, effective even in cold water, to remove germs and bacteria.
- Départ différé : Program the machine to finish a cycle at a specific time, allowing you to plan your laundry around your schedule.
- Rinçage supplémentaire: Adds an additional rinse cycle to ensure no detergent residue remains on clothes.
- Save+/Speed+: Options to either save energy (Save+) or reduce wash time (Speed+).

Figure 6: The Stain Match Plus feature targets specific stain types for effective cleaning.

Figure 7: The Allergy Care program ensures thorough sterilization, ideal for sensitive items like baby clothes.

Figure 8: Utilize Save+ for energy efficiency or Speed+ for quicker wash cycles, depending on your needs.
6. Début et fin d'un cycle
Press the Start/Pause button to begin the selected wash cycle. The digital display will show the remaining time. Once the cycle is complete, the machine will signal, and the door will unlock. Remove your laundry promptly.

Figure 9: The SteamMax function in action, enveloping laundry in steam for deep cleaning and odor removal.
Entretien
1. Nettoyage de l'extérieur
Essuyez les surfaces extérieures avec un chiffon doux, damp Chiffon. Évitez les nettoyants abrasifs ou les solvants qui pourraient endommager la finition.
2. Nettoyage du distributeur de détergent
Regularly remove and clean the detergent dispenser drawer to prevent residue buildup. Rinse it under running water and dry before reinserting.
3. Nettoyage du tambour
Effectuez périodiquement un cycle de lavage d'entretien (par exemple, un lavage à chaud sans linge et avec un agent détartrant) pour nettoyer le tambour et éliminer toute odeur ou résidu.

Figure 10: The textured stainless steel drum interior is designed for effective washing and should be cleaned regularly.
4. Nettoyage du filtre de vidange
Locate the drain filter, usually at the bottom front of the machine. Open the cover, drain any residual water, and carefully remove and clean the filter of lint and debris. Reassemble securely.
Dépannage
Avant de contacter le service client, veuillez consulter le tableau suivant pour connaître les problèmes courants et leurs solutions :
| Problème | Cause possible | Solution |
|---|---|---|
| La machine ne démarre pas | Pas d'alimentation ; porte non fermée ; programme non sélectionné. | Vérifiez le branchement électrique ; assurez-vous que la porte est bien verrouillée ; sélectionnez un programme et appuyez sur Démarrer. |
| L'eau ne se remplit pas | Robinet d'eau fermé ; tuyau d'arrivée d'eau plié ; pression d'eau trop faible. | Ouvrir le robinet d'eau ; Redresser le tuyau ; Vérifier la pression de l'eau du domicile. |
| L'eau ne s'écoule pas | Tuyau d'évacuation plié ou bouché ; filtre d'évacuation obstrué. | Vérifier et dégager le tuyau d'évacuation ; nettoyer le filtre d'évacuation. |
| Vibrations/bruit excessifs | Boulons de transport non retirés ; machine non nivelée ; charge inégale. | Retirer les boulons de transport ; Ajuster les pieds de nivellement ; Redistribuer le linge dans le tambour. |
| Résidus de détergent sur les vêtements | Too much detergent; Detergent dispenser clogged; Insufficient rinse. | Reduce detergent amount; Clean dispenser; Select Extra Rinse option. |
Caractéristiques
| Marque | Cecotec |
| Nom du modèle | Bolero Dresscode 750 Bi Inverter Steel A |
| Numéro de modèle | 00129 |
| Taper | Integrated Front-Load Washing Machine |
| Capacité | 7 kg |
| Vitesse d'essorage maximale | 1200 tr/min |
| Classe énergétique | A |
| Nombre de programmes | 15 |
| Caractéristiques spéciales | Inverter Motor, SteamMax, Stain Match Plus, Allergy Care, Delay Start, Extra Rinse, Auto Dose, High Efficiency, Temperature Control |
| Dimensions (L x P x H) | 60 cm x 55 cm x 82 cm (approximate, based on product image) |
| Matériel | Stainless Steel (drum interior), Steel (exterior finish) |
| Niveau de bruit | 74 dB (from energy label) |
| Consommation d'énergie | 47 kWh / 100 cycles (from energy label) |
| Consommation d'eau | 48 L / 100 cycles (from energy label) |

Figure 11: EU Energy Label for the Cecotec Bolero Dresscode Serie 50 Inverter A 7 Kg washing machine, indicating its energy efficiency and consumption details. For more details, visit the official EU EPREL database: https://eprel.ec.europa.eu/qr/2041690
Informations sur la garantie
Ce produit est livré avec une norme Garantie de 3 ans. The Inverter Motor specifically benefits from an extended Garantie de 10 ans, reflecting its durability and advanced technology.

Figure 12: The Inverter Motor is highlighted with a 10-year warranty, ensuring long-term performance and reliability.
Please retain your proof of purchase for warranty claims. The warranty covers manufacturing defects under normal household use.
Assistance clientèle
For further assistance, technical support, or warranty inquiries, please contact Cecotec customer service. You can find contact information on the official Cecotec websur le site ou auprès de votre détaillant.
If purchased via Amazon, you may also contact the seller directly: Boutique officielle Cecotec