JideTech 64H2UA
Manuel d'utilisation du commutateur KVM HDMI 4 ports JideTech
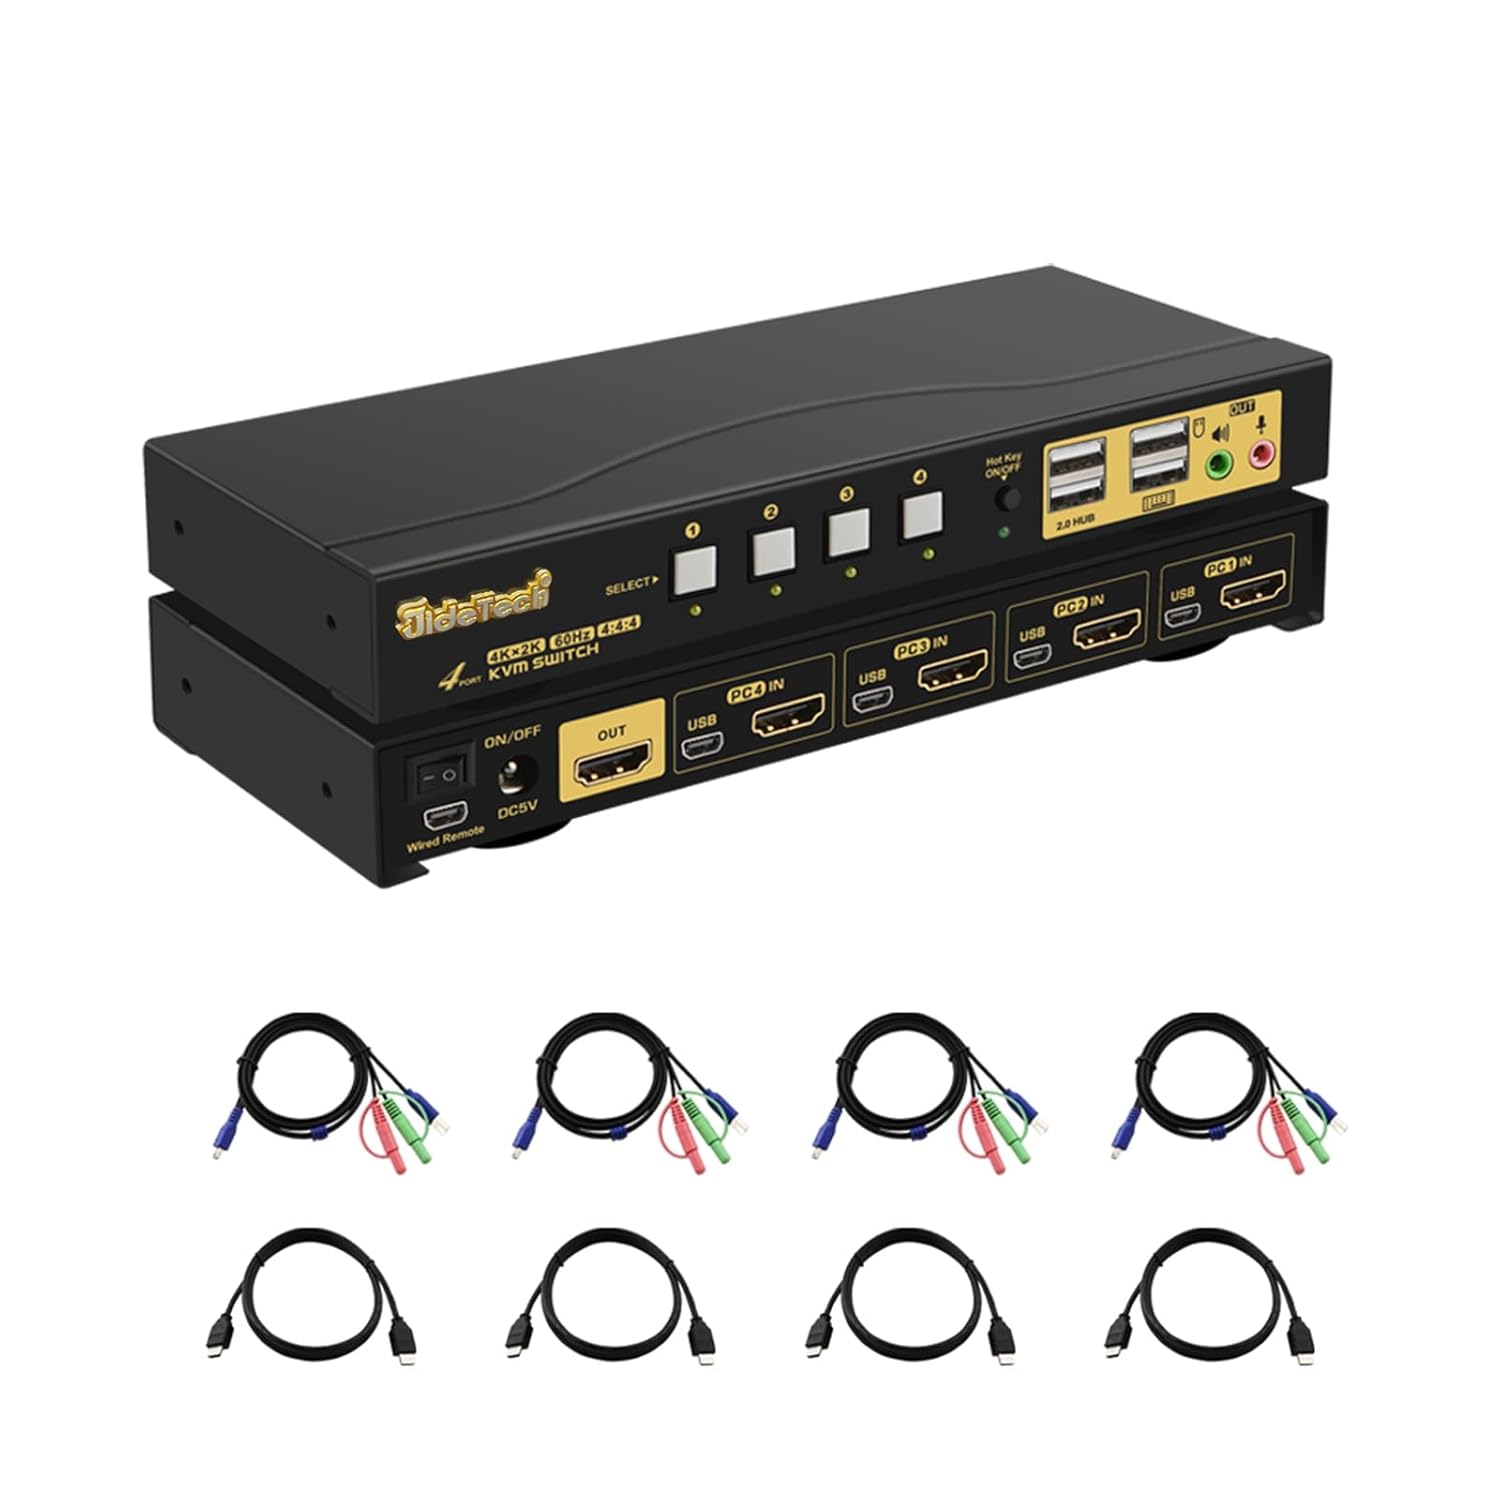
Model: 64H2UA
Marque : JideTech
1. Produit terminéview
The JideTech 4-Port HDMI KVM Switch allows you to control up to four HDMI-enabled computers or devices using a single set of USB keyboard, USB mouse, and HDMI monitor. It supports Ultra HD 4K@60Hz resolution, ensuring high-quality video output. This switch is designed to streamline your workspace by reducing cable clutter and simplifying multi-system management.
Caractéristiques principales :
- Supports 4 HDMI devices (PC, Servers, NVR, Game Consoles, AppleTV, etc.)
- Ultra HD 4K (4096x2160) @ 60Hz resolution support
- Compatible with HDMI 2.0, EDID, HDCP2.2, HDR10
- Integrated 2-port USB 2.0 hub for sharing peripherals (printers, scanners, USB drives)
- 3.5mm microphone and speaker ports for audio input/output
- Multiple switching methods: Front Panel Button, Wired Remote, Keyboard Hotkey, Mouse Switching
- Plug and Play functionality, driver-free for most operating systems
Contenu du colis :
- 1 x JideTech 4-Port HDMI KVM Switch
- 1 x Adaptateur secteur USB
- 4 câbles USB 3.0
- 4 câbles HDMI
- 1 x télécommande filaire
- 1 x Manuel d'utilisation (ce document)
2. Configuration et installation
Follow these steps to properly set up your KVM switch:
- Éteignez les appareils : Assurez-vous que tous les ordinateurs et le moniteur sont éteints avant d'effectuer toute connexion.
- Connecter le moniteur : Connect your HDMI monitor to the 'OUT' HDMI port on the KVM switch.
- Connexion des ordinateurs (HDMI) : Connect the HDMI output of each computer (PC1, PC2, PC3, PC4) to the corresponding 'PC IN' HDMI ports on the KVM switch.
- Connexion des ordinateurs (USB) : Connect the USB 3.0 cable from each computer's USB port to the corresponding 'USB IN' ports on the KVM switch. These cables transmit keyboard, mouse, and USB hub data.
- Connectez le clavier et la souris : Plug your USB keyboard and USB mouse into the dedicated keyboard and mouse USB ports on the front panel of the KVM switch.
- Connectez les périphériques USB : If desired, connect additional USB devices (e.g., printer, USB drive) to the '2.0 HUB' ports on the front panel.
- Connecter l'audio : Connect your speakers or headphones to the green audio output port and your microphone to the pink microphone input port on the front panel.
- Connecter l'alimentation : Plug the provided USB power adapter into the 'DC5V' port on the KVM switch and then into a power outlet.
- Mise sous tension : Power on the KVM switch using the 'ON/OFF' switch, then power on your monitor and computers.


3. Mode d'emploi
The JideTech KVM Switch offers multiple convenient ways to switch between connected computers:
3.1. Changement de mode

- Front Panel Button Switching:
Press the 'SELECT' buttons (1, 2, 3, 4) on the front panel of the KVM switch to directly switch to the corresponding computer input.

Figure 6: The Hotkey On/Off switch on the KVM. - Wired Remote Control Switching:
Use the included wired remote control to switch between inputs. Press the numbered buttons (1, 2, 3, 4) to select the desired computer. The 'AUTO' button can initiate an auto-scan function.
- Keyboard Hotkey Switching:
Ensure the 'Hot Key On/Off' switch on the front panel is in the 'ON' (green light) position. Use the following hotkey commands:
- Switch to PC1: Press CTRL droit deux fois, puis 1, alors Entrer.
- Switch to PC2: Press CTRL droit deux fois, puis 2, alors Entrer.
- Switch to PC3: Press CTRL droit deux fois, puis 3, alors Entrer.
- Switch to PC4: Press CTRL droit deux fois, puis 4, alors Entrer.
- Disable Beep Sound: Press CTRL droit deux fois, puis B, alors Entrer.
- Enable Loudspeaker (Audio): Press CTRL droit deux fois, puis P, alors Entrer.
Note: Hotkey functionality may vary with certain specialized keyboards (e.g., gaming or mechanical keyboards). If issues arise, try connecting the keyboard to a USB hub connected to the KVM's USB 2.0 hub port.
- Changement de souris :
Move the mouse cursor to the far right edge of the screen and quickly move it right again. This will switch to the next active input. Repeat to cycle through inputs.
3.2. Audio Capabilities
The KVM switch includes 3.5mm audio input and output ports, allowing you to share speakers and a microphone across all connected computers. Simply plug your audio devices into the corresponding ports on the front panel.

4. Entretien
To ensure the longevity and optimal performance of your JideTech KVM Switch, follow these maintenance guidelines:
- Nettoyage: Utilisez un chiffon doux et sec pour nettoyer l'extérieur du commutateur KVM. Évitez d'utiliser des nettoyants liquides ou des aérosols, qui pourraient endommager l'appareil.
- Ventilation: Veillez à placer le commutateur KVM dans un endroit bien ventilé afin d'éviter toute surchauffe. Ne bloquez aucune ouverture de ventilation.
- Gestion des câbles: Keep cables organized and untangled to prevent damage to ports and cables. Avoid excessive bending or pulling of cables.
- Alimentation: Always use the original power adapter provided with the KVM switch.
- Stockage: Si vous devez stocker l'appareil pendant une période prolongée, débranchez tous les câbles et rangez-le dans un endroit frais et sec.
5. Dépannage
Si vous rencontrez des problèmes avec votre commutateur KVM, veuillez consulter les problèmes et solutions courants suivants :
- Aucun affichage ou écran clignotant :
- Assurez-vous que tous les câbles HDMI sont correctement connectés à la fois au commutateur KVM et aux ordinateurs/moniteurs.
- Vérifiez que le commutateur KVM est sous tension.
- Try using different HDMI cables, especially if they are not the ones provided.
- Check the display resolution settings on your computers. Ensure they are compatible with 4K@60Hz or a supported lower resolution.
- Power cycle the KVM switch and all connected devices.
- Keyboard or Mouse Unresponsive:
- Ensure the keyboard and mouse are plugged into the dedicated USB ports on the front panel.
- Try unplugging and replugging the keyboard/mouse.
- If using a specialized keyboard/mouse (e.g., gaming, mechanical, or wireless with a dongle), connect them to a powered USB 2.0 hub, then connect the hub to one of the KVM's '2.0 HUB' ports.
- Assurez-vous que les câbles USB 3.0 reliant les ordinateurs au KVM sont correctement connectés.
- Disable hotkey switching if it interferes with your specific keyboard/mouse.
- Aucun son ou son déformé :
- Check that speakers/headphones and microphone are correctly plugged into the 3.5mm audio ports.
- Vérifiez les paramètres de sortie audio de votre ordinateur.
- Ensure the 'Loudspeaker' hotkey (Right CTRL twice, then P, then Enter) is enabled if needed.
- Loud Beep Sound When Switching:
- The beep sound can be disabled using the hotkey command: Press CTRL droit deux fois, puis B, alors Entrer.
- Auto-Scan Not Working:
- Ensure all connected computers are powered on and sending a video signal.
- Check the wired remote control connection.
If the problem persists after trying these solutions, please contact JideTech customer support for further assistance.
6. Spécifications
| Fonctionnalité | Description |
|---|---|
| Numéro de modèle | 64H2UA |
| Dimensions du produit | 2.95 x 0.97 x 8.07 pouces |
| Poids | 2.93 livres |
| Résolution vidéo | Up to 4096x2160@60Hz (4K@60Hz) |
| Norme HDMI | HDMI 2.0 |
| Prise en charge HDCP | HDCP 2.2 |
| Prise en charge HDR | HDR10 |
| Ports USB | 2 x USB 2.0 Hub, Dedicated Keyboard/Mouse USB ports |
| Ports audio | Sortie audio stéréo 3.5 mm, entrée microphone 3.5 mm |
| Méthodes de commutation | Front Panel Button, Wired Remote, Keyboard Hotkey, Mouse Switching |
| Vol d'exploitationtage | 5 volts |
| Systèmes d'exploitation compatibles | Windows 10/7/2000/XP/Vista, Linux, Mac, Debian, Ubuntu, Fedora, Raspbian, etc. |


7. Garantie et assistance
For warranty information and technical support, please refer to the official JideTech webVous pouvez consulter le site web ou contacter directement le service client du fabricant. Les informations relatives à l'enregistrement du produit, aux demandes de garantie et à l'assistance technique sont généralement disponibles sur les pages d'assistance du fabricant.
Coordonnées: S'il vous plaît visitez le JideTech Store on Amazon ou leur représentant website pour obtenir les coordonnées de contact du service d'assistance les plus récentes.
Ask a question about this manual
Ask about setup, troubleshooting, compatibility, parts, safety, or missing instructions. Manuals+ will review the question and use this page’s manual context to help answer it.