1. Introduction
This manual provides comprehensive instructions for the CEYOMUR CY60 Trail Camera. This device is designed for capturing high-resolution photos and videos of wildlife, offering features such as 4K video recording, 36MP photo resolution, infrared night vision, and IP66 waterproof rating. Please read this manual thoroughly before operating the camera to ensure proper usage and optimal performance.
2. Contenu du colis
Vérifiez que tous les éléments énumérés ci-dessous sont inclus dans votre colis :
- 1 x Caméra de chasse CEYOMUR CY60
- 1 x câble USB
- 1 x Courroie de montage
- 1 x support de montage réglable
- 1 x Manuel d'utilisation

Image: Contents of the CEYOMUR CY60 Trail Camera package, showing the camera, USB cable, mounting strap, and user manual.
3. Caméra terminéeview
Familiarize yourself with the main components of your CEYOMUR CY60 Trail Camera.

Image : Avant view of the CEYOMUR CY60 Trail Camera, highlighting the lens, PIR sensors, and infrared LEDs.

Image: The CEYOMUR CY60 Trail Camera with its front casing open, revealing the internal LCD screen, control buttons, and SD card slot.
4. Installation
4.1 Installation de la batterie
The camera requires 8 AA batteries (not included). For optimal performance and extended battery life, especially in cold conditions, it is recommended to use high-quality alkaline or rechargeable AA batteries.
- Ouvrez le c de la caméraasing.
- Repérez le compartiment à piles au bas de l'appareil photo.
- Insérez 8 piles AA en veillant à respecter la polarité (+/-) indiquée à l'intérieur du compartiment.
- Fermez soigneusement le compartiment à piles.
4.2 Installation de la carte SD
A Micro SD card (up to 32GB, not included) is required to store photos and videos. Ensure the card is formatted before first use.
- Avec la caméra casinOuvrez le boîtier et repérez l'emplacement pour carte SD sur le côté.
- Insérez la carte Micro SD dans son emplacement jusqu'à ce qu'elle s'enclenche.
- Pour la retirer, appuyez doucement sur la carte jusqu'à ce qu'elle se détache.
Image : Un gros plan view of the CEYOMUR CY60 Trail Camera's side, indicating the SD card slot and the external power port for convenient access.
4.3 Montage de la caméra
The camera can be mounted using the included strap or the adjustable mounting bracket.
- Fixation par sangle : Passez la sangle de fixation dans les fentes à l'arrière de l'appareil photo et fixez-la autour d'un arbre ou d'un poteau.
- Support de montage : Attach the adjustable mounting bracket to a wall or flat surface using screws (not included). Then, secure the camera to the bracket.

Image: The CEYOMUR CY60 Trail Camera securely mounted to a tree trunk using the provided strap, demonstrating its outdoor placement.

Image: The CEYOMUR CY60 Trail Camera camouflaged against a tree, illustrating its discreet design for wildlife observation.
5. Mode d'emploi
5.1 Mise sous tension et paramètres de base
- Ouvrez la caméra casing.
- Slide the power switch from OFF to SETUP. The LCD screen will turn on.
- Use the navigation buttons (UP, DOWN, LEFT, RIGHT, OK) to access the menu.
- Navigate to "Date/Time" to set the current date and time. This is crucial for accurate timestamps sur vos enregistrements.
- Format the SD card through the menu option to ensure compatibility and clear any previous data.
Modes de fonctionnement 5.2
L'appareil photo propose trois modes de fonctionnement principaux :
- Mode photo: Capture des images fixes lorsqu'elle est déclenchée.
- Mode vidéo : Enregistre les clips vidéo lorsqu'ils sont déclenchés.
- Mode photo + vidéo : Capture une image fixe suivie d'un clip vidéo lorsqu'elle est déclenchée.
Select your desired mode from the camera's menu settings.
5.3 PIR Sensor and Trigger Settings
The Passive Infrared (PIR) sensor detects motion and triggers the camera. The CY60 features a 120° detection angle with a central 60° sensor and two side 30° sensors.
- Sensibilité PIR: Adjust sensitivity (Low, Medium, High) based on the environment to prevent false triggers or missed events.
- Intervalle PIR : Set the delay between consecutive triggers to avoid capturing too many redundant images/videos of the same event.
- Vitesse de déclenchement : The camera boasts an ultra-fast 0.2-second trigger speed to capture fast-moving subjects.

Image: A visual representation of the CEYOMUR CY60 Trail Camera's 120-degree detection angle, showing the coverage area of its PIR sensors.

Image: A cheetah in mid-leap, overlaid with a target reticle, illustrating the camera's ultra-fast 0.2-second trigger speed for capturing dynamic wildlife moments.
5.4 Vision nocturne
The camera utilizes 36 low-glow 850nm infrared LEDs for night vision, providing clear black and white images and videos in low-light conditions without disturbing wildlife.

Image: A split image demonstrating the camera's capability, showing a red panda in full color during the day and the same scene in clear black and white using infrared night vision.
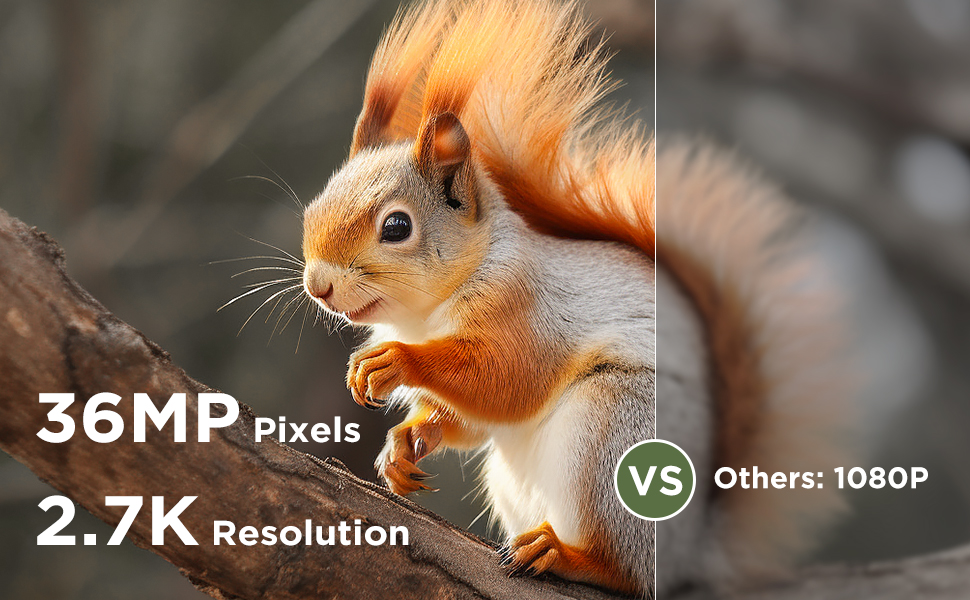
Image: A comparison illustrating the effectiveness of 940nm No Glow infrared LEDs for discreet night vision, showing two fawns undisturbed in their natural habitat.
5.5 ViewMédias
Tu peux view captured photos and videos directly on the camera's LCD screen or by connecting the camera to a computer using the provided USB cable. Alternatively, remove the SD card and insert it into a compatible card reader.
6. Entretien
6.1 Nettoyage
To maintain optimal performance, regularly clean the camera lens and the PIR sensors with a soft, dry cloth. Avoid using abrasive cleaners or solvents.
If condensation appears on the lens, open the camera casing to allow it to air dry in a dry environment.
6.2 Résistance à l'eau
The CEYOMUR CY60 is rated IP66 waterproof, providing protection against dust and strong jets of water. Ensure the casing is securely closed and the rubber seal is free of debris to maintain its water resistance.
6.3 Gestion de la batterie et de la carte SD
Replace batteries when the low battery indicator appears on the screen. Regularly check the SD card for available space and transfer important filese connecter à un ordinateur pour éviter toute perte de données.
7. Dépannage
- La caméra ne s'allume pas :
Ensure batteries are inserted correctly with the right polarity and are fully charged. Check if the power switch is in the 'SETUP' or 'ON' position.
- Aucune photo ni vidéo n'a été capturée :
Verify that the SD card is properly inserted and has sufficient free space. Check PIR sensitivity settings; increase if necessary. Ensure the camera is in the correct operating mode (Photo, Video, or Photo+Video). Confirm that the PIR interval is not set too long.
- Mauvaise vision nocturne :
Ensure the camera lens and IR LEDs are clean and unobstructed. Check battery levels, as low power can affect IR performance.
- Autonomie courte de la batterie :
Using high-quality alkaline or rechargeable batteries is recommended. Frequent video recording, especially at night, consumes more power. Reduce PIR sensitivity or interval if excessive triggers occur.
- Condensation on lens:
Ouvrez la caméra casing and allow it to dry in a warm, dry environment. Ensure the rubber seal is clean and the casing is securely closed to prevent moisture ingress.
8. Spécifications
| Fonctionnalité | Spécification |
|---|---|
| Numéro de modèle | CY60 |
| Résolution photo | 36MP (Upgraded from 30MP) |
| Résolution vidéo | 4K (2160p) 30fps |
| Angle de détection | 120 degrees (60° central PIR + two 30° side PIRs) |
| Vitesse de déclenchement | 0.2 secondes |
| Vision nocturne | 36 x 850nm Low-Glow IR LEDs |
| Résistance à l'eau | IP66 |
| Source d'énergie | 8 x AA Batteries (6V DC) |
| Stockage | Carte Micro SD jusqu'à 32GB |
| Dimensions (L x l x H) | 14.7 x 10.4 x 8 cm |
| Matériel | Caoutchouc |
| Connectivité | Wired IR, USB |
9. Garantie et assistance
La caméra de chasse CEYOMUR CY60 est livrée avec un Garantie constructeur d'un an.
For technical support, troubleshooting assistance, or warranty claims, please contact CEYOMUR customer service. Refer to the contact information provided on the product packaging or the official CEYOMUR website.