1. Introduction
This manual provides detailed instructions for the safe and efficient installation, operation, and maintenance of the VENTS-US VKM 150 Metal Inline Duct Fan. The VKM 150 is a centrifugal impeller fan designed for boosting airflow in 6-inch ducts, suitable for various ventilation applications including bathrooms, kitchens, living areas, workshops, and warehouses. Please read this manual thoroughly before installation and operation.
2. Consignes de sécurité
Respectez toujours les consignes de sécurité suivantes afin de réduire les risques d'incendie, d'électrocution ou de blessure :
- Débranchez l'alimentation avant l'entretien ou le nettoyage.
- Installation must comply with all local electrical and safety codes.
- N’utilisez pas ce ventilateur avec un dispositif de contrôle de vitesse à semi-conducteurs, sauf s’il a été spécifiquement conçu à cet effet.
- Assurez une mise à la terre appropriée pour réduire le risque de choc électrique.
- Mount the unit with the lowest moving parts at least 8 feet (2.5 meters) above the floor or grade level.
- Install behind shutters for protection from rain if used in an exposed location.
- This fan is designed for indoor usage only.
3. Contenu du colis
Vérifiez que tous les composants sont présents et non endommagés :
- VENTS-US VKM 150 Inline Duct Fan
- Supports de montage
- Cordon d'alimentation
- Manuel d'instructions (ce document)
4. Produit terminéview
The VKM 150 is a robust metal inline duct fan featuring a centrifugal impeller for high static pressure applications. Its durable polymer-coated steel housing ensures longevity, and the permanently lubricated ball bearing motor provides maintenance-free operation.

Figure 4.1 : Face avant view of the VENTS-US VKM 150 Metal Inline Duct Fan, showcasing its blue housing and power connection box.

Figure 4.2 : Arrière view of the VKM 150 fan, showing the internal impeller and mounting bracket attachment points.
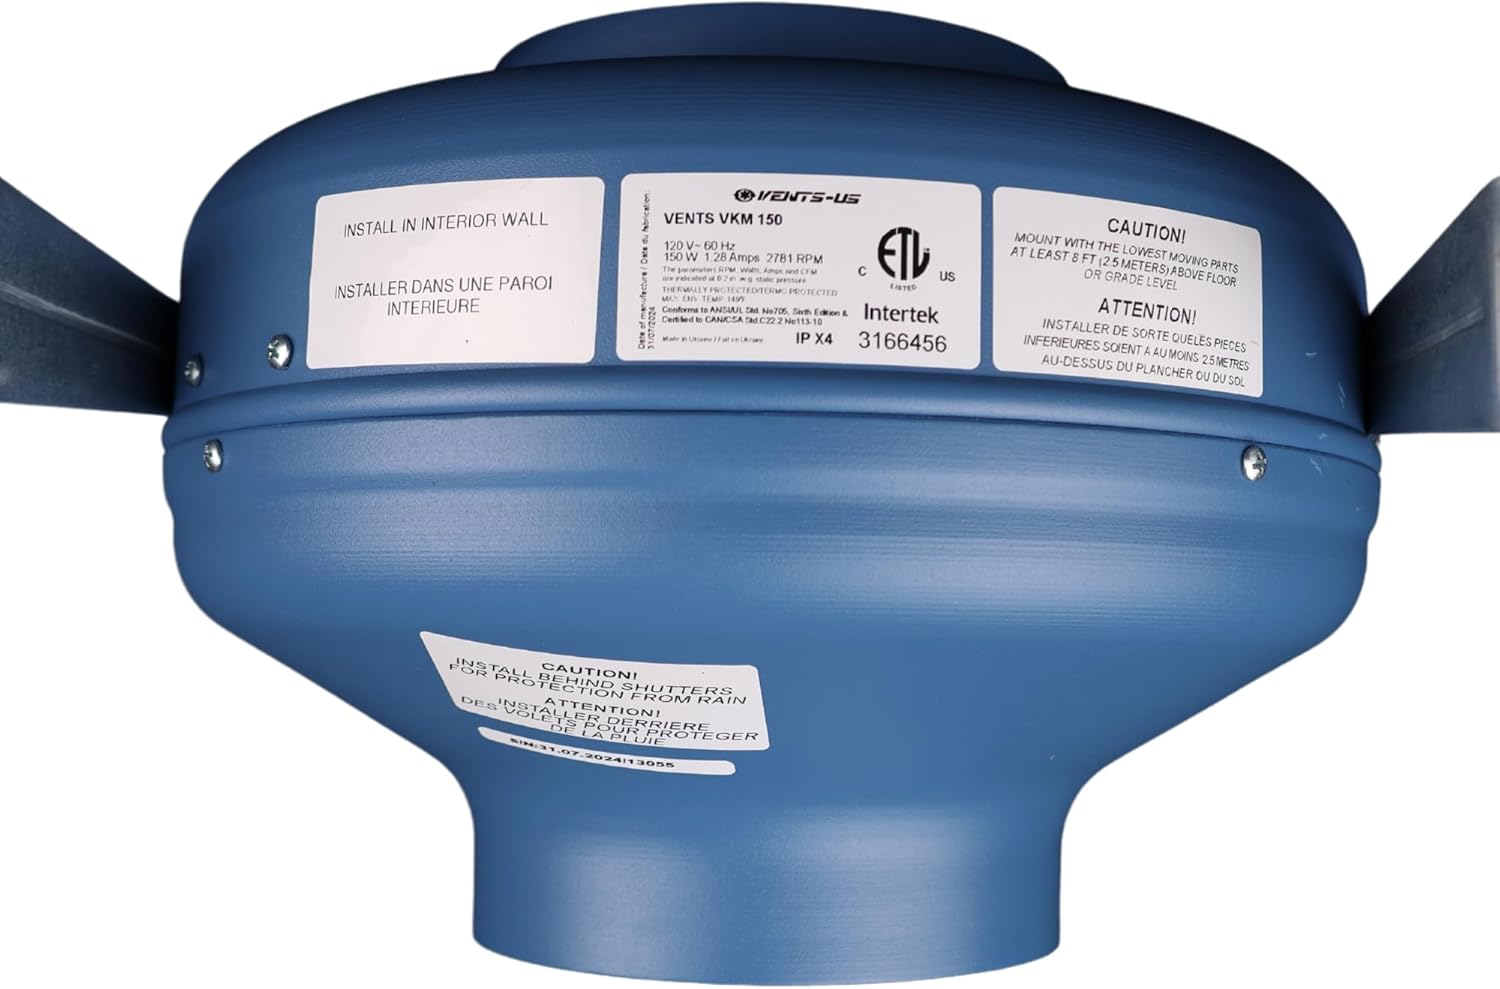
Figure 4.3 : Haut view of the VKM 150 fan, displaying product labels with electrical specifications and safety warnings.

Figure 4.4 : Gros plan latéral view of the electrical connection box on the VKM 150 fan.

Figure 4.5 : Angulaire view of the VKM 150 fan, showing the pre-wired power cord and mounting brackets.
Vidéo 4.1 : Terminéview of the VKM Inline Centrifugal Metal Fan Series, highlighting its features and applications.
5. Spécifications
| Fonctionnalité | Spécification |
|---|---|
| Nom du modèle | VKM 150 |
| Marque | ÉVENTS-US |
| Diamètre du conduit | 6 pouces |
| Capacité de débit d'air | 460 CFM (at 0" static pressure) / 422 CFM (at 0.2" static pressure) |
| Quoitage | 152 watts |
| Voltage | 120 volts |
| Vitesse | 3287 tr/min |
| Niveau de bruit | 3.2 sons |
| Type de moteur | Single-phase external rotor motor with backward curved centrifugal impellers, permanently lubricated ball bearings |
| Matériau du boîtier | Acier revêtu de polymère |
| Dimensions du produit | 8.69"P x 13.75"L x 11.94"H |
| Poids de l'article | 12.07 livres |
| Type d'installation | En ligne |
| Utilisation intérieure/extérieure | Intérieur |
| Certification | ETL |

Figure 5.1: Dimensional drawing of the VKM 150 fan, showing key measurements for installation planning.
6. Configuration et installation
The VKM 150 fan is designed for straightforward installation in 6-inch ducting. It comes pre-wired with a power cord and includes mounting brackets for convenience.
6.1 Montage du ventilateur
- Sélectionnez l'emplacement: Choose a suitable location within your duct system. Ensure there is enough space for the fan and access for future maintenance. Remember to mount the fan with the lowest moving parts at least 8 feet (2.5 meters) above the floor or grade level.
- Fixer les supports : Secure the included mounting brackets to a stable surface (e.g., ceiling joist, wall stud) using appropriate fasteners (not included).
- Position du ventilateur : Place the fan onto the mounting brackets and secure it firmly.
6.2 Raccordement des conduits
- Raccordement des conduits : Connect the 6-inch ductwork to both inlet and outlet ports of the fan.
- Connexions sécurisées : Use duct clamps or aluminum tape to create airtight seals at all connections. This prevents air leakage and ensures optimal performance.
6.3 Connexion électrique
- Éteindre: Ensure the main power supply to the installation area is turned off at the circuit breaker before making any electrical connections.
- Brancher: The VKM 150 comes with a pre-wired power cord. Plug the power cord into a standard 120V AC outlet.
- Vérifier la mise à la terre : Confirm that the outlet provides proper grounding.
Note: All electrical work should be performed by a qualified electrician and comply with local codes.
7. Mode d'emploi
The VKM 150 fan operates at a single speed. Once properly installed and connected to power, it is ready for operation.
- Mise sous tension : Rétablir l'alimentation électrique du circuit au niveau du disjoncteur.
- Activer le ventilateur : If connected to a wall switch or other control device, turn it on to activate the fan.
- Vérifier l'opération : Listen for the fan to start and feel for airflow through the duct system.
The fan is designed for continuous operation in appropriate environments. Control methods can include a simple on/off switch or more advanced app-based controls if integrated into a smart home system (requires compatible third-party devices, not included).
8. Entretien
The VKM 150 fan features a permanently lubricated ball bearing motor, requiring minimal maintenance. However, periodic cleaning is recommended to ensure optimal performance and longevity.
8.1 Consignes de nettoyage
- Débrancher l'alimentation : AVERTISSEMENT: Always disconnect power to the fan at the circuit breaker before attempting any cleaning or maintenance.
- Turbine d'accès : Carefully remove any duct connections to access the fan's impeller.
- Nettoyer la turbine et le carter : Use a soft brush or vacuum cleaner to remove dust and debris from the impeller blades and the interior of the fan housing. Avoid using harsh chemicals or abrasive materials.
- Remonter: Reconnect ducting and ensure all connections are secure before restoring power.
Fréquence: Cleaning frequency depends on the operating environment. In dusty or greasy environments, more frequent cleaning may be necessary.
9. Dépannage
If you experience issues with your VKM 150 fan, consult the following table before contacting support.
| Problème | Cause possible | Solution |
|---|---|---|
| Le ventilateur ne s'allume pas. | Pas d'alimentation électrique. Faulty switch/control. Câblage lâche. | Vérifiez le disjoncteur. Test switch/control. Vérifiez les connexions électriques (assurez-vous que l'alimentation est coupée). |
| Débit d'air réduit. | Clogged impeller/ducts. Duct leakage. Dimension du conduit incorrecte. | Clean impeller and ducts. Seal all duct connections. Ensure 6-inch ducting is used. |
| Bruit ou vibration excessif. | Montage lâche. Débris dans la roue. Roue endommagée. | Serrer les fixations. Nettoyer la roue. Contact VENTS-US support if impeller is damaged. |
| Fan runs intermittently. | Overheating (thermal overload). Connexion électrique desserrée. | Ensure adequate ventilation around the fan. Vérifiez les connexions électriques (coupez le courant). |
10. Garantie et assistance
VENTS-US products are manufactured to high-quality standards. For specific warranty details, please refer to the warranty card included with your product or visit the official VENTS-US website. If you require technical assistance or have questions not covered in this manual, please contact VENTS-US customer support.
VENTS-US Contact Information:
- Website: Visit the VENTS Store on Amazon
- Service client: Refer to your product packaging or the VENTS-US website pour les coordonnées les plus récentes.