GEEKVAPE Aegis Mini 2 (M100)
Manuel d'utilisation du kit GeekVape M100 Aegis Mini 2
Model: Aegis Mini 2 (M100) | Brand: GEEKVAPE
1. Introduction
Welcome to the user manual for your GeekVape M100 Aegis Mini 2 Kit. This device is a powerful and durable e-cigarette vaporizer designed for an optimal vaping experience. It features a robust 2500mAh internal battery, capable of delivering up to 100W of power, and is paired with the GeekVape Z Nano 2 Tank, compatible with GeekVape B Series Coils.
The M100 Aegis Mini 2 is built with advanced durability, boasting an IP68 rating for water and dust resistance, along with innovative shock resistance. Its A-lock design prevents accidental firing, ensuring a stable and safe output. The device also features a clear 1.08-inch full screen display for easy operation and monitoring.
Remarque importante sur la sécurité : This product does not contain nicotine or tobacco. Sale is prohibited to persons under 18 years of age. By ordering this product, you certify that you are over 18 years old.
2. Contenu du colis
Veuillez cocher la case correspondant aux éléments suivants :
- 1 x GeekVape M100 Aegis Mini 2 Mod
- 1 x GeekVape Z Nano 2 Tank (3.5ml)
- 1 x GeekVape B Series 0.2ohm Coil (Pre-installed)
- 1 x GeekVape B Series 0.6ohm Coil (Spare)
- 1 x Drip Tip
- 1 x outil à bobine
- 1 x Spare Parts Pack
- 1 x Spare Glass Tube
- 1 x câble USB Type-C

Image: The GeekVape M100 Aegis Mini 2 Kit, its packaging, and all included accessories laid out.
3. Produit terminéview
Familiarize yourself with the main components of your GeekVape M100 Aegis Mini 2 Kit.

Image : Avant view of the assembled GeekVape M100 Aegis Mini 2 Kit in classic black.
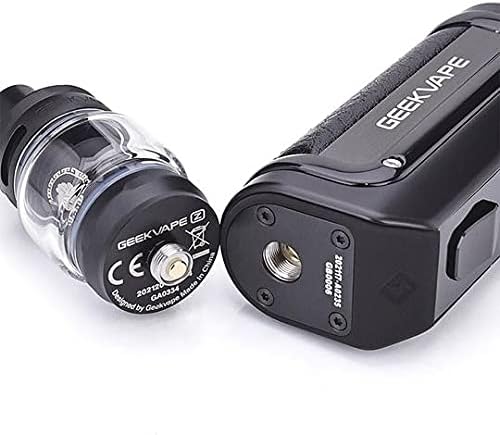
Image : Gros plan view of the 510 connection point on the mod and the base of the Z Nano 2 Tank.

Image : Une image détaillée view of the 1.08-inch full screen display showing power, resistance, amprage, voltage, and puff counter.

Image: Several GeekVape B Series Coils, highlighting their mesh design and resistance markings.
4. Guide de configuration
4.1. Installation de la bobine
- Unscrew the base of the Z Nano 2 Tank from the main tank section.
- Carefully push the GeekVape B Series Coil into the designated slot in the tank base. Ensure it is seated firmly.
- Amorcer la bobine : Before reassembling, apply a few drops of e-liquid to the cotton wicking ports of the new coil. This saturates the cotton and prevents dry hits.
- Screw the tank base back onto the tank section.
4.2. Filling the E-liquid
- Locate the top cap of the Z Nano 2 Tank.
- Twist the top cap a quarter turn counter-clockwise to remove it, revealing the fill ports.
- Insert the nozzle of your e-liquid bottle into one of the fill ports (avoid the center airflow hole).
- Slowly fill the tank with e-liquid up to the maximum fill line.
- Replace the top cap by aligning it and twisting clockwise until secure.
- Important: After filling a new coil, let the tank stand upright for at least 5-10 minutes to allow the e-liquid to fully saturate the coil. This prevents burning the coil.
4.3. Chargement de l'appareil
- Locate the Type-C charging port on the side of the M100 Mod, usually protected by a silicone flap.
- Open the silicone flap.
- Connect the provided USB Type-C cable to the device and the other end to a 5V/2A wall adapter or a compatible USB port.
- The screen will display the charging status. The battery icon will indicate charging progress.
- Once fully charged, disconnect the cable and close the silicone flap to maintain IP68 rating.

Image: Close-up of the GeekVape M100 Mod showing the Type-C charging port with its protective cover open.
5. Mode d'emploi
5.1. Marche/Arrêt
- Pour tourner l'appareil ON: Press the fire button 5 times rapidly within 2 seconds. The screen will light up.
- Pour tourner l'appareil DÉSACTIVÉ: Press the fire button 5 times rapidly within 2 seconds. The screen will display "System Off".
5.2. Réglage de l'eautage
- Once the device is on, use the "+" et "-" adjustment buttons located below the screen to increase or decrease the wattage.
- Le wattage range is typically 5W to 100W. Adjust according to your coil's recommended wattage range for optimal performance and coil longevity.
5.3. A-Lock Function
- The M100 features an A-lock switch on the side of the device.
- Faites glisser l'interrupteur vers le bas to lock the device, preventing accidental presses and firing. This is useful when carrying the device in a pocket or bag.
- Faites glisser l'interrupteur up to unlock the device and resume normal operation.
5.4. Vapoter
- With the tank filled and coil primed, and the device powered on and unlocked, press and hold the fire button while inhaling from the drip tip.
- Relâchez le bouton de tir lorsque vous avez fini d'inhaler.
6. Entretien
6.1. Remplacement de la bobine
- Coils typically need to be replaced every 1-2 weeks, depending on usage and e-liquid type.
- A burnt taste, reduced vapor production, or diminished flavor are signs that the coil needs replacement.
- Follow the steps in Section 4.1 to replace the coil.
6.2. Nettoyage du réservoir
- To clean the tank, disassemble it by removing the top cap, glass tube, and coil.
- Rinse all components (except the coil) with warm water. For a deeper clean, use a mild dish soap and rinse thoroughly.
- Assurez-vous que toutes les pièces sont complètement sèches avant de les remonter.
6.3. Nettoyage de l'appareil
- Wipe the mod body with a soft, damp cloth to remove any dust or e-liquid residue.
- Veillez à ce que le port de chargement soit propre et exempt de débris.
- Do not submerge the entire device in water, despite its IP68 rating, unless specifically instructed for cleaning. The rating is for accidental exposure.
7. Dépannage
| Problème | Cause possible | Solution |
|---|---|---|
| L'appareil ne s'allume pas | Low battery; Device off; Faulty device | Charge the device; Press fire button 5 times rapidly; Contact support if issue persists. |
| Aucune production de vapeur | Coil not installed correctly; No e-liquid; Low battery; Wattage too low; Coil burnt out | Ensure coil is seated; Fill tank; Charge device; Increase wattage; Replace coil. |
| Goût de brûlé | Coil not primed; Coil burnt out; E-liquid level too low; Wattage trop haut | Prime new coil; Replace coil; Refill tank; Reduce wattage. |
| E-liquid leaking from tank | Coil not installed correctly; O-rings damaged/missing; Tank overfilled; Airflow not closed during filling | Reinstall coil; Check/replace O-rings; Do not overfill; Ensure top cap is secure. |
| "Atomizer Short" or "No Atomizer" error | Coil not making contact; Faulty coil; Tank not screwed on properly | Reseat coil; Try a new coil; Ensure tank is screwed on firmly but not overtightened. |
8. Spécifications
| Fonctionnalité | Détail |
|---|---|
| Marque | GEEKVAPE |
| Modèle | Aegis Mini 2 (M100) Kit |
| Couleur | Classic Black (Noir Classique) |
| Dimensions (L x l x H) | 30 x 10 x 70 mm (approximate for mod) |
| Poids | 100 grammes (environ) |
| Capacité de la batterie | 2500 mAh (Internal) |
| Puissance de sortietage | 100 watts maximum |
| Port de chargement | Type C, 5 V/2 A |
| Volume du réservoir | 3.5 Milliliters (Z Nano 2 Tank) |
| Compatibilité des bobines | GeekVape B Series Coils |
| Écran d'affichage | 1.08 inch Full Screen |
| Indice de durabilité | IP68 Water & Dust Resistance, Shock Resistance |
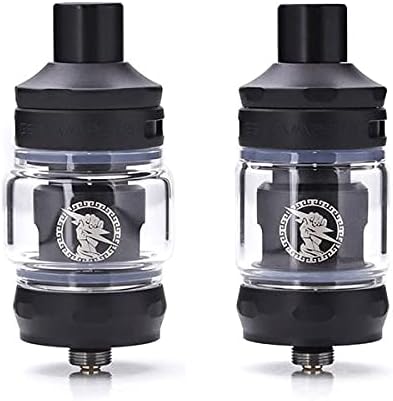
Image: The GeekVape M100 Aegis Mini 2 Kit being splashed with water, illustrating its IP68 water resistance.
9. Consignes de sécurité
Please read and adhere to the following safety guidelines to ensure safe operation of your device:
- Keep the device away from extreme temperatures, direct sunlight, and moisture (beyond its IP68 rating).
- N'utilisez pas de batteries ou de chargeurs endommagés.
- Do not disassemble the device beyond what is instructed in this manual.
- Tenir hors de portée des enfants et des animaux domestiques.
- Use only genuine GeekVape coils and accessories.
- Mettez au rebut l'appareil et ses composants de manière responsable, conformément à la réglementation locale.
- Ce produit est destiné exclusivement aux fumeurs et vapoteurs adultes.
10. Garantie et assistance
For warranty information and customer support, please refer to the warranty card included in your package or visit the official GEEKVAPE website. If you encounter any issues not covered in this manual, please contact the retailer or manufacturer's customer service for assistance.
Veuillez conserver votre preuve d'achat pour toute réclamation au titre de la garantie.