1. Produit terminéview
The KIMAFUN KM-G150-T1R4 is a professional 2.4G wireless in-ear monitor (IEM) system designed for musicians, bands, and performers. It provides stable, high-fidelity audio monitoring with low latency, ensuring clear sound during rehearsals and live performances. The system includes one transmitter and four receivers, allowing for a 'one-to-many' setup.
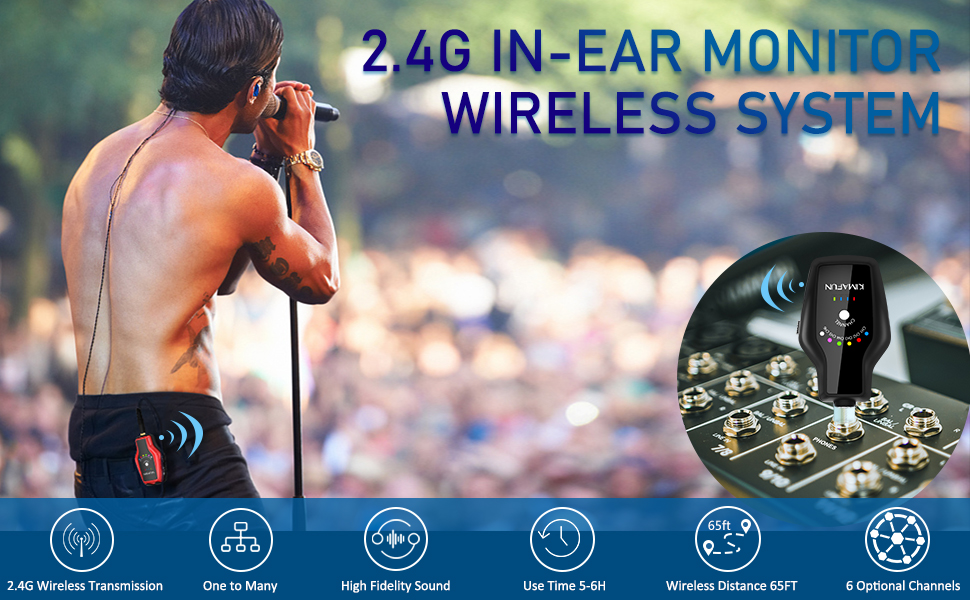
Image: A guitarist using the KIMAFUN 2.4G Wireless In-Ear Monitor System, with the transmitter connected to an amplifier and the receiver clipped to his belt.
2. Contenu du colis
Vérifiez que tous les éléments énumérés ci-dessous sont inclus dans votre colis :
- 1 × émetteur
- 4 × récepteur
- 4 × Écouteurs intra-auriculaires
- Adaptateur mono 2 × 6.35 mm
- Adaptateur stéréo 1 × 6.35 mm
- 1 × Câble adaptateur de transmission
- 2 × Câble adaptateur de réception
- 1 × Câble de chargement (USB-C)
- 4 × 3 paires d'embouts auriculaires (S, M, L)
- 1 × sac de transport

Image: All components of the KIMAFUN KM-G150-T1R4 system laid out, including transmitter, receivers, earphones, various cables, adapters, eartips, and a carrying bag.
3. Guide de configuration
3.1 Identification des composants

Image: Labeled diagrams of the receiver and transmitter, highlighting features like the 1/8" earphone socket, channel indicator, channel switch button, power display, power on/off, volume buttons, Type-C charging port, and belt clip.
3.2 Connexion de l'émetteur
- Connect the transmitter (black unit) to your audio source (e.g., mixer, guitar amplifier, PA system) using the appropriate 1/8" jack or 1/4" adapter.
- Ensure the audio source's output is set to a suitable level.
3.3 Connecting the Receivers and Earphones
- Plug the monitor earphones into the 1/8" earphone socket on each receiver (red units).
- Adjust the eartips for a comfortable and secure fit. The ergonomically shaped 45-degree angle earbuds provide excellent noise reduction.
- Clip the receivers to your belt or clothing for convenience.

Image: Connection diagrams for the transmitter to mixers, sound cards, and guitar amps, and receiver connection to speakers for monitoring.
4. Mode d'emploi
4.1 Mise sous/hors tension
- Press and hold the Power On/Off button on both the transmitter and receivers to turn them on or off.
- The power display LEDs will indicate the battery level.
4.2 Sélection et appariement des canaux
- The system features 6 built-in channels. To switch channels, press the Channel Switch Button on both the transmitter and receivers.
- Ensure the transmitter and all desired receivers are set to the same channel for proper pairing and audio transmission.
- One transmitter can connect to multiple receivers simultaneously, as long as they are on the same channel.

Image: A visual representation of the 'one to many' functionality, with a single transmitter sending audio to several receivers, each connected to a musician.
4.3 Contrôle du volume
- Each receiver has independent volume control via the '+' and '-' buttons. Adjust the volume to your preferred listening level.
4.4 Wireless Range and Stability
- The 2.4G wireless transmission offers high signal stability and anti-interference capabilities.
- The wireless transmission distance can reach 50-65 feet (15-20 meters) in line of sight.

Image: A visual depiction of the system's range, with a transmitter and receiver maintaining connection over distances up to 65 feet.
5. Entretien et recharge
5.1 Chargement des unités
- Both the transmitter and receivers have built-in rechargeable lithium batteries.
- Use the provided USB-C charging cable to charge the units.
- Une charge complète prend environ 2 heures et offre plus de 6 heures d'utilisation continue.

Image: The transmitter and receiver units connected to a USB-C charging cable, illustrating the charging process and battery life.
5.2 Nettoyage et stockage
- Wipe the units with a soft, dry cloth. Avoid using harsh chemicals or abrasive materials.
- Rangez le système dans le sac de transport fourni lorsqu'il n'est pas utilisé afin de le protéger de la poussière et des dommages.
6. Dépannage
- Pas d'audio : Ensure both transmitter and receivers are powered on and set to the same channel. Check all cable connections and audio source output levels.
- Interférences/statiques : Switch to a different channel on both the transmitter and receivers. Up to 3 sets of systems can be used simultaneously in the same area without interference. Avoid obstacles that may block the line of sight between units.
- Faible volume : Adjust the volume using the '+' button on the receiver. Check the output volume of your audio source.
- Durée de vie de la batterie courte : Ensure units are fully charged (2 hours for 6+ hours use). Battery performance may vary with usage and age.
7. Spécifications
| Fonctionnalité | Détail |
|---|---|
| Nom du modèle | KIMAFUN KM-G150-T1R4 |
| Technologie de connectivité | Sans fil |
| Technologie de communication sans fil | Sans fil 2.4G |
| Nombre de canaux | 6 |
| Distance de transmission | 50 à 65 pieds (15 à 20 mètres) de visibilité directe |
| Autonomie de la batterie | 6 heures |
| Temps de charge | 2 heures |
| Prise pour casque | 3.5 mm Jack |
| Matériel | Plastique ABS, métal |
| Poids de l'article | 1.98 livres (898 XNUMX grammes) |
| Dimensions du produit | 13 x 9 x 3 pouces |
8. Vidéos officielles du produit
Kimafun KM-G150-3 Wireless and Battery Charged IEM System
Vidéo : Un overview of the Kimafun KM-G150-3 Wireless and Battery Charged IEM System, demonstrating its features and functionality.
KM-G150-3 Wireless IEM System
Video: A short demonstration highlighting key aspects of the KM-G150-3 Wireless IEM System.
9. Garantie et assistance
Pour toute information relative à la garantie ou pour obtenir une assistance technique, veuillez consulter le site officiel de KIMAFUN. website or contact their customer service directly. Details can typically be found in the product packaging or on the brand's online store.