1. Introduction
Merci pour votre achatasing the Udreamer Turntable Vinyl Record Player Model UD001. This manual provides essential information for the proper setup, operation, and maintenance of your new record player. Please read these instructions carefully before use to ensure optimal performance and longevity of the product. Keep this manual for future reference.

Image 1.1: Udreamer Turntable Vinyl Record Player Model UD001. This image shows the turntable with its clear dust cover open, revealing the black platter, tonearm, and cartridge.
2. Consignes de sécurité
- Source d'alimentation : Utilisez uniquement l'adaptateur secteur spécifié. Assurez-vous que le volumetage correspond à votre alimentation électrique locale.
- Eau et humidité : N’exposez pas l’appareil à la pluie, à l’humidité ou à des liquides. Ne placez pas d’objets remplis de liquide, tels que des vases, sur l’appareil.
- Chaleur: Ne placez pas l'appareil à proximité de sources de chaleur telles que des radiateurs, des bouches de chauffage, des poêles ou d'autres appareils (y compris amp(échangeurs thermiques) qui produisent de la chaleur.
- Ventilation: Assurez une ventilation adéquate. Ne bloquez aucune ouverture de ventilation.
- Nettoyage: Débranchez l'appareil de la prise murale avant de le nettoyer. Utilisez uniquement un chiffon doux et sec.
- Entretien: N'essayez pas de réparer vous-même ce produit. Confiez tous les travaux d'entretien à du personnel de service qualifié.
- Placement: Placez l'appareil sur une surface stable et plane pour éviter tout dommage dû à une chute.
3. Contenu du colis
Veuillez vérifier que tous les articles énumérés ci-dessous sont inclus dans votre colis :
- Platine vinyle Udreamer
- Cache-poussière
- Plat
- Felt Mat
- Contrepoids
- Adaptateur 45 tr / min
- Adaptateur secteur
- Câble USB
- Manuel de l'utilisateur (ce document)
4. Produit terminéview
Familiarize yourself with the various parts and controls of your Udreamer Turntable.

Image 4.1: Key features of the Udreamer Turntable. This image highlights the turntable's capabilities such as Vinyl to Computer conversion, Bluetooth output, iron platter, built-in phono equalizer, needle pressure adjustment, speed alignment, and moving magnet cartridge.

Image 4.2 : Détail view of the turntable's components. This image shows the solid iron platter for stability and the moving magnet cartridge, which provides accurate audio reproduction and has a longer lifespan.

Image 4.3: Internal and external components of the turntable system. This diagram illustrates the belt-driven mechanism, arm lifter, record mat, foot pads for vibration isolation, and the 45 RPM adapter.
4.1 Face avant et dessus View
- Cache-poussière : Protège le plateau et le bras de lecture de la poussière.
- Plat: The surface on which records are placed.
- Broche: Maintient le disque en place sur le plateau.
- Tapis en feutre : Provides cushioning for records and reduces static.
- Bras de lecture: Contient la cartouche et le stylet.
- Cartouche avec stylet : Lit les sillons du disque.
- Contrepoids: Équilibre le bras de lecture et ajuste la force d'appui.
- Levier de repérage : Raises and lowers the tonearm gently.
- Repose-bras : Permet de fixer le bras de lecture lorsqu'il n'est pas utilisé.
- Sélecteur de vitesse : Switches between 33 1/3 and 45 RPM.
- Contrôle de hauteur : Permet un réglage précis de la vitesse de lecture.
4.2 Panneau arrière
- Commutateur LINE/BT OUT/PHONO : Selects output mode (Line Out, Bluetooth Out, Phono Out).
- Prises de sortie RCA (G/D) : Connects to external active speakers or an amplifier.
- Port USB-PC : Connects to a computer for vinyl-to-digital conversion.
- Prise d'entrée CC : Connecte l'adaptateur secteur.
- Interrupteur marche/arrêt : Allume ou éteint l'appareil.
5. Installation
5.1 Déballage et placement
- Carefully remove the turntable from its packaging. Retain packaging for future transport.
- Placez la platine sur une surface stable et plane, à l'abri de la lumière directe du soleil, des sources de chaleur, de la poussière excessive et des vibrations.
5.2 Installation du plateau et de la courroie
- Placez le plateau sur l'axe central.
- Carefully lift the felt mat to expose the drive belt underneath the platter.
- Locate the motor pulley (a small brass cylinder) on the top left of the turntable chassis.
- Using the provided ribbon or your fingers, gently stretch the drive belt and hook it around the motor pulley. Ensure the belt is flat and not twisted.
- Place the felt mat back on the platter.
5.3 Réglage du contrepoids
Un réglage correct du contrepoids est crucial pour une qualité sonore optimale et pour éviter d'endommager vos disques et votre stylet.

Image 5.1: Counterweight and Pitch Adjustment. This image illustrates how to accurately adjust the tonearm pressure using the counterweight and fine-tune the playback speed with the pitch control.
- Retirez délicatement le protecteur du stylet.
- Place the counterweight onto the rear of the tonearm. Rotate it clockwise until it is fully threaded.
- Release the tonearm from its rest. Move the cueing lever to the down position.
- Carefully rotate the counterweight until the tonearm is perfectly balanced horizontally, floating freely without touching the surface or rising too high.
- Once balanced, hold the counterweight steady with one hand and rotate the numbered ring on the front of the counterweight until '0' aligns with the line on the tonearm.
- Rotate the entire counterweight (including the numbered ring) counter-clockwise to the recommended tracking force. For the pre-installed magnetic cartridge, a typical tracking force is between 2.5 to 3.5 grams. Refer to your cartridge's specific recommendations if available.
- Return the tonearm to its rest and engage the tonearm clamp.
5.4 Installation du couvercle anti-poussière
Insert the hinges of the dust cover into the hinge receptacles at the rear of the turntable chassis.
5.5 Connexion d'alimentation
Connect the power adapter to the DC IN jack on the rear of the turntable, then plug the adapter into a wall outlet.
6. Mode d'emploi
6.1 Lecture d'enregistrements de base
- Placez un disque sur le plateau. Si vous écoutez un 45 tours, placez d'abord l'adaptateur 45 tours sur l'axe.
- Sélectionnez la vitesse appropriée (33 1/3 ou 45 tr/min) à l'aide du sélecteur de vitesse.
- Ensure the LINE/BT OUT/PHONO switch is set to 'LINE OUT' or 'PHONO' if connecting to external speakers, or 'BT OUT' for Bluetooth.
- Turn on the turntable using the Power ON/OFF switch.
- Dégagez le bras de lecture de son support.
- Soulevez le bras de lecture à l'aide du levier de levage.
- Positionnez manuellement le bras de lecture au-dessus du sillon de départ souhaité du disque.
- Abaissez délicatement le bras de lecture à l'aide du levier de levage. Le diamant entrera en contact avec le disque et la lecture commencera.
- At the end of the record, the auto-stop function will stop the platter rotation. Lift the tonearm, return it to its rest, and turn off the turntable.
6.2 Pitch Adjustment
Use the Pitch Control knob (refer to Image 5.1) to fine-tune the playback speed. Rotate the knob to increase or decrease the speed slightly.
6.3 Sortie Bluetooth
The turntable can wirelessly stream audio to Bluetooth-enabled devices such as headphones, speakers, or soundbars.

Image 6.1: Bluetooth Output functionality. This image demonstrates the turntable's ability to wirelessly connect to various Bluetooth receivers like earphones, soundbars, and external speakers.
- Ensure the LINE/BT OUT/PHONO switch on the rear is set to 'BT OUT'.
- Turn on your Bluetooth receiving device (e.g., speaker, headphones) and set it to pairing mode.
- Turn on the turntable. The Bluetooth indicator light on the turntable will flash, indicating it is searching for a device.
- Once paired, the Bluetooth indicator light will become solid. Audio from the turntable will now play through your Bluetooth device.
- Si le jumelage échoue, éteignez les deux appareils et réessayez.
6.4 Vinyl to Computer Recording (USB-PC)
Vous pouvez convertir vos disques vinyles en audio numérique. files using the USB-PC output.

Image 6.2: Vinyl to Computer conversion setup. This image shows the turntable connected to a laptop via a USB cable, illustrating the process of converting vinyl audio to MP3 format for computer playback.
- Connect the USB cable from the turntable's USB-PC port to an available USB port on your computer.
- Ensure the LINE/BT OUT/PHONO switch is set to 'LINE OUT' or 'PHONO'.
- Install and open audio recording software on your computer (e.g., Audacity, a free open-source software).
- In your recording software's preferences, select the turntable as the audio input device (it may appear as 'USB Audio CODEC' or similar).
- Start recording in the software, then begin playing your record on the turntable (refer to Section 6.1).
- Une fois l'enregistrement terminé, arrêtez-le dans le logiciel et sauvegardez votre fichier audio numérique. file.
6.5 Connecting External Speakers (RCA)
The turntable features RCA output jacks for connecting to external active speakers or an amplifier.
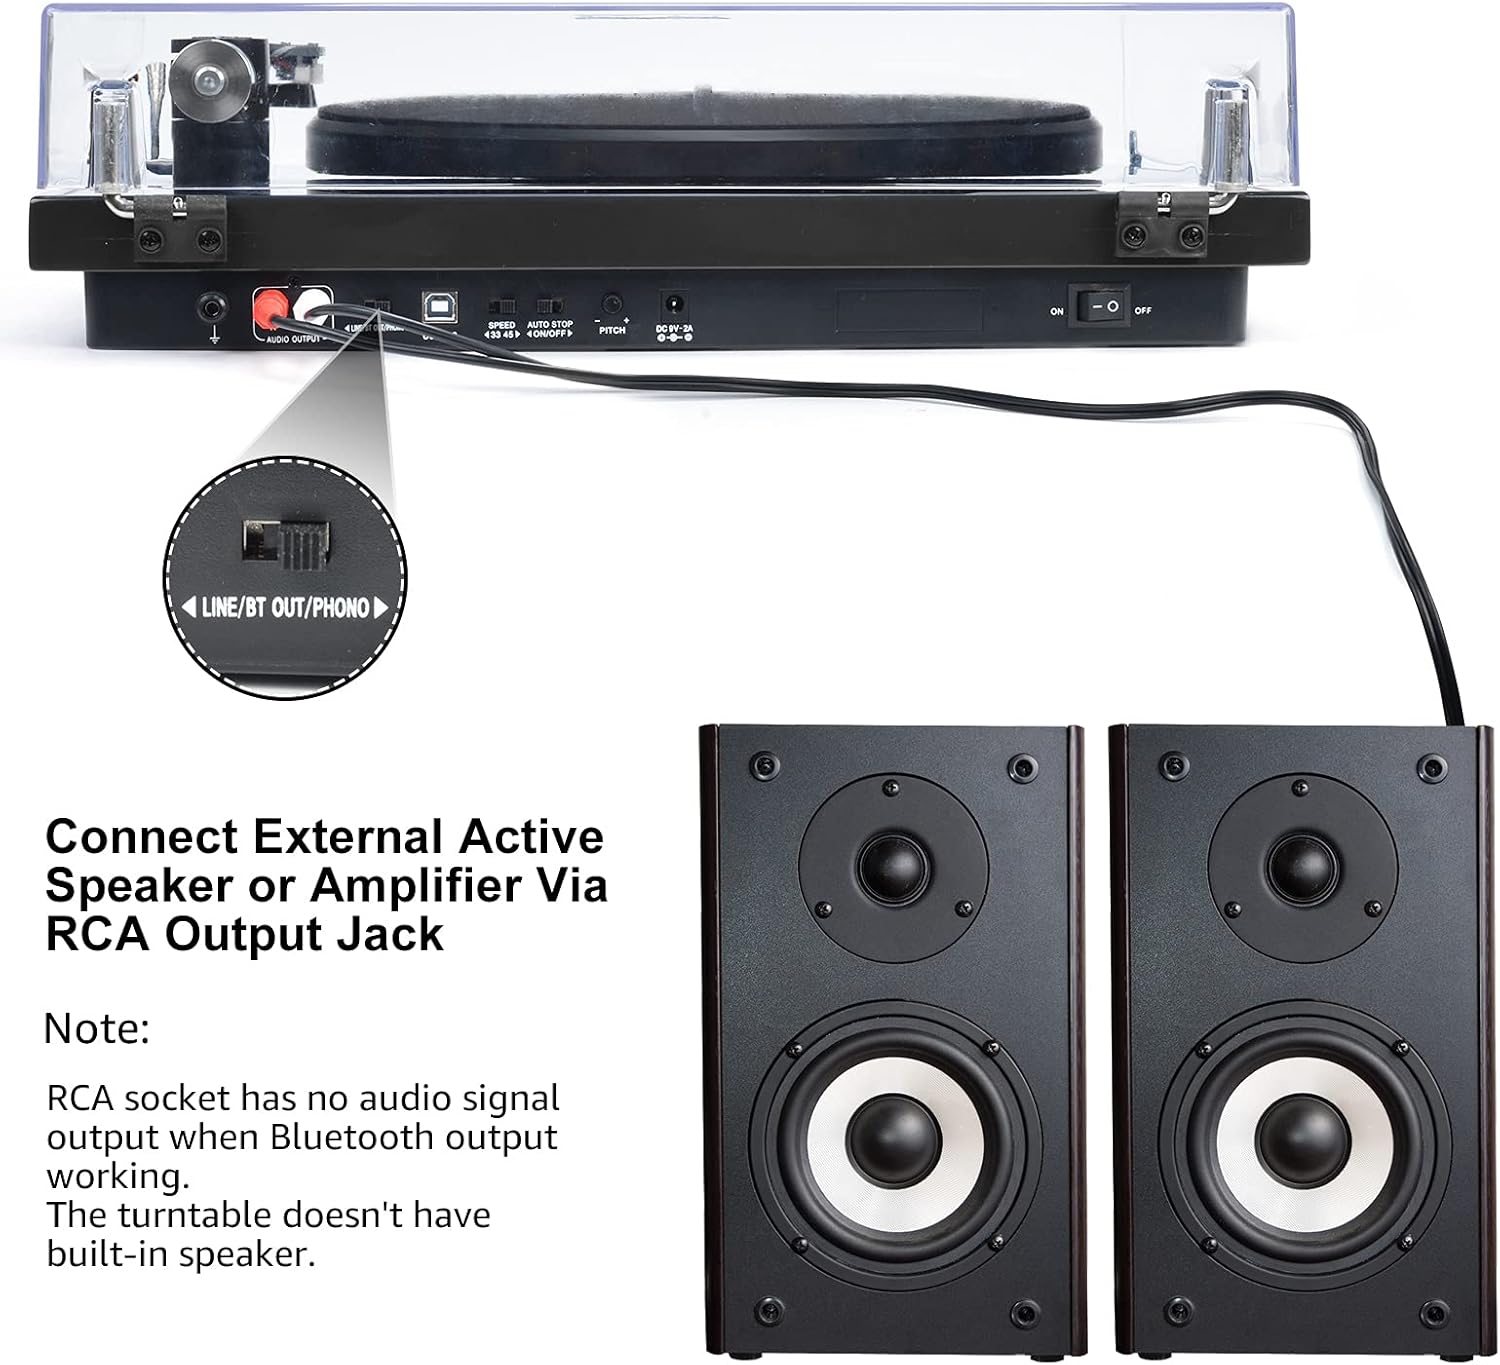
Image 6.3: Connecting to external speakers. This image shows the rear panel of the turntable with the RCA output jacks connected to a pair of external active speakers, indicating how to route audio for amplified playback.
- Ensure the LINE/BT OUT/PHONO switch on the rear is set to 'LINE OUT' if connecting to active speakers (speakers with their own amplificateur) ou un amplifier's 'LINE IN' input. Set to 'PHONO' if connecting to an amplifier with a dedicated 'PHONO' input.
- Connect the RCA cables (red for right channel, white for left channel) from the turntable's RCA output jacks to the corresponding input jacks on your active speakers or amplifier.
- Turn on your external audio system and adjust the volume.
Note: The Udreamer Turntable Model UD001 does not have built-in speakers. An external audio system (active speakers, amplifier, or Bluetooth device) is required for sound output.
7. Entretien
7.1 Nettoyage
- Platine tournante : Wipe the exterior with a soft, dry, lint-free cloth. Do not use harsh chemicals or abrasive cleaners.
- Cache-poussière : Clean with a soft cloth and a mild, non-abrasive cleaner. Avoid scratching the surface.
- Style: Use a soft stylus brush, brushing gently from back to front (in the direction of play) to remove dust and debris. Never use your fingers.
7.2 Remplacement du stylet
The stylus (needle) is a consumable part and will wear out over time, typically after 300-500 hours of playback. A worn stylus can damage your records and degrade sound quality. Replace the stylus when you notice a decrease in sound quality or visible wear.
- Gently grasp the front of the cartridge body.
- Pull the old stylus assembly downwards and forwards to detach it from the cartridge body.
- Align the new stylus assembly with the cartridge body and push it upwards and backwards until it clicks into place.
- Re-adjust the tracking force if necessary after replacing the stylus.
8. Dépannage
Si vous rencontrez des problèmes avec votre platine vinyle, consultez les problèmes et solutions courants suivants :
| Problème | Cause possible | Solution |
|---|---|---|
| Pas de courant | Adaptateur secteur non connecté ; interrupteur éteint | Ensure power adapter is securely plugged in; Turn power switch ON |
| Pas de son | Incorrect output mode selected; External speakers not connected/powered; Bluetooth not paired | Set LINE/BT OUT/PHONO switch correctly; Connect/power on external speakers; Pair Bluetooth device |
| Son déformé ou saccadé | Stylus dirty or worn; Tracking force incorrect; Turntable not level; Record dirty or damaged | Clean or replace stylus; Adjust counterweight; Place turntable on a level surface; Clean record |
| Le plateau ne tourne pas. | Drive belt dislodged or broken; Auto-stop engaged | Re-install or replace drive belt; Ensure tonearm is over the record to disengage auto-stop |
| L'appairage Bluetooth échoue | Device too far; Device not in pairing mode; Interference | Move devices closer; Ensure receiving device is in pairing mode; Restart both devices |
9. Spécifications
| Fonctionnalité | Spécification |
|---|---|
| Dimensions du produit | 12.8 x 9.8 x 4.7 pouces |
| Poids de l'article | 5.79 livres |
| Numéro de modèle de l'article | UD001 |
| Marque | Urêveur |
| Dossier spécial | Récepteur Bluetooth intégré |
| Matériel | Plastique |
| Style | Vintage |
| Appareils compatibles | Casque, Haut-parleur |
| Type de moteur | Moteur à courant alternatif |
| Format du signal | Numérique |
| Source d'énergie | Électrique avec fil |
| Signal-to-Noise Ratio | 60 dB |
10. Garantie et assistance
Udreamer products are designed and manufactured to the highest quality standards. For warranty information or technical support, please refer to the contact details provided with your purchase or visit the official Udreamer website. Please have your model number (UD001) and purchase information ready when contacting support.