
1. Introduction
The Gravity 4000.1D is a high-performance Class D monoblock ampAmplificateur conçu pour les systèmes audio automobiles. amplifier delivers 4000 Watts maximum power and is stable at 1 Ohm, 2 Ohm, and 4 Ohm loads, making it suitable for driving subwoofers. It features a digital design with a MOSFET power supply for efficient operation. This manual provides essential information for proper installation, operation, and maintenance of your amplifier.
2. Précautions de sécurité
- Débranchez toujours la borne négative de la batterie du véhicule avant de commencer toute installation.
- Veillez à ce que tous les câbles soient correctement acheminés et fixés afin d'éviter tout dommage ou court-circuit.
- Utilisez des câbles d'alimentation et de terre de section appropriée, comme spécifié dans la section installation.
- Installez le amplificateur dans un endroit bien ventilé pour éviter la surchauffe.
- Evitez de monter le amplifier in locations exposed to direct sunlight or excessive moisture.
- Consultez un installateur audio automobile professionnel si vous avez des doutes sur les étapes d'installation.
3. Contenu du colis
Vérifiez que tous les éléments sont présents dans le colis :
- Gravity 4000.1D Class D Car Amplifier
- Bouton de basses à distance avec câble
- Matériel de montage (vis)
- Manuel d'utilisation (ce document)
- SoundXtreme AP6 Bass Machine (Bundle Component)
4. Produit terminéview
Familiarisez-vous avec le amplifier's layout and connections.

Figure 1 : Haut view of the Gravity 4000.1D Class D Car Amplifier, showing the 'GRAVITY' logo and 'WARZONE' branding, along with the model number 'WZ 4000-1D'.
4.1 Panneau d'entrée et de commande

Figure 2 : Gros plan view de la amplifier's input and control panel. This side features RCA input jacks, a remote bass knob port, and various adjustment controls.
- PROTÉGER LA LED : S'allume lorsque le amplifier est en mode protection.
- À DISTANCE: Port for connecting the wired remote bass knob.
- ENTRÉE (RCA) : Audio signal input from your head unit or source.
- BRIDGE IN: Used for bridging multiple amplifiers (refer to advanced setup).
- GAIN: Ajuste la sensibilité d’entrée du amplifier.
- LPF (filtre passe-bas) : Adjusts the low-pass crossover frequency (40 Hz ~ 180 Hz).
- SUBSONIQUE: Adjusts the subsonic filter frequency (0 Hz ~ 50 Hz).
- FRÉQUENCE D'AGILATION DES BASSES : Selects the center frequency for bass boost (30 Hz, 40 Hz, 60 Hz).
- RENFORCEMENT DES BASSES: Adjusts the level of bass boost (0 dB ~ 12 dB).
- DEL D'ALIMENTATION : S'allume lorsque le amplifier est sous tension.
4.2 Power and Speaker Terminal Panel

Figure 3 : Gros plan view de la amplifier's power and speaker terminal panel. This side includes connections for power, ground, remote turn-on, and speaker outputs.
- CONFÉRENCIER: Output terminals for connecting your subwoofer(s).
- POWER (+12V): Connects to the positive terminal of the vehicle's battery.
- REM (télécommande) : Connects to the remote turn-on output of your head unit.
- GND (Masse): Se connecte à un point de masse solide du châssis du véhicule.
5. Installation
5.1 Montage du Amplifier
Choisissez un emplacement de montage sec, bien ventilé et sécurisé. Assurez-vous d'une circulation d'air suffisante autour de l'appareil. amplifier to prevent overheating. The amplifier can be mounted horizontally or vertically. Use the provided mounting screws to secure the amplifier sur une surface solide dans votre véhicule.
5.2 Connexions de câblage
Proper wiring is crucial for optimal performance and safety. Refer to Figure 3 for terminal locations.
- Connexion d'alimentation (+12V): Run a heavy-gauge power cable (e.g., 4-gauge or larger) directly from the vehicle's positive battery terminal to the ampBorne +12V de l'amplificateur. Installez un porte-fusible en ligne avec un fusible approprié (non fourni) à moins de 45 cm (18 pouces) de la batterie.
- Connexion à la terre (GND) : Run a heavy-gauge ground cable (same gauge as power cable) from the amplifier's GND terminal to a clean, unpainted metal surface on the vehicle's chassis. Ensure a good electrical connection by scraping away any paint or rust. The ground cable should be as short as possible, ideally less than 3 feet (1 meter).
- Connexion de mise en marche à distance (REM) : Raccordez un fil de plus petit calibre (par exemple, de calibre 18) à partir du ampConnectez la borne REM de l'amplificateur à la sortie de mise en marche à distance de votre autoradio. Ce fil indique… ampAmplificateur à activer lorsque votre autoradio est en marche.
- Connexion d'entrée RCA : Connect RCA cables from the pre-out outputs of your head unit to the INPUT RCA jacks on the amplifier.
- Connexion haut-parleur : Connect your subwoofer(s) to the SPEAKER output terminals. Ensure correct polarity (+ to + and - to -). The amplifier is stable down to 1 Ohm. Consult your subwoofer's specifications for proper wiring configurations to achieve the desired impedance.
- Bouton de basse à distance : Plug the remote bass knob cable into the REMOTE port on the amplifier and mount the knob in a convenient location for adjustment.
6. Fonctionnement
6.1 Mise sous tension initiale
After all connections are made and verified, reconnect the vehicle's battery. Turn on your head unit. The POWER LED on the amplifier should illuminate. If the PROTECT LED illuminates, refer to the Troubleshooting section.
6.2 Réglage AmpParamètres de lifier
Adjust these settings carefully to optimize sound quality and prevent damage to your speakers.
- GAIN: Start with the GAIN control at minimum. Play a familiar piece of music at a moderate volume on your head unit. Slowly increase the GAIN until you hear distortion, then back off slightly. This sets the ampRéglez la sensibilité d'entrée de l'amplificateur pour qu'elle corresponde à la sortie de votre autoradio.
- LPF (filtre passe-bas) : Adjust the LPF to filter out frequencies above your desired subwoofer range. A common starting point is 80-100 Hz. This ensures only low frequencies are sent to your subwoofer.
- SUBSONIC Filter: This filter removes extremely low frequencies that your subwoofer cannot reproduce efficiently, preventing damage and improving sound quality. Set it slightly below your subwoofer's port tuning frequency or around 25-30 Hz for sealed enclosures.
- BASS BOOST FREQ & BASS BOOST: Use these controls to enhance bass output at a specific frequency. Start with Bass Boost at 0 dB and adjust only if needed. Excessive bass boost can cause distortion and damage.
Bouton de basses à distance 6.3

Figure 4: The wired remote bass knob, used for convenient adjustment of bass level from the driver's seat.
The remote bass knob allows you to adjust the subwoofer output level conveniently from your listening position. This control typically acts as a master volume for the subwoofer channel, allowing you to fine-tune bass levels without accessing the amplifier directement.
7. Spécifications
| Fonctionnalité | Spécification |
|---|---|
| Modèle | 4000.1D |
| Puissance de sortie | 4000 Watts Max |
| Classe | Classe D |
| Stabilité | 1 Ohm, 2 Ohm, 4 Ohm Stable |
| Rapport signal/bruit | > 70 dB |
| Réponse en fréquence | 8 Hz ~ 180 Hz |
| THD | < 0.2% |
| Niveau d'amplification des basses | 0 ~ 12 dB |
| LPF (filtre passe-bas) | 40 Hz ~ 180 Hz |
| Filtre subsonique | 0 à 50 XNUMX Hz |
| Entrées | High and Low Level Inputs |
| Dimensions (L × l × H) | 286 mm (11.3 po) × 211 mm (8.3 po) × 64.5 mm (2.5 po) |
| Nombre de canaux | 1 (Monobloc) |
| Type de montage | Freestanding |
8. Dépannage
Si vous rencontrez des problèmes avec votre amplifier, consultez le tableau suivant :
| Problème | Cause possible | Solution |
|---|---|---|
| AmpL'amplificateur ne s'allume pas (LED d'alimentation éteinte). | Pas d'alimentation, pas de mise à la terre, ni de signal à distance. Fusible grillé. | Check +12V, GND, and REM connections. Verify in-line fuse. |
| PROTECT LED illuminates | Short circuit in speaker wiring, impedance too low, overheating, or DC offset. | Check speaker wiring for shorts. Verify speaker impedance. Ensure proper ventilation. Allow amplifier pour refroidir. |
| Pas de sortie audio | No input signal, incorrect gain setting, or speaker wiring issue. | Check RCA input connections. Adjust GAIN. Verify speaker connections and polarity. |
| Son déformé | GAIN set too high, improper crossover settings, or damaged speakers. | Reduce GAIN. Adjust LPF and Subsonic filters. Inspect speakers for damage. |
| Engine noise/whine | Poor grounding, RCA cable routing, or power cable interference. | Ensure solid ground connection. Route RCA cables away from power cables. Consider a ground loop isolator. |
9. Entretien
To ensure the longevity and optimal performance of your Gravity 4000.1D amplifier :
- Gardez le ampNettoyez l'amplificateur en veillant à ce qu'il soit propre et exempt de poussière. Utilisez un chiffon doux et sec pour le nettoyer.
- Veillez à ce que les ailettes de refroidissement ne soient pas obstruées afin de permettre une bonne dissipation de la chaleur.
- Vérifiez périodiquement le serrage et l'absence de corrosion de tous les raccordements électriques.
- Évitez de renverser des liquides sur le amplifier.
10. SoundXtreme AP6 Bass Machine (Bundle Component)
The Gravity 4000.1D amplifier may be bundled with a SoundXtreme AP6 Bass Machine. This component is designed to enhance bass response and provide additional control over low frequencies in your audio system.
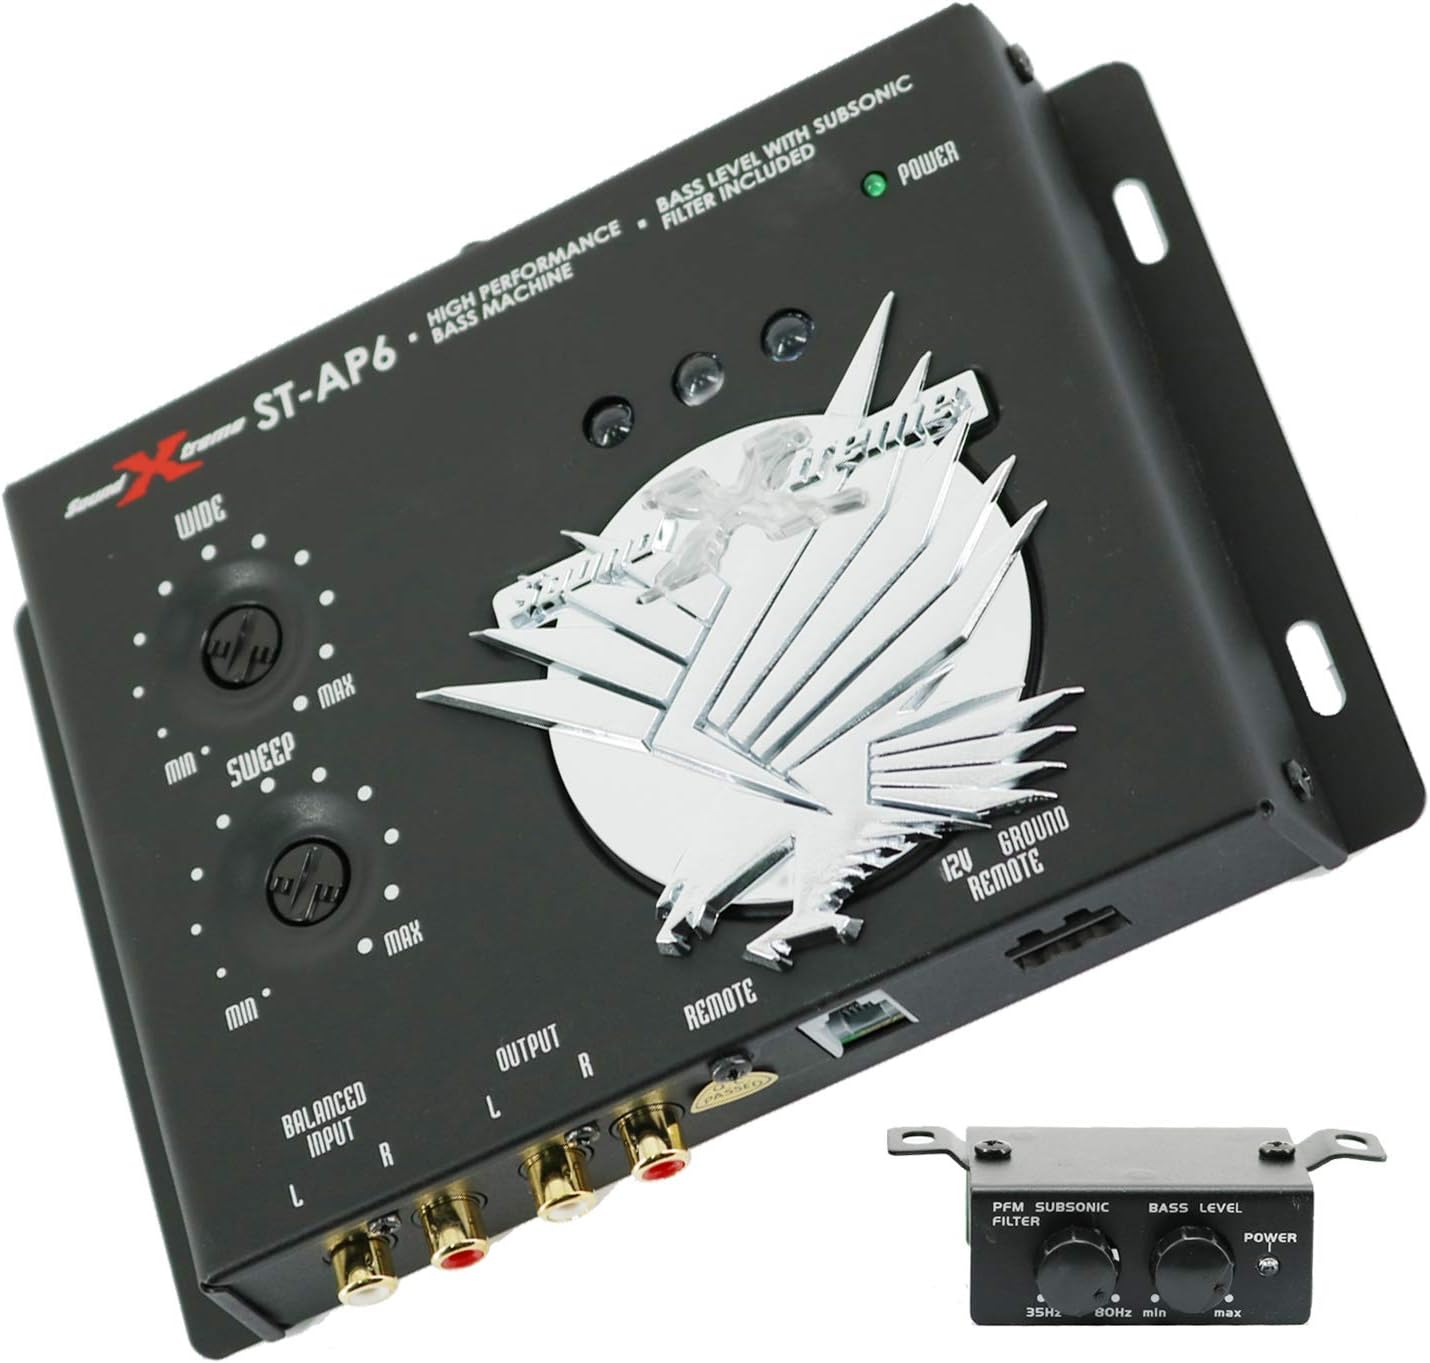
Figure 5: The SoundXtreme AP6 Bass Machine, a high-performance bass processor included in some bundles.
For detailed installation and operation instructions for the SoundXtreme AP6 Bass Machine, please refer to its dedicated user manual, as its functionality is separate from the Gravity 4000.1D amplifier.
11. Garantie et assistance
For warranty information and technical support, please refer to the documentation provided with your purchase or contact Gravity customer service. Keep your proof of purchase for warranty claims.