1. Introduction
Thank you for choosing the HiLook HIKVISION 204U-K1 4-Channel 5MP HD DVR. This manual provides essential information for the proper installation, operation, and maintenance of your digital video recorder. Please read this manual thoroughly before using the product and retain it for future reference.
2. Consignes de sécurité importantes
- Alimentation: Utilisez uniquement l'adaptateur secteur spécifié pour cet appareil. Assurez-vous que le volume d'alimentationtage is stable and meets the requirements.
- Ventilation: Ne pas obstruer les ouvertures de ventilation. Procéder à l'installation conformément aux instructions du fabricant.
- Eau et humidité : N’exposez pas l’appareil à la pluie ou à l’humidité. Ne placez pas d’objets remplis de liquide, tels que des vases, sur l’appareil.
- Température: Utilisez l'appareil dans la plage de températures spécifiée. Évitez les environnements extrêmement chauds ou froids.
- Nettoyage: Nettoyez uniquement avec un chiffon sec. Ne pas utiliser de nettoyants liquides ou aerosols.
- Entretien: N'essayez pas de réparer vous-même ce produit. Confiez tous les travaux d'entretien à du personnel de service qualifié.
- Disque dur: Handle the hard drive with care. Improper installation or removal can cause data loss or damage.
3. Contenu du colis
Vérifiez que tous les articles sont présents et en bon état lors du déballage. Si des articles sont manquants ou endommagés, contactez votre vendeur.
- HiLook HIKVISION 204U-K1 DVR Unit
- Adaptateur secteur
- Souris USB
- SATA Data Cable (for HDD connection)
- SATA Power Cable (for HDD connection)
- Guide de démarrage rapide

Figure 3.1: The HiLook HIKVISION 204U-K1 DVR unit, shown with an optional hard drive and included accessories such as a mouse and cables.
4. Configuration initiale
4.1. Connexion du DVR
Follow these steps to connect your DVR to cameras, a monitor, and the network.
- Installer le disque dur (facultatif) : Si votre enregistreur numérique n'était pas équipé d'un disque dur préinstallé, ouvrez le boîtier de l'enregistreur.asing, connect the SATA data and power cables to the HDD, and secure the HDD inside the DVR.
- Connecter les caméras : Connect your surveillance cameras to the BNC video input ports on the rear panel of the DVR. This model supports 4 channels.
- Connecter le moniteur : Connect a monitor to the HDMI or VGA output port on the rear panel.
- Connecter le réseau : Connect an Ethernet cable from the DVR's LAN port to your router or network switch for remote access and network features.
- Connecter une souris USB : Branchez la souris USB fournie sur l'un des ports USB pour la navigation.
- Connecter l'alimentation : Connect the power adapter to the DVR's power input and then plug it into a power outlet.

Figure 4.1: Rear panel of the DVR, illustrating the various input and output ports including video in, audio in/out, VGA, HDMI, USB, network interface, and power supply.
4.2. Mise sous tension
After all connections are made, the DVR will power on automatically. The system will boot up, and you should see the HiLook logo on your connected monitor. Follow the on-screen prompts for initial setup, including setting up an administrator password and configuring network settings.
5. Guide d'utilisation
5.1. Interface utilisateur terminéeview
The DVR's graphical user interface (GUI) can be navigated using the USB mouse. Right-click to access the main menu, and left-click to select options. The live view displays feeds from connected cameras.
5.2. Enregistrement et lecture
- Enregistrement manuel : Du direct view, click the record icon to start or stop manual recording for a specific channel.
- Enregistrement programmé : Access the main menu, navigate to Enregistrement > Planification to set up continuous or motion-triggered recording schedules for each camera.
- Lecture: Dans le menu principal, sélectionnez Lecture. Choose the date, time, and camera channel to review enregistré footage.
5.3. Détection de mouvement et alertes
The DVR supports smart motion detection and can send alerts via email or push notifications to a mobile application.
- Configurer la détection de mouvement : Aller à Main Menu > Alarm > Motion Detection. Select the camera channel, enable motion detection, and define the detection area and sensitivity.
- Set Up Email Alerts: In Main Menu > Network > Email, configure your SMTP server settings and recipient email addresses. Enable email linkage for motion detection events.
- Notifications de l'application mobile : Download the official HiLook mobile application. Add your DVR to the app and enable push notifications for alarm events.

Figure 5.1: A smartphone screen showing a real-time email notification triggered by smart motion detection.

Figure 5.2: A smartphone displaying multiple smart motion-triggered alerts, indicating movement detected in specific areas monitored by surveillance cameras.
6. Entretien
- Nettoyage: Regularly clean the exterior of the DVR with a soft, dry cloth. Ensure ventilation openings are free from dust.
- Mises à jour du micrologiciel : Consultez le site officiel de HiLook website for the latest firmware updates. Updating firmware can improve performance and add new features. Follow the provided instructions carefully.
- Gestion du disque dur : Periodically check the health of your hard drive through the DVR's system settings. Ensure sufficient storage space is available for recordings.
- Sécurité du mot de passe : Regularly change your administrator password to maintain system security.
7. Dépannage
If you encounter issues with your DVR, refer to the table below for common problems and solutions.
| Problème | Cause possible | Solution |
|---|---|---|
| Aucun affichage vidéo sur le moniteur | Loose HDMI/VGA cable; Incorrect monitor input; DVR not powered on. | Check cable connections; Select correct input on monitor; Verify power supply. |
| Aucune image de caméra | Camera not powered; Loose BNC cable; Faulty camera. | Ensure camera power; Check BNC connections; Test camera with another input if possible. |
| Impossible d'accéder au DVR à distance | Network cable disconnected; Incorrect network settings; Firewall blocking access. | Verify Ethernet connection; Check IP address, gateway, DNS settings; Configure router/firewall. |
| Aucun enregistrement | Hard drive not installed/initialized; Recording schedule not set; HDD full. | Install/initialize HDD; Configure recording schedule; Check HDD status and capacity. |
| La détection de mouvement ne fonctionne pas | Détection de mouvement désactivée ; sensibilité trop faible ; zone de détection non définie. | Enable motion detection; Adjust sensitivity; Define detection area. |
8. Spécifications techniques
Below are the key technical specifications for the HiLook HIKVISION 204U-K1 DVR.
| Fonctionnalité | Spécification |
|---|---|
| Modèle | 204U-K1 |
| Entrée vidéo | 4-channel BNC interface (supports HDTVI/AHD/CVI/CVBS/IP) |
| Compression vidéo | H.265 Pro+/H.265 Pro/H.265/H.264 |
| Sortie vidéo | 1 HDMI, 1 VGA (sortie simultanée) |
| Résolution de sortie HDMI | Up to 4K (3840 × 2160) for 204U-K1 |
| Entrée/Sortie audio | 1-ch RCA (2-way audio) / 1-ch RCA |
| Disque dur (HDD) | 1 interface SATA, capacité jusqu'à 10 To |
| Interfaces réseau | 1 interface Ethernet auto-adaptative RJ45 10M/100M |
| Interface USB | 2 × USB 2.0 |
| Alimentation électrique | 12 VCC |
| Dimensions (L × P × H) | Approx. 200 × 200 × 45 mm (7.9 × 7.9 × 1.8 inch) |
| Poids (sans les disques durs) | Environ 1 kg (2.2 lb) |
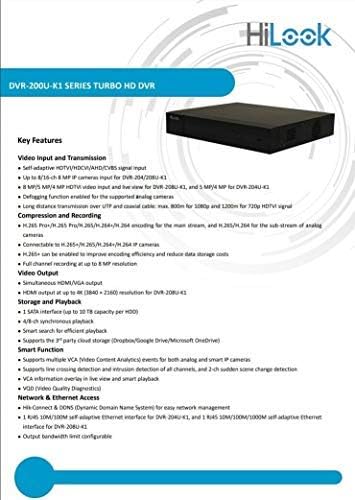
Figure 8.1: A detailed list of key features for the DVR-200U-K1 series, including video input/transmission, compression, video output, storage, smart functions, and network access.
9. Garantie et support client
Your HiLook HIKVISION 204U-K1 DVR comes with a limited warranty. Please refer to the warranty card included in your package or visit the official HiLook website for detailed warranty terms and conditions. For technical assistance, troubleshooting, or service inquiries, please contact your authorized HiLook dealer or customer support.
Ressources en ligne : For additional support, firmware downloads, and FAQs, please visit the official HiLook support website.