
1. Introduction
This manual provides detailed instructions for the installation, operation, and maintenance of your EPEVER TRIRON2210N 20A MPPT Solar Charge Controller. Please read this manual thoroughly before use to ensure optimal performance and safety. This controller is designed to manage power flow from solar panels to batteries and loads, ensuring efficient charging and protection for your solar system.
2. caractéristiques du produit
- Advanced MPPT (Maximum Power Point Tracking) technology with tracking efficiency not less than 99.5% and maximum conversion efficiency of 98%.
- Écran LCD pour viewing operational data and system status, with LED indicators for abnormal information.
- Automatic 12V/24VDC system voltage identification.
- Comprehensive electronic protection functions, including overload and over-discharge protection.
- RS485 communication module design for reading inverter/controller data and controlling inverter switch via relay interface.
- Dual 5V DC USB output interface for charging electronic devices.
- Suitable for various applications: communication base stations, home systems, street lighting, field monitoring, RV solar systems.
2.1 Contrôleur terminéview

This image illustrates the main components of the EPEVER TRIRON2210N controller, including the solar panel indicator, battery indicator, load indicator, RS485 slave port, two USB ports, insulating material, LCD screen, PV terminals, battery terminals, and load terminals.
2.2 Dimensions
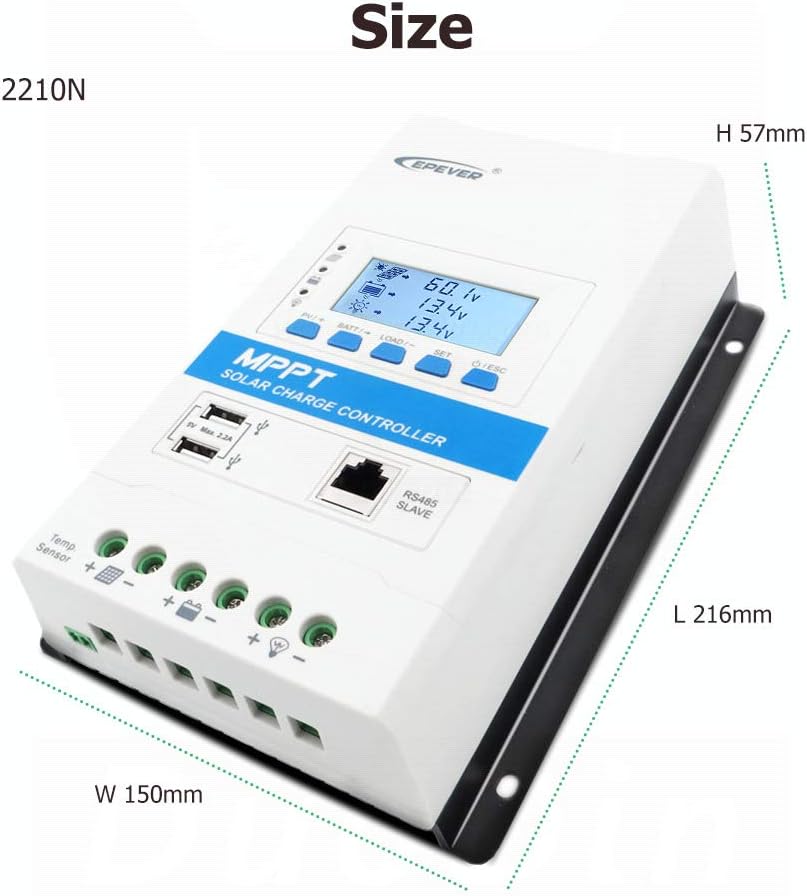
The controller measures 216mm in length, 150mm in width, and 57mm in height, designed for compact installation.
3. Spécifications
| Fonctionnalité | Valeur |
|---|---|
| Couleur | 20A |
| Marque | ÉPEVER |
| Poids de l'article | 1.16 kilogrammes |
| Type d'affichage | Écran LCD |
| Code UPC | 680465249956 |
| Fabricant | SolaMr |
| Pays d'origine | Chine |
| ASIN | B07R5MGC3V |
| Code GTIN | 680465249956 |
3.1 Vol batterietage Control Parameters (12V System @ 25°C)
Pour un système 24 V, doublez le volumetage values. These parameters are crucial for proper battery management and longevity.

This table provides detailed voltage control parameters for different battery types: Sealed, Gel, Flooded, and User-defined (9-34V). It includes settings for over-discharge, charge limits, equalization, boost, float, low voltage reconnect, low voltage disconnect, and warning voltaget.
4. Installation
4.1 Schéma de câblage
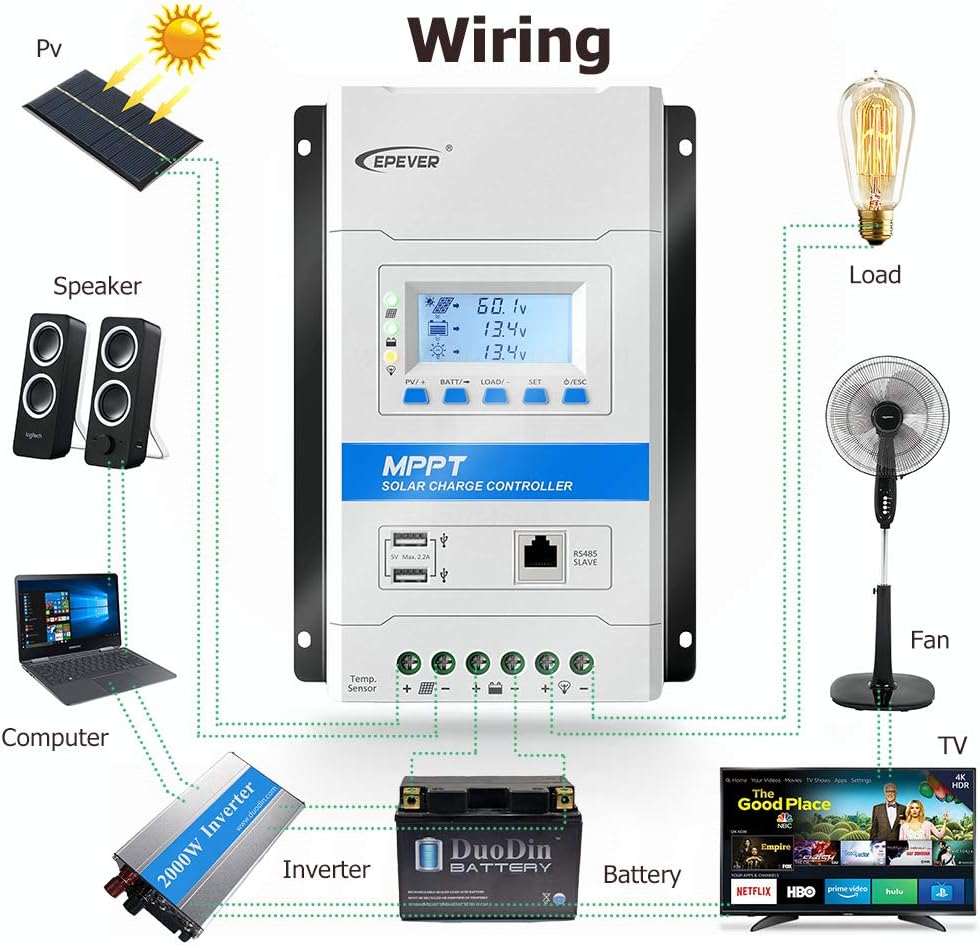
This diagram illustrates the correct wiring sequence for connecting the solar panel, battery, and various loads (e.g., computer, fan, TV) to the controller. Ensure all connections are secure and correctly polarized.
4.2 Ordre de connexion
- Connectez la batterie au contrôleur.
- Connect the PV (solar panel) to the controller.
- Connectez la charge au contrôleur.
4.3 Disconnection Sequence
- Débranchez la charge du contrôleur.
- Disconnect the PV (solar panel) from the controller.
- Débranchez la batterie du contrôleur.
Important: Always follow the specified connection and disconnection order to prevent damage to the controller or other components.
4.4 Installation and Setup Video Guide
This video demonstrates the physical features of the controller and the correct connection order for the battery, solar panel, and load. It also shows how the display illuminates upon correct battery connection and guides through initial settings like battery type, capacity, temperature unit, and load working mode.
5. Fonctionnement
5.1 Fonctions des boutons
- Bouton ÉCHAP : Used to exit the current menu or cancel an operation.
- Bouton de réglage: Used to enter a menu, confirm settings, or navigate interfaces.
- Bouton CHARGER/- : Used to decrease values or navigate backward through display interfaces.
- BATT/+ Button: Used to increase values or navigate forward through display interfaces.
- Bouton PV/+ : Used to increase values or navigate forward through display interfaces.
5.2 Navigation de l'écran
The LCD screen displays various operational data such as voltage, current, power, and temperature. Use the PV/+, BATT/-, LOAD/-, SET, and ESC buttons to navigate through the interfaces and adjust settings as needed.
5.3 Réglage du type de batterie
To set the battery type for optimal charging:
- Appuyez et maintenez enfoncé le BATT/+ button for 5 seconds to enter the battery type setting interface.
- Utilisez le PV/+ or LOAD/- buttons to select the desired battery type (e.g., Sealed, Gel, Flooded, LiFePO4, Li(NiCoMn)O2, or User).
- Appuyez sur le ENSEMBLE bouton pour confirmer la sélection.
Note: Refer to the "Battery Voltage Control Parameters" table in the Specifications section for specific voltage settings for each battery type.
5.4 Réglage de la capacité de la batterie
To set the battery's Amp-hour (Ah) capacity:
- Appuyez sur le ENSEMBLE button to navigate to the battery capacity interface.
- Appuyez et maintenez enfoncé le BATT/+ button for 5 seconds to enter the battery capacity setting.
- Utilisez le PV/+ or LOAD/- buttons to adjust the capacity value (e.g., 200 Ah).
- Appuyez sur le ENSEMBLE bouton pour confirmer le réglage.
5.5 Unité de réglage de la température
To set the temperature unit (°C or °F) for display:
- Appuyez sur le ENSEMBLE button twice to navigate to the temperature unit interface.
- Utilisez le PV/+ or LOAD/- boutons pour basculer entre Celsius (°C) et Fahrenheit (°F).
- Appuyez sur le ENSEMBLE bouton pour confirmer le réglage.
5.6 Configuration du mode de fonctionnement de la charge
To configure how the load output operates:
- Appuyez et maintenez enfoncé le LOAD/- button for 5 seconds to enter the load working mode interface.
- Utilisez le PV/+ or LOAD/- buttons to select the desired mode (e.g., 100 for ON/OFF, 101-115 for timer modes, 116 for test mode, 117 for manual mode).
- Appuyez sur le ENSEMBLE bouton pour confirmer le réglage.
Note: In manual mode (117), the ÉCHAP button controls the load ON/OFF.
5.7 Load Working Mode Table
The following table details the available load working modes and their corresponding settings:

This table provides a comprehensive list of load working modes, including light control (ON/OFF), various timer settings (e.g., 1 to 15 hours from dusk or before dawn), test mode, and manual mode. Each mode is assigned a specific code for selection.
6. Entretien
Un entretien régulier garantit la longévité et les performances optimales de votre régulateur de charge solaire.
- Regularly inspect all wiring connections to ensure they are tight and free from corrosion. Loose connections can cause power loss and overheating.
- Keep the controller clean and free from dust and debris. Use a dry, soft cloth for cleaning. Avoid using harsh chemicals or abrasive materials.
- Ensure adequate ventilation around the controller to prevent overheating. Do not block ventilation openings.
- Periodically check the battery terminals for any signs of corrosion and clean if necessary. Corrosion can impede current flow.
- Monitor the system's performance through the LCD display to identify any anomalies early. Pay attention to unusual voltage or current readings.
For detailed maintenance procedures, refer to the full product manual provided with your controller.
7. Dépannage
If you encounter issues with your EPEVER TRIRON2210N controller, refer to the following common troubleshooting tips:
- Pas d'affichage : Vérifiez les connexions de la batterie et assurez-vous que le volume de la batterietage is within the operating range (12V/24V). Verify the battery fuse is intact.
- Pas de recharge : Verify solar panel connections, ensure sufficient sunlight, and check for any shading on the panels. Confirm battery type settings are correct on the controller.
- Chargement impossible : Check load connections, ensure the load current does not exceed the controller's rating, and verify the load working mode settings (e.g., not in manual OFF mode).
- Codes d'erreur : If an error code appears on the display, consult the comprehensive manual for specific error definitions and detailed troubleshooting steps.
If issues persist after attempting these steps, contact EPEVER customer support for further assistance.
8. Garantie et assistance
EPEVER products typically come with a standard manufacturer's warranty. For specific warranty terms, product registration, and technical support, please refer to the official EPEVER website or contact your local distributor. It is recommended to keep your purchase receipt as proof of purchase for warranty claims.
Fabricant: SolaMr
Boutique de la marque : EPEVER Store on Amazon.it