Argo ARGO RELAX STYLE
Manuel d'utilisation du climatiseur portable Argo Relax Style
Model: ARGO RELAX STYLE
Introduction
The Argo Relax Style portable air conditioner is designed for efficient and compact cooling. Featuring a vertical design concept (VDC), this unit offers powerful performance in a sleek, modern form factor. It combines a high-gloss front finish with matte side panels for an ergonomic grip and contemporary aesthetic.
This appliance provides three primary functions: cooling, ventilation, and dehumidification. It also offers three fan speeds, including an automatic speed setting, to suit various comfort needs. The unit incorporates automatic condensation vaporization during cooling operation and allows for continuous condensate drainage in dehumidification mode. It utilizes a refrigerant gas with a Global Warming Potential (GWP) close to zero, reflecting an environmentally conscious design.

Figure 1 : Face avant view of the Argo Relax Style Portable Air Conditioner.
Consignes de sécurité
Veuillez lire attentivement toutes les consignes de sécurité avant d'utiliser l'appareil. Le non-respect de ces consignes peut entraîner un choc électrique, un incendie ou des blessures graves.
- Assurer l'alimentation voltage correspond à l'étiquette de puissance sur l'appareil.
- N'utilisez pas l'appareil avec un cordon d'alimentation ou une fiche endommagés.
- Ne pas obstruer les entrées et sorties d'air. Maintenir un dégagement suffisant autour de l'appareil pour une bonne circulation de l'air.
- N’insérez aucun objet dans les orifices de sortie d’air.
- Tenez l'appareil éloigné des matériaux inflammables et des sources de chaleur.
- Débranchez toujours l'appareil avant de le nettoyer ou d'effectuer toute opération de maintenance.
- Cet appareil n'est pas destiné à être utilisé par des personnes (y compris les enfants) ayant des capacités physiques, sensorielles ou mentales réduites, ou manquant d'expérience et de connaissances, à moins qu'elles ne bénéficient d'une surveillance ou d'instructions concernant l'utilisation de l'appareil par une personne responsable de leur sécurité.
- Les enfants doivent être surveillés pour s’assurer qu’ils ne jouent pas avec l’appareil.
Composants du produit
The Argo Relax Style portable air conditioner comes with several components necessary for its operation and installation. Familiarize yourself with these parts before setup.
- Unité principale de climatiseur
- Tuyau d'échappement flexible
- Window Adapter Kit (for exhaust hose)
- Multi-function Remote Control with LED screen
- Drainage Hose (for continuous dehumidification)
- Air Filter (removable for cleaning)
- Multi-directional Wheels and Handle for portability

Figure 2: Included components: flexible hose, window adapter, remote control, and drainage hose.
Installation
1. Déballage
Retirez soigneusement le climatiseur et tous ses accessoires de l'emballage. Conservez l'emballage d'origine pour tout stockage ou transport ultérieur.
2. Placement
Place the unit on a flat, stable surface. Ensure there is at least 30 cm (12 inches) of space around the unit for proper air circulation. Position the unit near a window or opening where the exhaust hose can be vented to the outside.

Figure 3 : Example placement of the air conditioner in a room.
3. Installation du tuyau d'échappement
- Attach one end of the flexible exhaust hose to the air outlet on the back of the unit.
- Connect the window adapter to the other end of the exhaust hose.
- Open a window or sliding door and place the window adapter securely in the opening to vent hot air outside. For fixed glass installations, use the provided kit. Ensure the hose is as straight and short as possible to maximize efficiency.
4. Drainage (Dehumidification Mode)
For continuous dehumidification, connect the drainage hose to the continuous drainage port on the unit and direct the other end to a suitable drain or container. In cooling mode, condensation is automatically vaporized.
5. Connexion électrique
Plug the power cord into a grounded electrical outlet. Ensure the outlet meets the electrical requirements specified in the 'Specifications' section.
Mode d'emploi
Panneau de configuration terminéview
Le panneau de commande est situé sur le dessus de l'appareil et comporte un écran LED et divers boutons de fonctionnement.

Figure 4: Top control panel of the unit.
- Bouton marche/arrêt : Allume ou éteint l'appareil.
- Bouton Mode : Cycles through Cooling, Fan, and Dehumidification modes.
- Boutons de réglage de la température/minuterie (+/-) : Adjusts desired temperature or sets timer duration.
- Bouton de vitesse du ventilateur : Sélectionne la vitesse du ventilateur (Faible, Moyenne, Élevée, Automatique).
- Bouton Swing : Activates or deactivates the automatic oscillation of the motorized louvers.
- Bouton de veille : Active le mode veille pour un fonctionnement plus silencieux et un réglage progressif de la température.
- Bouton de minuterie : Configure la minuterie programmable sur 24 heures pour une mise en marche/arrêt automatique.
Télécommande
The unit can be operated using the included multi-function remote control, which mirrors the functions of the control panel.
Modes de fonctionnement
- Mode de refroidissement : Reduces room temperature. Set desired temperature using the +/- buttons. The unit will cool until the set temperature is reached.
- Mode ventilateur : Fait circuler l'air sans le refroidir. Sélectionnez la vitesse de ventilation souhaitée.
- Mode déshumidification : Removes excess moisture from the air. Connect the continuous drainage hose for optimal performance in this mode.
Fonctions spéciales
- Minuteur programmable sur 24 heures : Allows you to set a specific time for the unit to turn on or off automatically.
- Fonction de sommeil: Optimizes operation for nighttime comfort, typically by gradually increasing the set temperature and reducing fan speed.
- Fonction mémoire : The unit retains your last settings when powered off and on.
- Autodiagnostic : The unit can perform self-diagnosis to identify potential issues.
- Motorized Louvers: The discharge fins are motorized and can be oriented horizontally and vertically with automatic oscillation for better air distribution.
Entretien
Un entretien régulier garantit des performances optimales et prolonge la durée de vie de votre climatiseur. Débranchez toujours l'appareil avant de le nettoyer ou de l'entretenir.
1. Nettoyage du filtre à air
The air filter should be cleaned regularly, typically every two weeks, or more frequently depending on usage and air quality. A dirty filter can reduce cooling efficiency and airflow.
- Locate the air filter, usually on the back or side of the unit. It is easily removable.
- Retirez délicatement le filtre.
- Nettoyez le filtre à l'aide d'un aspirateur pour enlever la poussière, ou lavez-le à l'eau tiède avec un détergent doux.
- Rincez abondamment et laissez le filtre sécher complètement à l'air libre avant de le réinsérer dans l'appareil.

Figure 5 : Côté view indicating air intake vents where the filter is located.
2. Évacuation des condensats
While the unit features automatic condensation vaporization in cooling mode, it's important to be aware of drainage for dehumidification or if the internal tank fills up.
- Automatic Vaporization: In cooling mode, most condensation is evaporated and expelled with the hot air.
- Drainage continu : For prolonged dehumidification or in very humid conditions, connect the provided drainage hose to the continuous drainage port to allow water to drain directly.
- Drainage manuel: If the internal tank becomes full (indicated by an error code or indicator light), turn off the unit, unplug it, and carefully move it to a location where water can be drained from the bottom drainage plug into a shallow pan.
3. Nettoyage de l'unité
Essuyez l'extérieur de l'appareil avec un chiffon doux.amp Utilisez un chiffon. N’utilisez pas de produits chimiques agressifs, d’abrasifs ou de solvants, car ils pourraient endommager la surface.
4. Stockage
Before storing the unit for an extended period (e.g., off-season):
- Ensure all water has been drained from the unit.
- Nettoyer le filtre à air.
- Débranchez le cordon d'alimentation et enroulez-le soigneusement.
- Store the unit in a cool, dry place, preferably in its original packaging, to protect it from dust and damage.
- If the unit has been stored horizontally, allow it to stand upright for at least 4 hours before restarting operation.
Dépannage
Avant de contacter le service client, veuillez consulter les problèmes courants suivants et leurs solutions :
| Problème | Cause possible | Solution |
|---|---|---|
| L'unité ne s'allume pas. | Pas de courant, cordon d'alimentation débranché, disjoncteur déclenché. | Vérifiez le branchement électrique, assurez-vous que la prise fonctionne, réinitialisez le disjoncteur. |
| L'appareil fonctionne mais ne refroidit pas. | Exhaust hose not properly vented, room too large, windows/doors open, dirty air filter, temperature setting too high. | Ensure exhaust hose is vented outside, close windows/doors, clean air filter, lower temperature setting. |
| L'unité est bruyante. | Normal operating noise (fan/compressor), unit not on a level surface, internal components vibrating. | Ensure unit is on a flat, stable surface. Some operating noise is normal for portable units. |
| Fuite d'eau. | Drainage plug not secured, continuous drainage hose blocked or disconnected, internal water tank full. | Check drainage plug, ensure hose is properly connected and clear, drain internal tank if full. |
| La télécommande ne fonctionne pas. | Piles déchargées ou mal insérées, obstruction entre la télécommande et l'appareil. | Remplacez les piles et assurez-vous d'avoir une ligne de visée dégagée vers le récepteur de l'appareil. |
Si le problème persiste après avoir essayé ces solutions, veuillez contacter le service client.
Caractéristiques
The following table provides detailed technical specifications for the Argo Relax Style portable air conditioner:
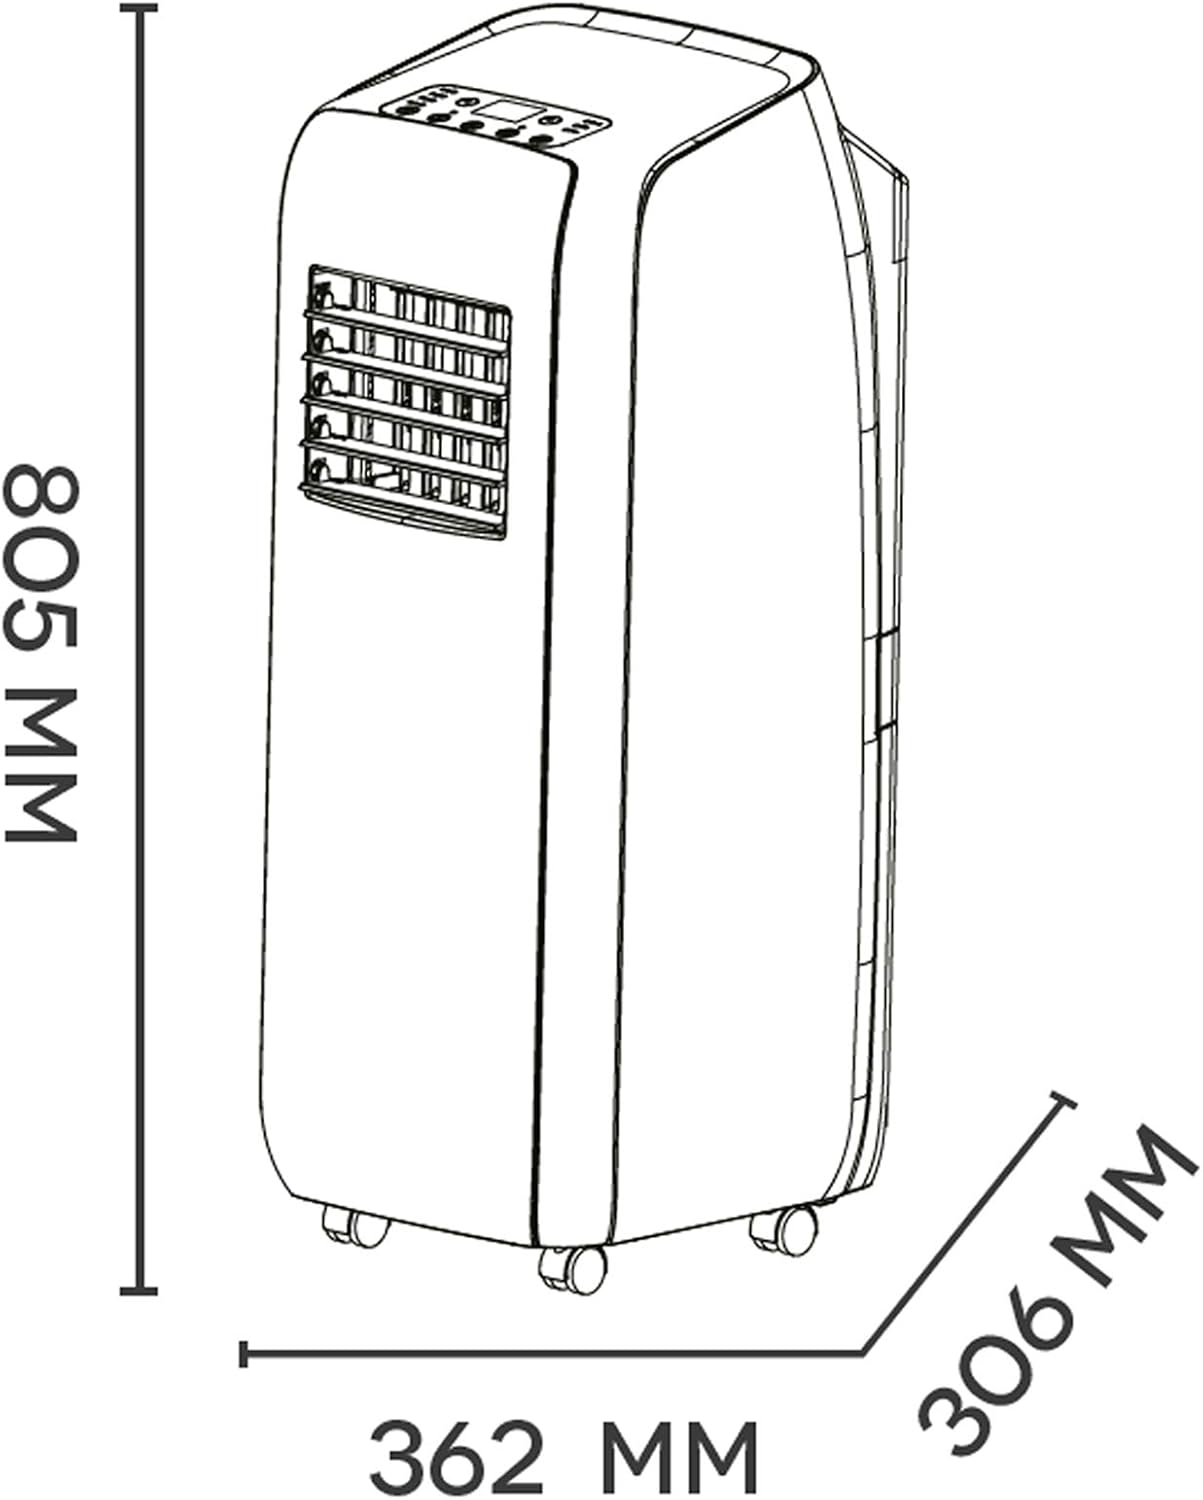
Figure 6: Dimensions of the unit.
| Fonctionnalité | Spécification |
|---|---|
| Marque | Argo |
| Numéro de modèle | RELAX STYLE |
| Dimensions du produit (L x l x H) | 36.2 x 30.6 x 80.5 cm (14.25 x 12.05 x 31.69 pouces) |
| Poids | 28 kg (61.7 lb) |
| Classe d'efficacité énergétique | A |
| Capacité de refroidissement | 12 000 BTU/H (2.6 kW) |
| Niveau de bruit | 64 dB |
| Voltage | 230 volts |
| Consommation d'énergie | 2600 watts |
| Type d'installation | Portable |
| Composants inclus | Product, manual, remote control, warranty, flexible hose, window adapter, fixed glass installation kit |
Garantie et assistance
Pour obtenir des informations sur la garantie, veuillez consulter la carte de garantie fournie avec votre produit ou visiter le site officiel d'Argo. webConsultez le site. Conservez votre reçu d'achat comme preuve d'achat.
For technical support, spare parts, or service inquiries, please contact Argo customer service. Contact details can typically be found in the product packaging or on the manufacturer's official website.
Important: Do not attempt to repair the unit yourself. Unauthorized repairs will void the warranty and may pose safety risks.
Ask a question about this manual
Ask about setup, troubleshooting, compatibility, parts, safety, or missing instructions. Manuals+ will review the question and use this page’s manual context to help answer it.