
Introduction
This manual provides detailed instructions for the setup, operation, and maintenance of your TFA Dostmann Digital Radio-Controlled Alarm Clock, model 60.2547.54. Please read this manual thoroughly before using the device to ensure proper function and to understand all features.
Produit terminéview & Composants
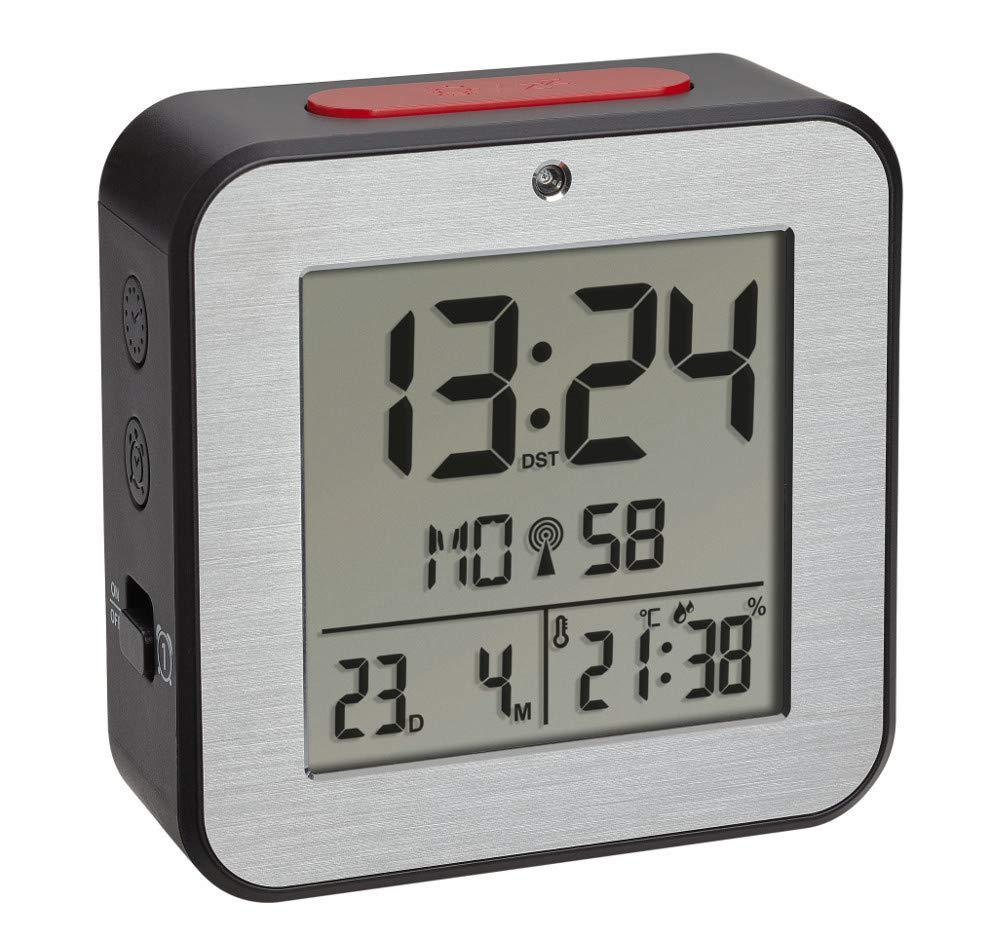
The TFA Dostmann Digital Radio-Controlled Alarm Clock is designed to provide accurate time, date, and indoor climate information. It features a highly precise radio-controlled clock, two independent alarm times, and an automatic night light function.


Installation de la batterie
- Repérez le couvercle du compartiment à piles à l'arrière du réveil.
- Retirez le couvercle en le faisant glisser ou en le soulevant.
- Insert two (2) 1.5 V AA batteries, ensuring correct polarity (+/-). Batteries are not included and must be purchased separately.
- Replacez soigneusement le couvercle du compartiment à piles.
- The device will power on and begin searching for the radio-controlled time signal.
Configuration initiale
Upon battery installation, the clock will automatically attempt to receive the radio-controlled time signal. This process may take several minutes. If the signal is not received or for manual adjustments, follow these steps:
Réglage manuel de la date et de l'heure
- Press and hold the 'SET' button (location may vary, refer to device diagram if available) to enter setup mode.
- Utilisez les boutons « + » ou « - » pour ajuster la valeur clignotante (par exemple, heure, minute, année, mois, jour).
- Appuyez de nouveau sur « SET » pour confirmer le réglage et passer au paramètre suivant.
- Repeat until all desired settings (time, date, year) are configured.
Sélection de la langue
The display supports 7 languages for the day of the week: French, Spanish, Italian, Dutch, Danish, and English. During initial setup or in settings mode, select your preferred language using the '+' or '-' buttons.
Réglage du fuseau horaire
If you are in a region where the radio signal's standard time differs from your local time, you can adjust the time zone by +/- 12 hours. Access this setting in the setup mode and use the '+' or '-' buttons to set the offset.
Mode d'emploi
Réglage des alarmes (Alarme 1 et Alarme 2)
- Press the 'ALARM 1' or 'ALARM 2' button to display the current alarm time.
- Press and hold the respective 'ALARM' button until the alarm time flashes.
- Use the '+' or '-' buttons to adjust the hour, then press the 'ALARM' button to confirm and move to minutes.
- Adjust minutes with '+' or '-' and press 'ALARM' to confirm.
- To activate or deactivate an alarm, press the 'ALARM 1 ON/OFF' or 'ALARM 2 ON/OFF' switch (typically located on the side or back). An alarm icon will appear on the display when active.
Fonction de répétition
When an alarm sounds, press the 'SNOOZE/LIGHT' button (usually a large button on top) to temporarily silence the alarm. The alarm will sound again after a few minutes (default snooze duration). To stop the alarm completely, press any other button or switch the alarm off using its dedicated ON/OFF switch.
Automatic Backlight and Light Sensor
The alarm clock features an automatic backlight that activates in low-light conditions. This function is controlled by a light sensor. To enable or disable the automatic backlight, locate the 'AUTO LIGHT' switch or setting (refer to your device's specific button layout).
Indoor Climate Display
The display continuously shows the indoor temperature in Celsius (°C) or Fahrenheit (°F) and the relative humidity (%). To switch between °C and °F, press the '°C/°F' button (if available) or cycle through display modes in the setup menu.
Entretien
- Nettoyage: Nettoyez l'appareil avec un chiffon doux et sec. N'utilisez pas de nettoyants abrasifs ni de solvants.
- Remplacement de la batterie : Replace batteries when the display dims or the device stops functioning. Always replace both batteries simultaneously with new ones of the same type. Dispose of used batteries responsibly.
- Stockage: Si vous devez stocker l'appareil pendant une période prolongée, retirez les piles pour éviter les fuites.
Dépannage
| Problème | Cause possible | Solution |
|---|---|---|
| L'écran est vide ou sombre. | Les piles sont faibles ou mal insérées. | Replace batteries with new 1.5 V AA batteries, ensuring correct polarity. |
| L'heure est incorrecte ou ne se règle pas automatiquement. | Poor radio signal reception; device is out of range or obstructed. | Move the alarm clock to a location with better signal reception, away from electronic devices or metal objects. Perform manual time setting if necessary. |
| L'alarme ne sonne pas. | L'alarme n'est pas activée ou le volume est trop faible. | Ensure the alarm's ON/OFF switch is in the 'ON' position. Check alarm time settings. |
| Les relevés de température et d'humidité semblent inexacts. | Device is exposed to direct sunlight, heat sources, or drafts. | Place the alarm clock in a stable indoor environment, away from extreme temperature fluctuations. |
Caractéristiques
- Modèle: 60.2547.54
- Marque: TFA Dostmann
- Type d'affichage : Numérique
- Source d'alimentation : 2 piles AA 1.5 V (non incluses)
- Dimensions (L x l x H) : 82 x 33 x 82 mm
- Poids: 110 gramme
- Matériel: Aluminium, plastique
- Plage de mesure de température: -9°C à +50°C (+14°F à +122°F)
- Plage de mesure de l'humidité : 20% à 95% HR
- Caractéristiques spéciales : Radio-controlled time, Dual alarms, Snooze function, Automatic backlight, Indoor temperature and humidity display, 7-language weekday display, Time zone adjustment.
Informations sur la garantie
TFA Dostmann products are manufactured with quality and care. For specific warranty terms and conditions, please refer to the warranty card included in your product packaging or visit the official TFA Dostmann webConsultez le site. Conservez votre preuve d'achat pour toute réclamation au titre de la garantie.
Soutien
If you encounter any issues not covered in this manual or require further assistance, please contact TFA Dostmann customer support. Contact details can typically be found on the official TFA Dostmann website ou sur l'emballage du produit.