
Introduction
Thank you for choosing the Peakeep S8 Digital Alarm Clock. This manual provides detailed instructions for setting up, operating, and maintaining your new alarm clock. Please read this manual thoroughly before use to ensure proper function and to maximize your product experience.
Caractéristiques du produit
- Grand écran LCD : Features a clear, boldface number display for easy readability.
- Capteur de lumière intelligent : Built-in sensor automatically activates a soft backlight in dark environments, ensuring visibility without disturbing sleep.
- Gradually Strengthening Alarm: The alarm sound increases in volume gradually to gently wake you up.
- Fonction de répétition: Permet de bénéficier de 5 minutes de sommeil supplémentaires après la sonnerie du réveil.
- Adjustable Time and Date Format: Customize time display (12/24 hour) and date format.
- Surveillance de la température : Affiche la température ambiante en degrés Celsius ou Fahrenheit.
- Alimenté par batterie : Operates on 3 x AAA batteries (not included).
Contenu du colis
- 1 x Peakeep S8 Digital Alarm Clock
- 1 x Manuel d'utilisation
Commandes et affichage
Affichage avant
The large LCD screen displays time, date, day of the week, alarm status, and temperature. The backlight activates automatically in low light conditions when the sensor is enabled.
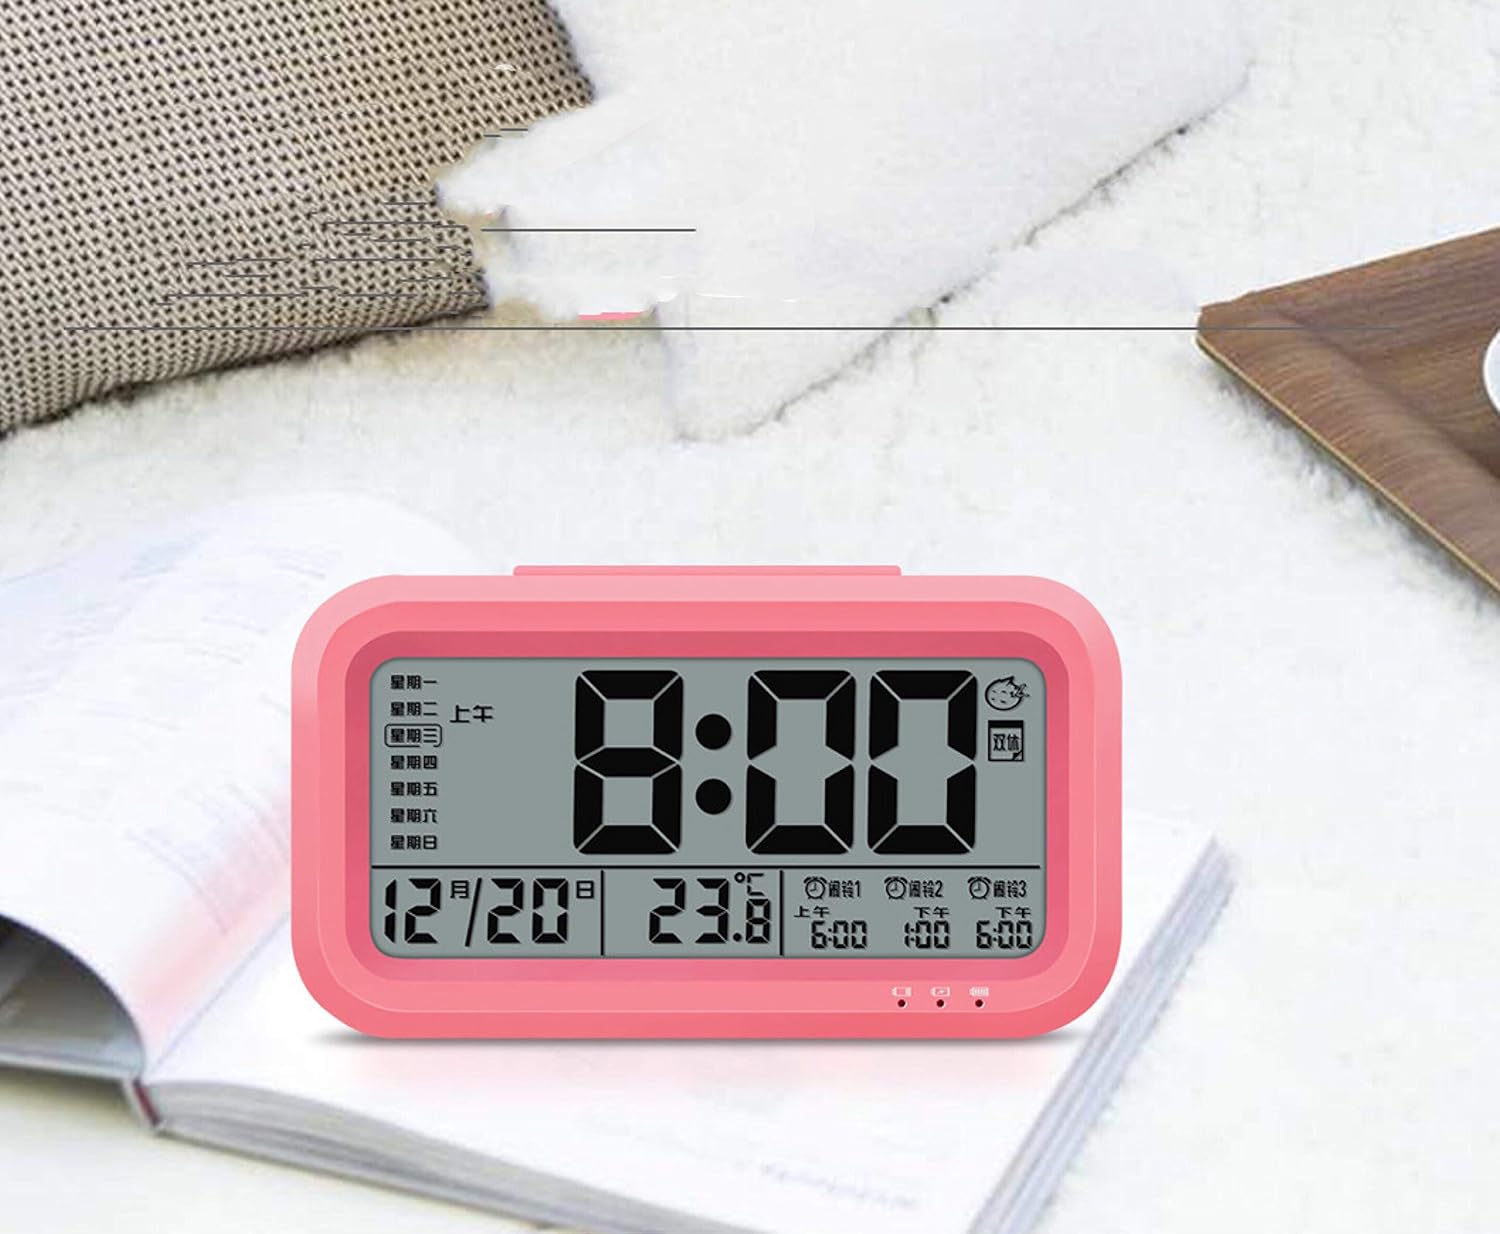
Image : Avant view of the Peakeep S8 Digital Alarm Clock. This image shows the large digital display with the time (8:00), date (12/20), and temperature (23.8°C). It also indicates alarm settings and day of the week.
Commandes arrière
The back of the clock features several buttons and switches for setting time, date, alarm, and other functions.
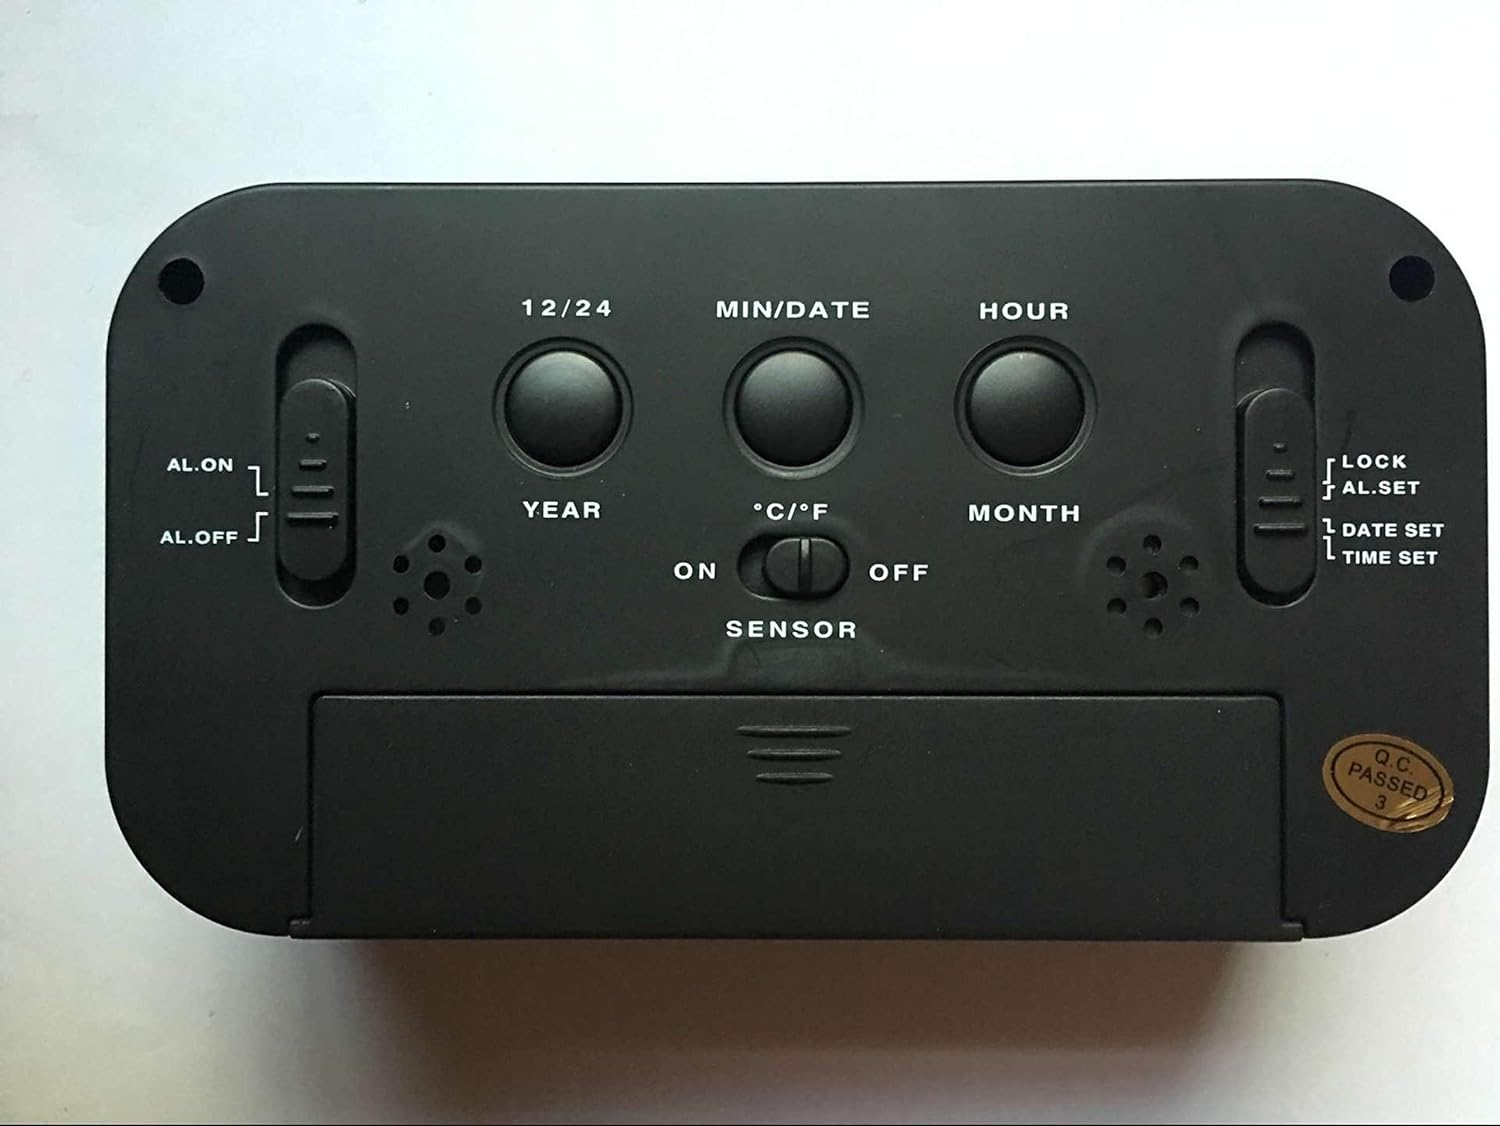
Image : Arrière view of the Peakeep S8 Digital Alarm Clock. This image highlights the control panel on the back, including buttons for 12/24 hour format, MIN/DATE, HOUR, YEAR, MONTH, °C/°F, and switches for AL.ON/AL.OFF, LOCK/AL.SET/DATE SET/TIME SET, and SENSOR ON/OFF.
- Bouton 12/24 : Permet de basculer entre l'affichage de l'heure au format 12 heures et au format 24 heures.
- Bouton MIN/DATE : Used to adjust minutes during time/alarm setting, and to view date.
- Bouton HEURE : Used to adjust hours during time/alarm setting.
- Bouton ANNÉE : Used to set the year.
- Bouton MOIS : Utilisé pour définir le mois.
- Touche °C/°F : Permet de basculer l'affichage de la température entre Celsius et Fahrenheit.
- AL.ON/AL.OFF Switch: Active ou désactive la fonction d'alarme.
- MODE Switch (LOCK/AL.SET/DATE SET/TIME SET):
- VERROUILLAGE: Locks current settings to prevent accidental changes.
- AL.SET: Passe en mode de réglage de l'alarme.
- DATE SET: Passe en mode de réglage de la date.
- RÉGLAGE DE L'HEURE: Passe en mode de réglage de l'heure.
- SENSOR ON/OFF Switch: Activates or deactivates the smart light sensor for automatic backlight.
- Bouton SNOOZE/LUMIÈRE (en haut) : Activates snooze when alarm sounds, or temporarily illuminates the display.
Installation
1. Installation de la batterie
- Ouvrez le couvercle du compartiment à piles situé à l'arrière de l'horloge.
- Insert 3 new 1.5V AAA batteries, ensuring correct polarity (+ and -).
- Fermez soigneusement le couvercle du compartiment à piles.
- Remarque : les piles ne sont pas incluses.
2. Réglage initial de l'heure
- Slide the MODE switch to RÉGLAGE DE L'HEURE.
- Appuyez sur le HEURE bouton pour régler l'heure.
- Appuyez sur le MINIMUM/DATE bouton pour régler les minutes.
- Once the correct time is set, slide the MODE switch back to VERROUILLAGE.
3. Initial Date Setting
- Slide the MODE switch to FIXER LA DATE.
- Appuyez sur le ANNÉE bouton pour régler l'année.
- Appuyez sur le MOIS bouton pour régler le mois.
- Appuyez sur le MINIMUM/DATE bouton pour régler la date.
- Once the correct date is set, slide the MODE switch back to VERROUILLAGE.
Mode d'emploi
Réglage de l'alarme
- Slide the MODE switch to AL.SET.
- Appuyez sur le HEURE bouton pour régler l'heure de l'alarme.
- Appuyez sur le MINIMUM/DATE bouton pour régler la durée de l'alarme (minutes).
- Once the desired alarm time is set, slide the MODE switch back to VERROUILLAGE.
- Pour activer l'alarme, faites glisser le AL.ON/AL.OFF passer à AL.ONUne icône d'alarme apparaîtra à l'écran.
Utilisation de la fonction Snooze
Lorsque l'alarme sonne, appuyez sur le grand bouton. SNOOZE / LUMIÈRE button on top of the clock. The alarm will pause for approximately 5 minutes and then sound again. This can be repeated.
Désactiver l'alarme
Pour désactiver complètement l'alarme, faites glisser le AL.ON/AL.OFF passer à AL.OFF. The alarm icon will disappear from the display.
Activating the Smart Light Sensor
To enable the automatic backlight feature, slide the CAPTEUR passer à ON. The display will automatically illuminate with a soft glow in dark environments. Slide the switch to DÉSACTIVÉ pour désactiver cette fonctionnalité.
Changement d'unité de température
Appuyez sur le ° C / ° F button on the back of the clock to switch the temperature display between Celsius and Fahrenheit.
Changing Time Format (12/24 Hour)
Appuyez sur le 12/24 button on the back of the clock to toggle between 12-hour (with AM/PM indicator) and 24-hour time formats.
Entretien
Nettoyage
Essuyez l'horloge avec un chiffon doux et sec. N'utilisez pas de produits nettoyants abrasifs ni de solvants, car ils pourraient endommager la surface.
Remplacement de la batterie
When the display becomes dim or the clock functions erratically, it is time to replace the batteries. Follow the battery installation steps in the "Setup" section. Always replace all three AAA batteries at the same time with new ones.
Dépannage
| Problème | Cause/solution possible |
|---|---|
| L'écran est vide ou sombre. |
|
| L'alarme ne sonne pas. |
|
| L'horloge avance ou retarde. |
|
| Les boutons ne répondent pas. |
|
Caractéristiques
- Marque: Peakeep
- Numéro de modèle : S8 (Item Model Number: Crazy Curry-030)
- Type d'affichage : LCD numérique
- Matériel: Plastique
- Couleur: Black (Black-a)
- Source d'alimentation : 3 piles AAA de 1.5 V (non incluses)
- Caractéristiques spéciales : Alarm, Snooze, Smart Light Sensor, Temperature Display (°C/°F), 12/24 Hour Format
- Dimensions: (Approximate, based on typical alarm clock size and weight)
- Poids de l'article : 178 g
- Poids à l'expédition : 0.18 kilogrammes
- Code à barres : 734602860235
Garantie et assistance
This product is designed for reliability and ease of use. For specific warranty information, please refer to the documentation provided at the time of purchase or contact your retailer.
If you encounter any issues not covered in this manual, please contact the retailer or manufacturer for assistance. Keep your purchase receipt as proof of purchase for any warranty claims.