
1. Introduction
Thank you for choosing the Technoline WT 538 Wireless Projection Alarm Clock. This modern device features a touch sensor for projection and illumination, designed to integrate seamlessly into your digital lifestyle. It offers a radio-controlled clock with manual setting options, date and weekday display in 7 languages, 12/24 hour format, time zone adjustment, and indoor temperature display in Celsius or Fahrenheit. The alarm includes a customizable snooze function, and the time can be projected onto a wall or ceiling. This manual provides detailed instructions for setup, operation, and maintenance to ensure optimal performance of your alarm clock.

Illustration 1.1 : Avant view of the Technoline WT 538 Wireless Projection Alarm Clock in use, showing its display and projection feature.
2. Consignes de sécurité
- Lisez attentivement toutes les instructions avant d'utiliser l'appareil.
- Gardez l'appareil à l'écart de l'eau, de l'humidité et des températures extrêmes.
- Use only the specified power adapter (4.5V) and battery type (2 x 1.5V AAA).
- N’essayez pas de démonter ou de réparer l’appareil vous-même. Confiez toute intervention à un personnel qualifié.
- Jetez les piles usagées de manière responsable conformément aux réglementations locales.
3. Contenu du colis
Veuillez vérifier que tous les articles sont présents et en bon état :
- Technoline WT 538 Wireless Projection Alarm Clock
- Adaptateur secteur 4.5V
- 2 piles AAA de 1.5 V
- Manuel de l'utilisateur (ce document)
4. Produit terminéview
Familiarize yourself with the main components and controls of your WT 538 alarm clock.
4.1 Front Display and Projection
The front of the device features a clear digital display showing time, date, weekday, and indoor temperature. The projection lens is located on the side, allowing time to be projected onto a surface.

Image 4.1 : Détail view of the alarm clock's digital display.
4.2 Rear Controls and Connections
The back of the alarm clock houses the control buttons, battery compartment, and power adapter input.

Image 4.2 : Arrière view showing buttons (SET, ALARM, +, -, WAVE), projection ON/OFF switch, alarm ON/OFF switch, battery compartment, and DC 4.5V power input.
5. Installation
5.1 Installation de la batterie
- Ouvrez le couvercle du compartiment des piles à l'arrière de l'appareil.
- Insert 2 x 1.5V AAA batteries, ensuring correct polarity (+ and -).
- Fermez soigneusement le couvercle du compartiment à piles.
5.2 Connexion de l'adaptateur secteur
For continuous operation and permanent projection, connect the included 4.5V power adapter.
- Plug the small end of the power adapter into the DC 4.5V input jack on the back of the alarm clock.
- Branchez l'autre extrémité de l'adaptateur secteur dans une prise murale standard.
5.3 Configuration initiale
Upon first power-on (either with batteries or power adapter), the clock will attempt to synchronize with the radio-controlled time signal. This process may take a few minutes. If the signal is not received, you can set the time manually.
6. Mode d'emploi
6.1 Time Setting (Radio-Controlled and Manual)
- Heure radiocommandée : The clock automatically attempts to receive the DCF-77 radio signal for accurate time. A signal icon on the display indicates reception status.
- Réglage manuel de l'heure : If radio reception is poor, press and hold the 'SET' button to enter manual time setting mode. Use the '+' and '-' buttons to adjust hours, minutes, and other settings. Press 'SET' again to confirm each step.
- Format 12/24 heures : During manual time setting, you can switch between 12-hour (with AM/PM indicator) and 24-hour formats.
- Réglage du fuseau horaire : Adjust the time zone offset if needed, typically during manual setup.
6.2 Date and Weekday Display
The display shows the current date and weekday. The weekday can be displayed in 7 different languages. Refer to the manual setting section to cycle through language options.
6.3 Indoor Temperature Display
The alarm clock continuously displays the indoor temperature. Press the '°C/°F' button to switch between Celsius and Fahrenheit units.
6.4 Fonction d'alarme
- Appuyez une fois sur le bouton « ALARME » pour view l'heure actuelle de l'alarme.
- Press and hold the 'ALARM' button to enter alarm setting mode. Use '+' and '-' to adjust the alarm hour and minute. Press 'ALARM' to confirm.
- Use the 'ALARM ON/OFF' switch on the back to activate or deactivate the alarm. An alarm icon will appear on the display when active.
6.5 Fonction de répétition
When the alarm sounds, gently touch the top of the alarm clock (touch sensor area) to activate the snooze function. The alarm will pause for a preset duration (adjustable during alarm setup) and sound again later.
6.6 Activation du rétroéclairage
The display backlight can be activated by gently touching the top of the alarm clock (touch sensor area). This provides temporary illumination for easy viewdans des conditions de faible luminosité.
6.7 Fonction de projection
The WT 538 can project the time onto a wall or ceiling.
- Temporary Projection: Gently touch the top of the alarm clock (touch sensor area) to activate the projection temporarily.
- Permanent Projection: Permanent projection is only possible when the alarm clock is powered by the included 4.5V power adapter. Use the 'Projection ON/OFF' switch on the back of the device to enable continuous projection.
- Adjust the angle of the projection lens to achieve the desired position and focus.
7. Entretien
7.1 Nettoyage
Wipe the device with a soft, dry cloth. Do not use abrasive cleaners or solvents, as these may damage the surface.
7.2 Remplacement de la batterie
When the display dims or the device functions become unreliable, it is time to replace the batteries. Follow the battery installation steps in Section 5.1.
8. Dépannage
- Aucun écran/appareil ne s'allume pas : Check battery polarity, ensure batteries are fresh, or verify the power adapter is correctly connected and plugged into a working outlet.
- Poor Radio Signal Reception: Move the alarm clock to a location away from electronic devices that may cause interference. Try different orientations.
- Projection Unclear/Out of Focus: Adjust the projection lens to focus the image. Ensure the projection surface is within the optimal range.
- Projection Not Permanent: Ensure the alarm clock is connected to the power adapter and the 'Projection ON' switch is activated. Permanent projection is not available when running on batteries alone.
- L'alarme ne sonne pas : Check if the alarm is set correctly and the 'ALARM ON' switch is activated.
9. Spécifications
| Fonctionnalité | Spécification |
|---|---|
| Marque | Technoline |
| Modèle | WT 538 |
| Type d'affichage | Numérique |
| Caractéristiques spéciales | Alarm, Calendar Display, Multiple Time Zones, Snooze, Silent Clock, Illuminated, Projection |
| Dimensions du produit (L x H x P) | 15 cm x 9 cm x 1.5 cm (with battery compartment: 4 cm) |
| Poids (batteries incluses) | 0.202 kg |
| Source d'énergie | 4.5V Power Adapter (included) or 2 x 1.5V AAA Batteries (included) |
| Type de montage | Dessus de table |
| Matériau du cadre | Acrylonitrile butadiène styrène |
| Plage de mesure de la température | -9.9 °C à 50 °C |
| Résolution de la température | 0.1 °F |
| Précision de la température | 0 °C to 40 °C: ± 1 °C; -9.9 °C to -0.1 °C: ± 2 °C; 40 °C to 50 °C: ± 2 °C |
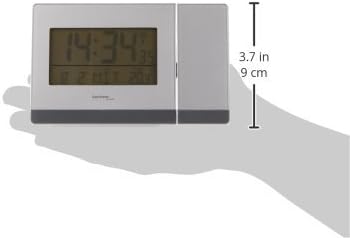
Image 9.1 : Côté view illustrating the dimensions of the alarm clock.
10. Garantie et assistance
Pour toute information relative à la garantie ou pour obtenir une assistance technique, veuillez consulter la documentation fournie avec votre achat ou contacter votre revendeur. Conservez votre preuve d'achat pour toute réclamation au titre de la garantie.