
Introduction
The Teesa Hypercare T300 rotary shaver (model TSA0520) is designed for efficient and comfortable facial hair removal. Its three flexible blades adapt to facial contours, and the integrated pop-up trimmer allows for precise styling of sideburns and moustaches. This manual provides essential information for safe operation, maintenance, and optimal performance of your device.
Consignes de sécurité
Please read these safety instructions carefully before using the appliance and keep them for future reference.
- Cet appareil est destiné à un usage domestique uniquement.
- Do not immerse the shaver in water or other liquids. Keep it dry.
- N'utilisez pas l'appareil si le cordon d'alimentation ou la fiche est endommagé.
- Always disconnect the shaver from the power supply before cleaning.
- Gardez l’appareil hors de portée des enfants.
- Utilisez uniquement le câble d'alimentation fourni avec l'appareil.
- Do not use the shaver if the shaving heads are damaged, as this may cause injury.
Contenu du colis
Veuillez vérifier le contenu de votre colis. Si des articles sont manquants ou endommagés, veuillez contacter votre revendeur.
- Teesa Hypercare T300 Rotary Shaver
- Câble d'alimentation
- Capuchon de protection
- Brosse de nettoyage
- Huile de graissage
- Manuel d'instructions
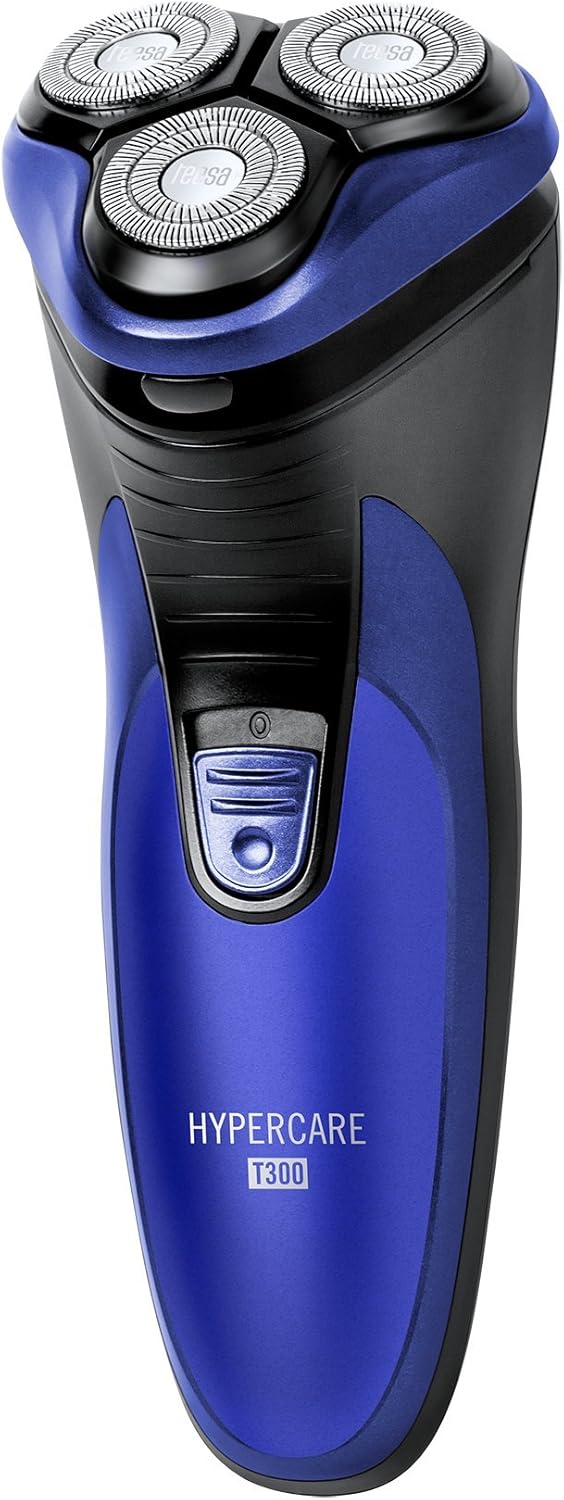
Produit terminéview
Familiarize yourself with the components of your Teesa Hypercare T300 Rotary Shaver.


Installation
Charger le rasoir
- Assurez-vous que le rasoir est éteint avant de le charger.
- Connect the power cable to the charging port on the shaver.
- Plug the other end of the power cable into a standard electrical outlet (220-240V; 50/60Hz).
- Le voyant de charge s'allumera, indiquant que le rasoir est en charge.

A full charge takes approximately 8 hours and provides up to 45 minutes of cordless operation. Do not leave the shaver connected to the charger for extended periods after it is fully charged.
Opérationnel
Rasage
- Assurez-vous que le rasoir est complètement chargé.
- Appuyez sur le bouton d'alimentation pour allumer le rasoir.
- Tenez le rasoir à angle droit par rapport à votre peau.
- Move the shaver in small, circular motions over your face and neck. For optimal results, shave against the direction of hair growth.
- The flexible shaving heads will adapt to the contours of your face for a close shave.
- Après le rasage, appuyez sur le bouton marche/arrêt pour éteindre le rasoir.
Utilisation du coupe-bordures escamotable
- Allumez le rasoir.
- Locate the pop-up trimmer release button on the side of the shaver.
- Slide the release button upwards to extend the pop-up trimmer.

- Use the trimmer to precisely shape sideburns, moustaches, or beard lines.
- After use, push the trimmer back down until it clicks into its closed position.
Entretien
Nettoyer le rasoir
Un nettoyage régulier garantit des performances et une hygiène optimales.
- Éteignez le rasoir et débranchez-le de la prise électrique.
- Press the release button on the front of the shaver to open the shaving head unit.
- Use the provided cleaning brush to remove any accumulated hair clippings from the shaving heads and the hair chamber.
- For a more thorough cleaning, you may rinse the shaving heads under running water. Ensure the main body of the shaver does not get wet.
- Allow all parts to air dry completely before reassembling the shaving head unit.
- Periodically apply a small drop of the provided lubricating oil to the shaving foils and cutters to maintain smooth operation and prolong blade life.
- Always replace the protective cap over the shaving heads after each use to prevent damage.
Dépannage
Si vous rencontrez des problèmes avec votre rasoir, consultez les problèmes et solutions courants suivants :
- Le rasoir ne s'allume pas :
- Assurez-vous que le rasoir est complètement chargé.
- Appuyez fermement sur le bouton d'alimentation.
- Mauvaises performances de rasage :
- The blades may be clogged with hair. Clean the shaver thoroughly as described in the Maintenance section.
- Ensure the shaver is fully charged. Performance may decrease with low battery.
- Blades may be dull. Consider replacing the shaving heads after extended use (replacement parts sold separately).
- Rasoir ne chargeant pas :
- Check that the power cable is securely connected to both the shaver and the electrical outlet.
- Vérifiez que la prise électrique fonctionne correctement.
- Ensure the charging indicator light illuminates when connected.
Si le problème persiste après avoir essayé ces solutions, veuillez contacter le service client.
Caractéristiques
| Fonctionnalité | Spécification |
|---|---|
| Numéro de modèle | TSA0520 |
| Pouvoir | 3 W |
| Vitesse de rotation | 6000 tr/min |
| Durée d'exécution | Jusqu'à 45 minutes |
| Temps de charge | Jusqu'à 8 XNUMX heures |
| Batterie | 2.4 V; 2/3 AA 600 mAh x2 (Rechargeable) |
| Alimentation électrique | 220 – 240 V ; 50/60Hz |
| Poids | 165 g |
| Dimensions (L x l x H) | 58.2 x 46.8 x 150.9 mm |
| Matériau de la lame | Acier allié |
| Nombre de lames | 3 (Rotary Type) |
| Dossier spécial | Conception ergonomique |
Garantie et assistance
For warranty information, technical assistance, or to inquire about replacement parts, please refer to the documentation included with your purchase or visit the official Teesa webConsultez le site. Conservez votre preuve d'achat pour toute réclamation au titre de la garantie.