
1. Produit terminéview
The DIGOO External Sensor is designed to provide accurate outdoor temperature and humidity readings to compatible DIGOO weather stations. This sensor operates wirelessly, transmitting data to your main weather station unit, allowing you to monitor environmental conditions remotely. It is specifically designed for use with DIGOO weather station models TH11300, TH8380, TH1981, and TH8805.

Figure 1 : DIGOO External Sensor shown with examples of compatible weather station displays. The sensor is a sleek, black rectangular unit with the DIGOO logo.
2. Installation
2.1 Installation de la batterie
The external sensor requires batteries for operation. Ensure you use fresh batteries of the correct type (typically AA or AAA, refer to the battery compartment for specifics).
- Repérez le couvercle du compartiment à piles à l'arrière du capteur.
- Faites glisser ou déclipsez le couvercle pour ouvrir le compartiment.
- Insérez les piles en respectant la polarité correcte (+ et -).
- Replace the battery compartment cover, ensuring it is securely closed to protect against moisture.
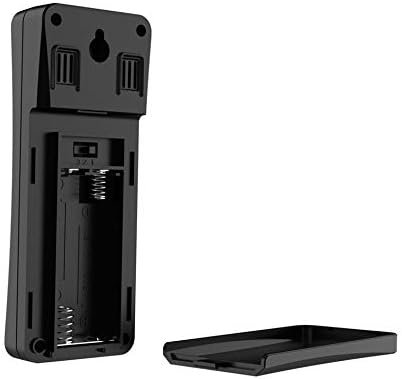
Figure 2 : Arrière view of the DIGOO External Sensor with the battery cover removed, showing the battery slots and a channel selection switch.
2.2 Appairage avec une station météorologique
For the external sensor to transmit data to your weather station, it must be paired. This process typically involves setting both devices to the same communication channel.
- On the back of the external sensor, locate the channel selection switch (usually labeled 1, 2, or 3). Select a channel.
- On your DIGOO weather station, navigate to the sensor pairing or channel selection settings. Set the weather station to the même canal as selected on the external sensor.
- Place the sensor and the weather station in close proximity (within a few meters) during the initial pairing process.
- Allow a few minutes for the devices to synchronize. The weather station display should show readings from the external sensor once connected.
2.3 Recommandations de stage
Optimal placement ensures accurate readings and reliable signal transmission.
- Emplacement extérieur : Place the sensor outdoors in a shaded area, away from direct sunlight, which can cause artificially high temperature readings.
- Protection contre les éléments : While designed for outdoor use, protect the sensor from direct rain and heavy snow to prolong its lifespan. A sheltered spot under an eave or porch is ideal.
- Ventilation: Ensure good airflow around the sensor for accurate humidity readings. Avoid enclosed spaces.
- Portée du signal : Place the sensor within the specified wireless range of your weather station (typically up to 30-100 meters, depending on obstacles). Walls and electronic devices can interfere with the signal.
- Montage: Use the integrated hanging hole on the back of the sensor to mount it securely on a wall or post.
3. Mode d'emploi
Once successfully paired and placed, the DIGOO External Sensor will automatically begin transmitting temperature and humidity data to your compatible DIGOO weather station. The sensor continuously monitors the outdoor environment and sends updates at regular intervals (e.g., every 30-60 seconds).
- The weather station will display the received data, often alongside indoor readings.
- No further user interaction is typically required for daily operation after initial setup.
- Refer to your specific DIGOO weather station manual for details on how to view and interpret the external sensor data on its display.
4. Entretien
4.1 Remplacement de la batterie
When the batteries are low, your weather station may indicate a low battery icon for the external sensor, or the sensor may stop transmitting data. Replace batteries as follows:
- Ouvrez le compartiment de la batterie comme décrit dans la section 2.1.
- Retirez les anciennes piles.
- Insérez de nouvelles piles en respectant la polarité.
- Fermez soigneusement le compartiment à piles.
- The sensor should automatically re-establish connection with the weather station. If not, re-pair as per Section 2.2.
4.2 Nettoyage
Pour maintenir des performances optimales, nettoyez périodiquement le capteur.
- Essuyez l'extérieur du capteur avec un chiffon doux et sec.amp tissu.
- N’utilisez pas de nettoyants abrasifs ni de solvants, car ils peuvent endommager le revêtement.asing ou composants internes.
- Ensure no water enters the battery compartment or sensor openings.
5. Dépannage
-
Sensor not connecting or no data displayed:
- Vérifiez que les piles sont correctement installées et suffisamment chargées. Remplacez-les si nécessaire.
- Ensure the external sensor and weather station are set to the same channel (refer to Section 2.2).
- Move the sensor closer to the weather station to rule out range issues or signal interference.
- Restart both the sensor (by removing and reinserting batteries) and the weather station.
- Avoid placing the sensor near large metal objects or other electronic devices that might cause interference.
-
Relevés de température/humidité inexacts :
- Verify the sensor is placed in a shaded area, away from direct sunlight or heat sources (e.g., vents, walls that absorb heat).
- Ensure the sensor has adequate ventilation and is not in an enclosed space.
- Check for any obstructions blocking the sensor's vents.
- Compare readings with another reliable thermometer/hygrometer in the same location to confirm inaccuracy.
6. Spécifications
- Marque: DIGOO
- Modèle: Capteur externe
- Compatibilité: DIGOO Weather Stations TH11300, TH8380, TH1981, TH8805
- Fréquence sans fil : 433 MHz
- Source d'alimentation : Batteries (type to be confirmed in battery compartment)
- ASIN: B07DF9XK7Q
- Première date disponible : 30 novembre 2019
7. Garantie et assistance
Specific warranty information for this DIGOO External Sensor is not available in the provided product details. For warranty claims, technical support, or further assistance, please refer to the documentation included with your original purchase or contact DIGOO customer service directly through their official website ou le détaillant où le produit a été acheté.