1. Introduction
This manual provides detailed instructions for the installation, operation, and maintenance of your Night Owl WM-8HD10L-4720 8-Channel Wired Security System. This system is designed to provide reliable surveillance with high-definition video quality, motion detection, and night vision capabilities. Please read this manual thoroughly before setting up and operating your system to ensure proper functionality and safety.
The Night Owl WM-8HD10L-4720 system includes an 8-channel Digital Video Recorder (DVR) and four wired security cameras, offering comprehensive coverage for your property.
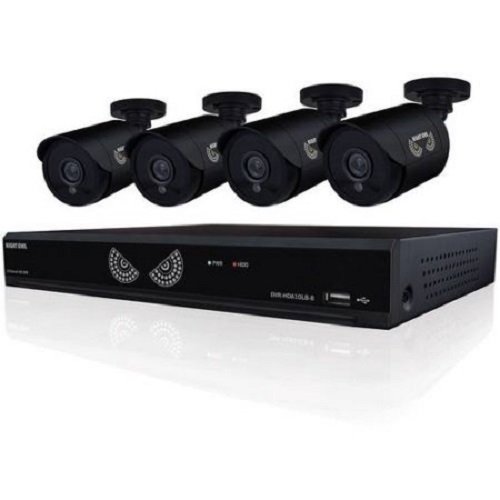
Figure 1: Night Owl WM-8HD10L-4720 8-Channel Wired Security System components, including the DVR and cameras.
2. Consignes de sécurité
Respectez toujours les consignes de sécurité de base lors de l'utilisation de ce produit afin de réduire les risques d'incendie, d'électrocution et de blessures.
- Lisez toutes les instructions avant d’utiliser le système.
- Keep the system away from water and moisture.
- N'essayez pas de réparer vous-même ce produit. Confiez tous les travaux d'entretien à du personnel de service qualifié.
- Utilisez uniquement l'adaptateur secteur fourni avec le système.
- Assurez une ventilation adéquate du DVR afin d'éviter toute surchauffe.
Avertissement concernant la Proposition 65 de Californie :
ATTN CA RESIDENTS: WARNING: This product can expose you to Polybrominated biphenyls, which is known to the State of California to cause Cancer and birth defects or other reproductive harm. For more information go to www.p65warnings.ca.gov.
3. Installation
Follow these steps to set up your Night Owl security system.
3.1 Déballage et inspection
- Retirez soigneusement tous les composants de l'emballage.
- Verify that all items listed in the product contents are present.
- Inspect all components for any signs of damage. Do not use damaged components.
3.2 Connexion du DVR
- Connect a monitor to the DVR's video output port (VGA or HDMI, if available).
- Connect a USB mouse to the DVR's USB port for navigation.
- Connect the DVR to your network router using an Ethernet cable (optional, for remote viewing).
3.3 Connexion des caméras
Each camera connects to the DVR using a wired connection. The system supports up to 8 cameras, and comes with 4.
- Mount each camera in your desired location, ensuring a clear field of view.
- Run the camera's video/power cable to the DVR.
- Connect the video connector from the camera cable to an available video input port on the back of the DVR.
- Connect the power connector from the camera cable to the power splitter, and then connect the splitter to the camera power adapter.
3.4 Mise sous tension
- Once all connections are secure, connect the DVR power adapter to the DVR and then to a power outlet.
- The system will power on automatically. Follow the on-screen prompts for initial setup, including setting the date, time, and creating a password.
4. Fonctionnement du système
This section covers the basic operation of your Night Owl security system.
4.1 En direct View
After powering on, the DVR will display the live view depuis toutes les caméras connectées sur le moniteur. Vous pouvez basculer entre les vues d'une seule caméra. view et multicaméra view en utilisant les commandes à l'écran ou la souris.
4.2 Modes d'enregistrement
The system supports various recording modes, including continuous recording and motion-activated recording.
- Motion Sensor Recording: The system is equipped with motion sensors. When motion is detected in a camera's field of view, the DVR will automatically begin recording. You can configure motion detection zones and sensitivity settings in the DVR's menu.
- Enregistrement programmé : Set specific times for the DVR to record continuously or based on motion.
4.3 Vision nocturne
The cameras are equipped with low light technology for night vision. In low-light conditions, the cameras automatically switch to infrared (IR) mode, providing clear black and white video surveillance.
Télécommande 4.4 View(facultatif)
If your DVR is connected to the internet, you may be able to access live camera feeds and recorded footage remotely via a compatible mobile application. Refer to the Night Owl website or app store for specific instructions on setting up remote access.
5. Entretien
Un entretien régulier garantit la longévité et les performances optimales de votre système de sécurité.
- Nettoyage: Regularly clean the camera lenses with a soft, dry cloth to remove dust and smudges. Ensure the DVR is free from dust buildup, especially around ventilation areas.
- Mises à jour du micrologiciel : Periodically check the Night Owl official website for available firmware updates for your DVR. Firmware updates can improve system performance, add new features, and enhance security.
- État du disque dur : The DVR's hard drive stores all recorded footage. Monitor its health through the DVR's system settings and ensure there is sufficient space for recordings.
6. Dépannage
This section addresses common issues you might encounter with your security system.
- Aucun signal vidéo provenant de la caméra :
- Check all cable connections between the camera and the DVR.
- Assurez-vous que la caméra est alimentée.
- Test the camera with a different cable or DVR port if available.
- L'enregistreur numérique ne s'allume pas :
- Vérifiez que l'adaptateur secteur est bien connecté au DVR et à une prise de courant fonctionnelle.
- Assurez-vous que la prise de courant est fonctionnelle.
- Remote App Password Error:
- The password for the mobile app may be different from the DVR's local password. Refer to the app's specific setup instructions or the Night Owl support resources for remote access password management.
- Ensure your DVR has an active internet connection.
- Mauvaise qualité de vision nocturne :
- Assurez-vous que l'objectif de la caméra est propre et dégagé de toute obstruction.
- Check for strong light sources near the camera that might interfere with IR illumination.
7. Spécifications
Technical specifications for the Night Owl WM-8HD10L-4720 security system.
| Fonctionnalité | Description |
|---|---|
| Numéro de modèle | WM-8HD10L-4720 |
| Marque | Hibou de nuit |
| Technologie de connectivité | Câblé |
| Résolution de capture vidéo | 720p |
| Caractéristiques spéciales | Détecteur de mouvement, vision nocturne |
| Nombre de canaux | 8 |
| Couleur | Noir |
| Source d'énergie | Électrique avec fil |
| Utilisation recommandée | Surveillance |
| Technologie à faible luminosité | Vision nocturne |
| Fréquence d'images | 30 images par seconde |
| Mode d'enregistrement | Détecteur de mouvement |
| Type de lentille | Varifocal |
| Dimensions du produit | 18.3 x 8.7 x 12.2 pouces |
| Poids de l'article | 2 livres |
| Piles requises | 1 Lithium Polymer (for internal clock/memory backup) |
| Code UPC | 810830023137 |
8. Informations sur la garantie
Night Owl products typically come with a limited manufacturer's warranty. For specific details regarding the warranty period, coverage, and terms for your WM-8HD10L-4720 system, please refer to the warranty card included with your product or visit the official Night Owl webConsultez le site. Conservez votre preuve d'achat pour toute réclamation au titre de la garantie.
9. Assistance
For technical assistance, customer service, or additional resources, please visit the official Night Owl support website or contact their customer service department. You can often find FAQs, video tutorials, and downloadable software/firmware updates on their support portal.
Support en ligne: Visit the Night Owl official website de ressources d'assistance.
Coordonnées: Refer to the Night Owl webConsultez le site pour connaître les numéros de téléphone et les horaires d'ouverture actuels.