1. Introduction
This manual provides detailed instructions for the installation, operation, maintenance, and troubleshooting of your Gateway SX2865 SFF Desktop Motherboard H61 (Model DB.U7411.001). This motherboard is designed for Small Form Factor (SFF) desktop systems, featuring the Intel H61 Express chipset and supporting LGA 1155/1156 CPUs and DDR3 RAM. Please read this manual thoroughly before proceeding with any installation or configuration to ensure proper functionality and safety.
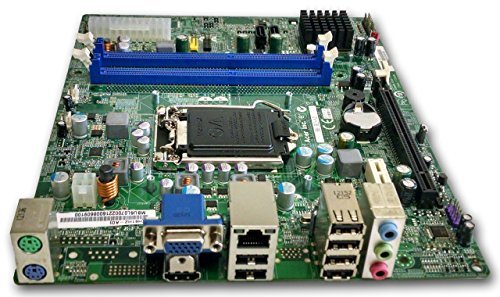
Figure 1 : Surview of the Gateway SX2865 SFF Desktop Motherboard H61. This image displays the main components and layout of the motherboard, including the CPU socket, RAM slots, and various connectors.
2. Consignes de sécurité
Respectez toujours les consignes de sécurité suivantes lors de la manipulation et de l'installation des composants informatiques :
- Débranchez le cordon d'alimentation de la prise murale avant d'installer ou de retirer tout composant.
- Portez un bracelet antistatique pour éviter les dommages causés par les décharges électrostatiques (ESD) aux composants sensibles.
- Manipulez la carte mère par ses bords pour éviter de toucher des composants ou des circuits sensibles.
- Assurez une ventilation adéquate à l'intérieur du boîtier de l'ordinateur afin d'éviter toute surchauffe.
- N’exposez pas la carte mère à l’humidité ou à des températures extrêmes.
- En cas de doute sur une étape quelconque de l'installation, consultez un technicien qualifié.
3. Configuration et installation
Follow these steps to properly install the Gateway SX2865 SFF Desktop Motherboard into your system:
3.1. Préparation du châssis
- Open your computer chassis and ensure it is clean and free of dust.
- Install the I/O shield provided with your chassis or motherboard into the rear panel opening.
- Verify that the standoffs in the chassis align with the mounting holes on the motherboard. Adjust if necessary.
3.2. Installation du processeur
- Locate the CPU socket (LGA 1155/1156) on the motherboard.
- Soulevez délicatement le levier de chargement et ouvrez le couvercle du socket du processeur.
- Carefully align the CPU with the socket, matching the golden triangle on the CPU with the triangle mark on the socket. Do not force the CPU into the socket.
- Fermez le couvercle de la prise et appuyez sur le levier de charge jusqu'à ce qu'il se verrouille.
- Apply a thin layer of thermal paste to the CPU surface (if not pre-applied on the cooler).
- Install the CPU cooler according to its manufacturer's instructions, ensuring it is securely fastened.
3.3. Installation de la RAM
- Localisez les emplacements DIMM DDR3 sur la carte mère.
- Ouvrez les clips situés aux deux extrémités de l'emplacement DIMM.
- Alignez l'encoche du module de RAM avec le détrompeur de l'emplacement DIMM.
- Appuyez fermement sur les deux extrémités du module de RAM jusqu'à ce que les clips s'enclenchent.
3.4. Montage de la carte mère
- Carefully place the motherboard into the chassis, aligning the mounting holes with the standoffs.
- Fixez la carte mère à l'aide de vis, en veillant à ne pas trop serrer.
3.5. Connexion des périphériques et alimentation électrique
- Connectez le connecteur d'alimentation ATX à 24 broches et le connecteur d'alimentation du processeur à 4 broches de votre alimentation à la carte mère.
- Connectez les câbles de données SATA de vos périphériques de stockage (HDD/SSD) aux ports SATA de la carte mère.
- Connect front panel connectors (power button, reset button, USB, audio) to their respective headers on the motherboard. Refer to the motherboard's silkscreen labels for correct orientation.
- Install any expansion cards (e.g., graphics card) into the appropriate PCIe slots and secure them.
- Connect all necessary cables to your power supply.
4. Fonctionnement et configuration
4.1. Démarrage initial
- After all components are installed and connected, close the chassis.
- Connectez votre moniteur, votre clavier et votre souris.
- Connect the power cord to the power supply and a wall outlet.
- Appuyez sur le bouton d'alimentation de votre ordinateur.
4.2. Configuration du BIOS/UEFI
The BIOS (Basic Input/Output System) or UEFI (Unified Extensible Firmware Interface) is firmware that initializes hardware during the booting process. To enter the BIOS/UEFI setup utility:
- During the initial boot-up sequence, repeatedly press the designated key (commonly Du, F2, ou F10). The exact key may vary; check the on-screen prompts.
- Within the BIOS/UEFI, you can configure settings such as:
- Date et heure du système
- Boot Order (to install an operating system from a USB drive or DVD)
- SATA Mode (AHCI, IDE)
- CPU and Memory settings (advanced users)
- Enregistrez les modifications et quittez le BIOS/UEFI pour poursuivre le démarrage.
4.3. Installation du système d'exploitation et des pilotes
After configuring the BIOS/UEFI, proceed with installing your preferred operating system (e.g., Windows, Linux). Once the OS is installed, install the necessary drivers for the motherboard's components (chipset, audio, LAN, etc.). These drivers are typically available on the manufacturer's website (Acer/Gateway) or can be found through the operating system's update features.
5. Entretien
Un entretien régulier contribue à assurer la longévité et la stabilité des performances de votre carte mère :
- Élimination de la poussière : Periodically clean the inside of your computer case, including the motherboard, CPU cooler, and fan vents, using compressed air. Ensure the system is powered off and unplugged before cleaning.
- Mises à jour du BIOS : Vérifiez le fabricant website (Acer/Gateway) for BIOS/UEFI updates. Updates can improve stability, add support for new hardware, or fix bugs. Follow the update instructions carefully to avoid damaging the motherboard.
- Mises à jour du pilote: Keep your system drivers updated to ensure optimal performance and compatibility.
- Inspection physique: Inspectez régulièrement la carte mère pour détecter tout signe de dommage, de connexion desserrée ou de condensateurs gonflés.
6. Dépannage
Si vous rencontrez des problèmes avec votre carte mère, reportez-vous aux étapes de dépannage courantes suivantes :
- Pas d'alimentation :
- Ensure the power supply is connected correctly to the motherboard (24-pin ATX and 4-pin CPU).
- Check that the power supply switch is in the 'ON' position.
- Verify the power cord is securely plugged into both the power supply and the wall outlet.
- Confirm the front panel power button connector is correctly attached to the motherboard.
- Pas d'affichage :
- Ensure the monitor is powered on and connected to the correct video output (either integrated graphics or a dedicated graphics card).
- Réinsérez les modules de RAM. Essayez de démarrer avec un seul module de RAM installé.
- Réinstallez la carte graphique (le cas échéant).
- Check if the CPU cooler is properly installed and the CPU power connector is secure.
- System Fails to Boot / POST Errors:
- Listen for beep codes from the motherboard's speaker (if installed). Consult the motherboard's documentation for beep code meanings.
- Clear the CMOS (Complementary Metal-Oxide-Semiconductor) by removing the CMOS battery for a few minutes or using the clear CMOS jumper (refer to motherboard layout).
- Ensure all essential components (CPU, RAM, GPU) are correctly installed.
- Problèmes liés au système d'exploitation :
- Verify that all necessary drivers are installed and up to date.
- Check SATA cable connections for storage devices.
- Run diagnostic tools for hard drives/SSDs and RAM.
7. Spécifications
Key technical specifications for the Gateway SX2865 SFF Desktop Motherboard H61 (Model DB.U7411.001):
| Fonctionnalité | Détail |
|---|---|
| Marque | Porte |
| Nom du modèle | SX2865 |
| Numéro de modèle de l'article | DB.U7411.001 |
| Fabricant | Acer |
| Type de chipset | Intel H61 Express |
| Prise de processeur | LGA 1155 or LGA 1156 |
| Processeurs compatibles | Intel Xeon (and other compatible LGA 1155/1156 CPUs) |
| Technologie de mémoire RAM | DDR3 |
| Vitesse d'horloge de la mémoire | 2133 MHz (Max supported, actual speed depends on CPU and RAM) |
| Capacité de stockage de la mémoire | 16 GB (Maximum supported) |
| Appareils compatibles | Ordinateur personnel |
| Plate-forme | Linux (and other compatible operating systems) |
| Facteur de forme | uATX (Micro-ATX) |
8. Garantie et assistance
For warranty information and technical support regarding your Gateway SX2865 SFF Desktop Motherboard H61 (Model DB.U7411.001), please refer to the documentation provided with your original system or contact the manufacturer directly.
- Fabricant: Acer (as per product specifications)
- Marque: Porte
- Visitez le site officiel Prise en charge de la passerelle website or Assistance Acer website Pour les conducteurs, FAQ et informations de contact.
- Conservez votre preuve d'achat pour les réclamations au titre de la garantie.