
Introduction
This manual provides detailed instructions for the setup, operation, and maintenance of your Homtime C12PRO Docking Station Speaker. The C12PRO integrates a Bluetooth speaker, FM radio, alarm clock, and dual USB charging capabilities, designed for convenient everyday use.
Contenu du colis
Veuillez vérifier que tous les éléments énumérés ci-dessous sont inclus dans votre colis :
- 1 x Homtime C12PRO Speaker Unit
- 1 x adaptateur secteur
- 1 x Manuel d'utilisation
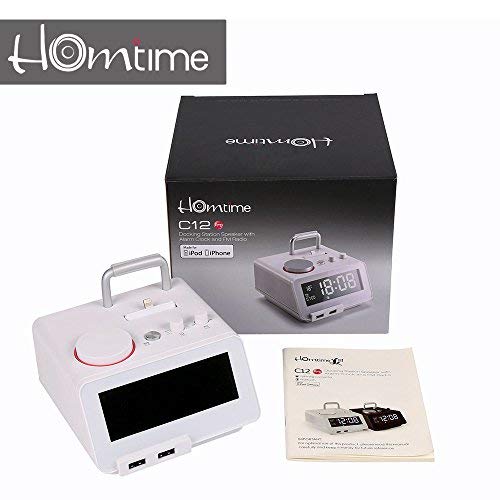
Image: Contents of the Homtime C12PRO package, showing the main speaker unit, power adapter, and the user manual.
Produit terminéview
Familiarize yourself with the various components and controls of your C12PRO unit.

Image: Devant view of the Homtime C12PRO with an iPhone docked. The large digital display shows time and temperature, and the front features dual USB charging ports.

Image: Devant view of the Homtime C12PRO without a phone docked. This image clearly shows the digital display, the docking connector, and the control buttons on the top surface.
Panneau avant et écran
- Grand écran LCD de 4.2 pouces : Shows time, alarm status, and room temperature (Celsius or Fahrenheit). Brightness is adjustable.
- Deux ports de chargement USB : Located at the front base for convenient charging of external devices.
Commandes du panneau supérieur
- Connecteur d'accueil : Apple Certified Lightning connector for iPod/iPhone.
- Boutons/Molettes de commande : For setting time, alarm, volume, mode selection, and FM radio tuning.
Connexions du panneau arrière
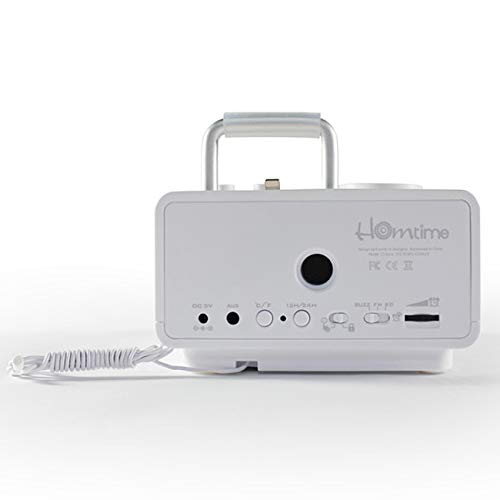
Image: Arrière view of the Homtime C12PRO. This image displays the DC 9V power input, AUX-in port, 12H/24H time format button, and other rear controls.
- Entrée d'alimentation CC 9V : Branchez ici l'adaptateur secteur fourni.
- Port d'entrée auxiliaire : Prise jack 3.5 mm pour connecter des sources audio externes.
- Bouton 12H/24H : Permet de basculer entre les formats d'affichage de l'heure sur 12 heures et sur 24 heures.
- Autres contrôles : May include snooze/dimmer, alarm on/off, and FM antenna connection.
Installation
- Déballer l'appareil : Carefully remove the C12PRO speaker and all accessories from the packaging.
- Connecter l'alimentation : Insert the DC plug of the power adapter into the DC 9V input port on the rear of the unit. Plug the power adapter into a standard wall outlet. The display will illuminate.
- Réglage initial de l'heure :
- Appuyez et maintenez enfoncé le RÉGLAGE DE L'HEURE button (location may vary, typically on top or rear).
- Utilisez le +/- buttons or rotary knob to adjust the hour. Press RÉGLAGE DE L'HEURE encore une fois pour confirmer.
- Réglez les minutes à l'aide du +/- buttons or rotary knob. Press RÉGLAGE DE L'HEURE pour confirmer et quitter le mode de réglage de l'heure.
- Pour basculer entre le format 12 heures et le format 24 heures, appuyez sur la touche correspondante. 12H/24H bouton sur le panneau arrière.
- Ajuster la luminosité de l'affichage : Appuyez sur le SNOOZE/GRADATEUR button (often combined) repeatedly to cycle through brightness levels.
- Unité de température réglée : Le cas échéant, appuyez sur la ° C / ° F button to switch between Celsius and Fahrenheit display for room temperature.
Mode d'emploi
Marche/Arrêt
Appuyez sur le POUVOIR button to turn the unit on or off. When off, the clock display remains active.
Réglage de l'alarme
- Appuyez et maintenez enfoncé le ENSEMBLE D'ALARME bouton. L'heure de l'alarme clignotera.
- Utilisez le +/- buttons or rotary knob to adjust the alarm hour. Press ENSEMBLE D'ALARME pour confirmer.
- Réglez la minute de l'alarme. Appuyez sur ENSEMBLE D'ALARME pour confirmer.
- Select the alarm source (Buzzer, FM Radio, or Docked Device). Use +/- or rotary knob and press ENSEMBLE D'ALARME pour confirmer.
- Pour activer/désactiver l'alarme, appuyez sur le ALARME ON / OFF bouton. Une icône d'alarme apparaîtra à l'écran lorsqu'il sera activé.
- Lorsque l'alarme sonne, appuyez sur la ROUPILLON button to temporarily silence it for a few minutes. Press POUVOIR pour éteindre l'alarme pour la journée.
Fonctionnement de la radio FM
- Appuyez sur le MODE appuyer sur le bouton jusqu'à ce que « FM » apparaisse à l'écran.
- Pour la numérisation automatique des stations, appuyez longuement sur LECTURE/PAUSE button (or a dedicated BALAYAGE button). The radio will scan and save available stations.
- Pour régler manuellement, utilisez le PRÉC/SUIVANT buttons or rotary knob to adjust the frequency.
- To select a saved station, press the PRÉRÉGLAGE bouton puis utilisez PRÉC/SUIVANT naviguer.
- Réglez le volume à l'aide du VOLUME knob or buttons.
Appariement Bluetooth
- Appuyez sur le MODE button until "BT" or "Bluetooth" appears on the display. The Bluetooth indicator will flash, indicating pairing mode.
- Sur votre appareil mobile, activez Bluetooth et recherchez de nouveaux appareils.
- Select "Homtime C12PRO" from the list of available devices.
- Once paired, the Bluetooth indicator on the C12PRO will stop flashing and remain solid. You can now play audio wirelessly from your device.
- Adjust volume on both the C12PRO and your connected device.
Utilisation de la station d'accueil
The C12PRO features an Apple Certified Lightning connector for compatible iPod/iPhone devices.
- Carefully align your iPhone/iPod with the Lightning connector on the top of the unit.
- Gently push down until the device is securely seated.
- The C12PRO will automatically charge your device and can play audio from it.
- Appuyez sur le MODE button to select the docking station as the audio source.
Chargement USB
The unit includes dual USB ports for charging other devices.
- Connect your USB charging cable to one of the USB ports on the front of the C12PRO.
- Connect the other end of the cable to your device (e.g., Android phone, tablet).
- The C12PRO will provide power to charge your device.
Connexion AUX-in
Connect external audio players via the 3.5mm AUX-in port.
- Connect a 3.5mm audio cable (not included) from your external audio device's headphone jack to the AUX-in port on the rear of the C12PRO.
- Appuyez sur le MODE appuyer sur le bouton jusqu'à ce que « AUX » apparaisse à l'écran.
- Play audio from your external device. Adjust volume on both the C12PRO and the external device.
Entretien
- Nettoyage: Disconnect the power adapter before cleaning. Use a soft, dry cloth to wipe the exterior surfaces. Do not use abrasive cleaners, waxes, or solvents.
- Stockage: Si vous devez entreposer l'appareil pendant une période prolongée, débranchez-le de l'alimentation et rangez-le dans un endroit frais et sec, à l'abri de la lumière directe du soleil et des températures extrêmes.
- Batterie: The unit contains a CR2 battery (included) for clock memory backup. This battery is not user-replaceable for general operation and should only be replaced by qualified service personnel if necessary.
Dépannage
| Problème | Cause possible | Solution |
|---|---|---|
| Pas d'alimentation/Écran éteint | Adaptateur secteur non connecté ou prise défectueuse. | Assurez-vous que l'adaptateur secteur est correctement branché à l'appareil et à une prise murale fonctionnelle. |
| Aucun son du haut-parleur | Volume too low; incorrect source selected; device not connected properly. | Augmentez le volume. Appuyez MODE to select the correct audio source (BT, FM, Dock, AUX). Reconnect Bluetooth device or docked phone. |
| L'appairage Bluetooth échoue | C12PRO not in pairing mode; device too far; interference. | Ensure C12PRO is in BT mode and flashing. Move device closer. Turn off other Bluetooth devices. |
| Réception FM médiocre/parasites | Signal faible ; antenne non déployée. | Extend the FM antenna fully. Reposition the unit for better reception. Perform auto-scan again. |
| L'alarme ne sonne pas | Alarme non activée ; volume de l'alarme trop faible. | Ensure the alarm icon is visible on the display. Check alarm volume settings. |
| Device not charging via USB/Dock | Problème de câble ; appareil incompatible ; appareil non alimenté. | Try a different USB cable. Ensure the C12PRO is powered on. Verify device compatibility with the Lightning dock. |
Caractéristiques

Image: A table detailing the specifications of the Homtime C12PRO, including driver units, S/N ratio, Bluetooth version, range, radio frequency, power, and dimensions.
| Modèle | C12 Pro |
| Unités de commande | 2x40mm |
| Rapport signal/bruit | >70 dB |
| Version Bluetooth | 2.1 + EDR |
| Portée Bluetooth | 10 millions |
| Gamme de fréquences radio | 87.5 MHz - 108 MHz |
| Appareils compatibles | iPad, iPhone, Android, Windows Phone, Computer |
| Adaptateur secteur | AC100-240V, 50/60Hz, DC 5V 3A |
| Puissance de sortie | 3W + 3W (6 Watts total) |
| Dimensions (L x l x H) | 12.8 x 12.9 x 10.7 cm |
| Poids de l'article | 800 g |
| Sources audio | Apple Lightning, USB, Bluetooth, Aux-in |
| Type d'affichage | Digital LCD (4.2 inches) |
| Piles | 1 CR2 battery required (included for clock memory) |
Garantie et assistance
Informations sur la garantie
The Homtime C12PRO comes with a Garantie limitée de 1 ans from the date of purchase. This warranty covers manufacturing defects in materials and workmanship under normal use. It does not cover damage caused by misuse, accidents, unauthorized modifications, or external causes.
Veuillez conserver votre preuve d'achat pour les réclamations au titre de la garantie.
Assistance clientèle
For technical assistance, troubleshooting not covered in this manual, or warranty inquiries, please contact Homtime customer support. Refer to the contact information provided with your product packaging or visit the official Homtime website pour les détails de support les plus récents.