Introduction
This manual provides essential instructions for the setup, operation, and maintenance of your Gigaset Handset and Charging Station. This product is compatible with various Gigaset phone systems, including models S2, S44, S200, S440, S445, S645, SX440, and SX445. Please read this manual carefully to ensure proper use and to maximize the lifespan of your device.
1. Installation
1.1 Déballage et inspection initiale
Carefully unpack all components. Ensure that the handset, charging station, and power adapter are present and undamaged. If any items are missing or damaged, contact your retailer.
1.2 Connecting the Charging Station
- Connect the power adapter cable to the charging station.
- Branchez l'adaptateur secteur sur une prise électrique standard.
- Place the charging station on a flat, stable surface, away from heat sources and direct sunlight.

Image 1.1 : Haut view of the Gigaset charging station. This image shows the compact design of the charging station, ready to receive the handset.
1.3 Inserting the Battery and Charging the Handset
- Ouvrez le couvercle du compartiment à piles situé à l'arrière du combiné.
- Insérez la batterie rechargeable en veillant à respecter la polarité.
- Fermez le couvercle du compartiment à piles.
- Place the handset into the charging station. Ensure it is seated correctly and the charging indicator (if present) illuminates.
- Laissez le téléphone se charger pendant au moins 6 à 8 heures avant la première utilisation afin de garantir une capacité de batterie maximale.
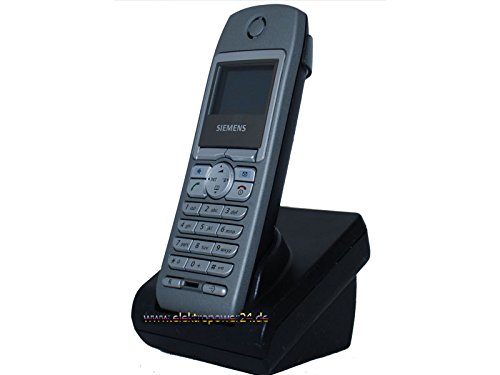
Illustration 1.2 : Avant view of the Gigaset handset securely placed in its charging station. The display shows "Wahlvorbereitung" (dialing preparation) and a phone number, indicating it's powered on and ready.
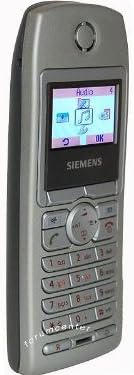
Image 1.3 : Côté view of the Gigaset handset, highlighting its ergonomic design and button layout. The display shows menu options like "Audio" and "OK".

Image 1.4 : Dos view of the Gigaset handset, showing the smooth casing et l'emplacement du couvercle du compartiment de la batterie.
1.4 Enregistrement du combiné auprès d'une station de base
This handset is designed to be compatible with various Gigaset base stations. The registration process may vary slightly depending on your specific base station model. Refer to your base station's manual for detailed instructions. Generally, the steps involve:
- Activate registration mode on your Gigaset base station (usually by pressing and holding a registration button).
- On the handset, navigate to the "Settings" or "Registration" menu.
- Select "Register Handset" and follow the on-screen prompts. You may need to enter a PIN (default is usually 0000).
- Once registered, the handset display will confirm successful connection to the base station.
2. Mode d'emploi
2.1 Fonctions de base
- Passer un appel : Saisissez le numéro de téléphone et appuyez sur la touche d'appel verte.
- Répondre à un appel: Appuyez sur la touche d'appel verte lorsque le téléphone sonne.
- Terminer un appel : Press the red end call key.
- Appels mains libres : During a call, press the dedicated hands-free key (often backlit) to activate the speakerphone.
2.2 Annuaire téléphonique
The handset features a directory capable of storing up to 200 phone numbers and names.
- Ajout d'une entrée : Navigate to the "Directory" or "Phonebook" menu, select "New Entry," and enter the name and number.
- Calling from Directory: Open the directory, scroll to the desired entry, and press the green call key.
2.3 Affichage et indicateurs
The handset features a 5-line illuminated graphic display. Key indicators include:
- Affichage de la date et de l'heure : Always visible on the idle screen.
- CLIP Function (Call Display): Shows the caller's number or name (if stored in the directory) for incoming calls.
- Indicateur de batterie : Affiche le niveau de charge actuel de la batterie.
- Indicateur de force du signal : Displays the connection quality to the base station.
3. Entretien
3.1 Nettoyage
- Wipe the handset and charging station with a soft, damp tissu.
- N'utilisez pas de nettoyants abrasifs ni de solvants.
- Veillez à ce qu'aucun liquide ne pénètre dans les ouvertures de l'appareil.
3.2 Entretien de la batterie
- Always use the original or approved replacement rechargeable batteries.
- Évitez d'exposer la batterie à des températures extrêmes.
- Si vous n'utilisez pas le téléphone pendant une période prolongée, retirez la batterie.
4. Dépannage
| Problème | Cause possible | Solution |
|---|---|---|
| Handset does not turn on. | Batterie mal insérée ou déchargée. | Check battery insertion. Place handset in charging station for several hours. |
| Pas de tonalité. | Téléphone non enregistré auprès de la station de base ou hors de portée. | Ensure handset is registered. Move closer to the base station. Check base station power. |
| Mauvaise qualité d'appel. | Interference or handset too far from base station. | Move away from other electronic devices. Move closer to the base station. |
| Impossible de passer ou de recevoir des appels. | Line issue or base station problem. | Check your telephone line connection. Restart the base station by unplugging and replugging its power. |
5. Spécifications
- Marque: Gigaset
- Modèles compatibles : Gigaset S2, S44, S200, S440, S445, S645, SX440, SX445
- Capacité du répertoire : Up to 200 entries (names and numbers)
- Afficher: 5-line illuminated graphic display
- Caractéristiques: Backlit hands-free key, Date/Time display, CLIP function (Call Display)
- Fabricant: Gigaset
- ASIN: B0102FULTW
Note: Information regarding spare parts availability and guaranteed software updates is not provided. This product is currently not listed as discontinued by the manufacturer.
6. Garantie et assistance
Specific warranty details for this Gigaset Handset and Charging Station are not provided within the available product information. For warranty claims, technical support, or service inquiries, please refer to the documentation included with your original purchase or visit the official Gigaset website de votre région.
Vous pouvez également contacter votre revendeur pour obtenir de l'aide.