XtremepowerUS MIG-195
XtremepowerUS MIG-195 Gas-Less Flux Core Welder Instruction Manual
Model: MIG-195 (Part Number: 55016)
1. Informations importantes sur la sécurité
Lisez et comprenez toutes les consignes de sécurité avant d'utiliser cette machine à souder. Le non-respect de ces consignes peut entraîner un choc électrique, un incendie, des blessures graves, voire mortelles.
- Un choc électrique peut tuer : Do not touch live electrical parts. Wear dry welding gloves and protective clothing. Insulate yourself from the work and ground.
- Les fumées et les gaz peuvent être dangereux : Éloignez votre tête des vapeurs. Utilisez la ventilation ou l'extraction pour évacuer les vapeurs de la zone respiratoire.
- Les rayons de l'arc électrique peuvent brûler les yeux et la peau : Portez un casque de soudeur équipé d'un filtre de teinte approprié. Portez des vêtements de protection pour protéger votre peau.
- Risque d'incendie et d'explosion : Éliminez tous les matériaux inflammables de la zone de soudage. Gardez un extincteur à proximité.
- Les parties chaudes peuvent provoquer de graves brûlures : Allow welded materials to cool before handling.
- Champs magnétiques : Les personnes porteuses d'un stimulateur cardiaque doivent consulter leur médecin avant toute intervention chirurgicale.
- Chute d'objets : Secure workpieces before welding.
- Bruit: Portez une protection auditive.
Always ensure proper grounding and use appropriate personal protective equipment (PPE) including welding helmet, gloves, and protective clothing.
2. Produit terminéview
The XtremepowerUS MIG-195 is a gas-less flux core wire welding machine designed for welding normal thin steel and iron. It features automatic wire feed and operates on 220V power. This compact welder is suitable for home DIY projects and general repair work.

Figure 1: XtremepowerUS MIG-195 Gas-Less Flux Core Welder with included welding mask, ground clamp, and torch.
3. Instructions de configuration
3.1 Déballage et inspection
- Retirez soigneusement tous les composants de l'emballage.
- Inspect the welder and all accessories for any signs of damage during shipping. If any damage is found, do not operate the machine and contact customer support.
- Ensure all included components are present: MIG 195 Welder, Torch, Ground Cord, Chipping Hammer/Wire Brush, Tip, Welding Mask.
3.2 Connexion d'alimentation
This welder requires a 220V power supply. Ensure your electrical outlet matches this requirement. The unit comes with a power plug that may require wiring to a suitable 220V receptacle. Consult a qualified electrician if unsure about wiring.

Figure 2: Included power plug components. This welder operates on 220V. Consult a qualified electrician if unsure about wiring.
3.3 Installation de la bobine de fil
The MIG-195 is designed for gas-less flux core welding. Use appropriate flux core wire for your application.
- Ouvrez le panneau latéral du poste à souder pour accéder au mécanisme d'alimentation du fil.
- Place the wire spool onto the spool holder. Ensure the wire unwinds smoothly from the bottom of the spool towards the wire feed rollers.
- Thread the wire through the guide tube and into the wire feed rollers.
- Close the wire feed roller tension arm and adjust the tension. The tension should be firm enough to feed the wire without slipping, but not so tight that it deforms the wire.
- Feed the wire through the torch liner until it exits the contact tip. You may need to press the trigger on the welding torch to activate the wire feed motor.

Figure 3 : Interne view of the welder, illustrating the wire feed mechanism and spool holder for flux core wire.

Figure 4: A spool of flux core welding wire, suitable for use with the MIG-195 welder.
3.4 Polarity Setting
For gas-less flux core welding, the polarity is typically DC electrode negative (DCEN), meaning the welding torch is connected to the negative terminal (-) and the ground clamp to the positive terminal (+). Verify the correct polarity for your specific flux core wire type.
3.5 Cl de terreamp Connexion
Connectez la borne de terreamp to the workpiece. Ensure a clean, bare metal connection for optimal electrical conductivity. A poor ground connection can lead to unstable arcs and poor weld quality.

Figure 5: The welding torch and ground clamp, essential components for the welding process.
4. Mode d'emploi
4.1 contrôles surview
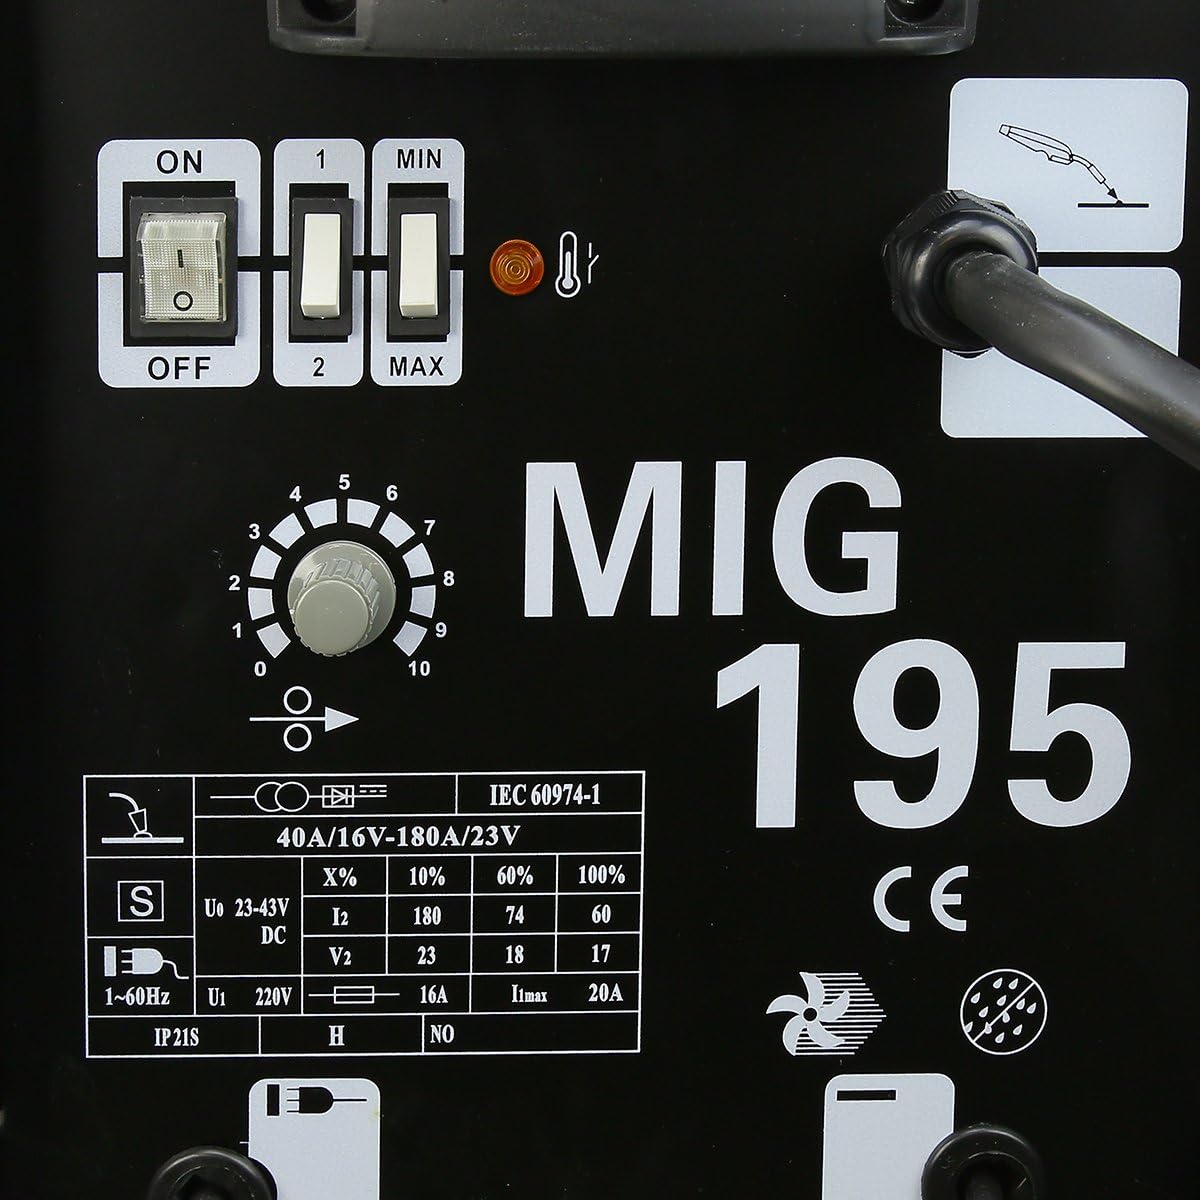
Figure 6 : Détaillé view of the control panel, showing power switches, voltage/amperage selectors, and wire feed speed dial.
- Interrupteur marche / arrêt: Allume ou éteint l'appareil.
- Voltage/Amperage Selector (1/2, MIN/MAX): Adjusts the welding power output. Use '1' for lower power and '2' for higher power. Within each setting, 'MIN' and 'MAX' provide fine-tuning.
- Wire Feed Speed Dial (0-10): Controls the speed at which the welding wire is fed through the torch. Higher numbers indicate faster wire feed.
- Indicateur de surcharge thermique : A light that illuminates if the machine overheats, indicating the need for a cool-down period.
4.2 Procédé de soudage
- Préparer la pièce : Ensure the workpiece is clean, free of rust, paint, and grease.
- Définir les paramètres : Refer to the welding setup guide (often located inside the welder's cover) or a welding chart for recommended voltage and wire feed speed settings based on material thickness and wire diameter.
- Portez des EPI : Always wear your welding helmet, gloves, and protective clothing.
- Commencez à souder : Position the torch tip approximately 1/4 to 3/8 inch from the workpiece. Press the trigger to start the wire feed and initiate the arc.
- Maintenir l'arc : Move the torch steadily along the joint, maintaining a consistent arc length and travel speed. Observe the weld puddle and adjust your technique as needed.
- Finish Weld: Release the trigger to stop the arc and wire feed. Allow the weld to cool before chipping away the slag (from flux core).
4.3 Cycle de service
The duty cycle indicates how long a welding machine can operate continuously within a 10-minute period before needing to cool down. Exceeding the duty cycle can damage the machine.
- 10% à 180 AMP
- 60% à 74 AMP
- 100% à 60 AMP
Par exempleample, at 180 AMP, the machine can weld for 1 minute out of every 10 minutes. If the thermal overload indicator lights up, stop welding and allow the machine to cool down.
4.4 Wire Capacity
- Flux Core: 0.047" (1.2mm), 0.023" to 0.035" (0.6-0.8mm)
- Steel & Stainless Steel (Solid Wire, requires gas): 0.031" (0.8mm)
- Aluminum (Solid Wire, requires gas): 0.030" to 0.039" (1.0mm)
Note: This model is primarily advertised as "Gas-Less" for flux core welding. Using solid wire for steel or aluminum would require an external gas supply and regulator, which are not included with this specific "Gas-Less" model.
5. Entretien
Un entretien régulier garantit la longévité et le fonctionnement sûr de votre machine à souder.
- Nettoyer régulièrement : Use compressed air to blow out dust and debris from the machine's vents and internal components. Do this periodically, especially in dusty environments.
- Inspectez les câbles et les connexions : Check all cables (power, ground, torch) for cuts, fraying, or loose connections. Replace damaged cables immediately.
- Maintenance de la torche :
- Clean the contact tip and nozzle regularly to remove spatter.
- Remplacez les embouts et les buses de contact usés selon les besoins.
- Ensure the torch liner is free of kinks and blockages for smooth wire feeding.
- Mécanisme d'alimentation du fil : Keep the wire feed rollers clean. Check for proper tension and alignment.
- Cl au solamp: Assurez-vous que le sol clamp is clean and makes good contact with the workpiece.

Figure 7: Common spare parts for the welder, such as fuses, contact tips, washers, and circlips, which may require periodic replacement.
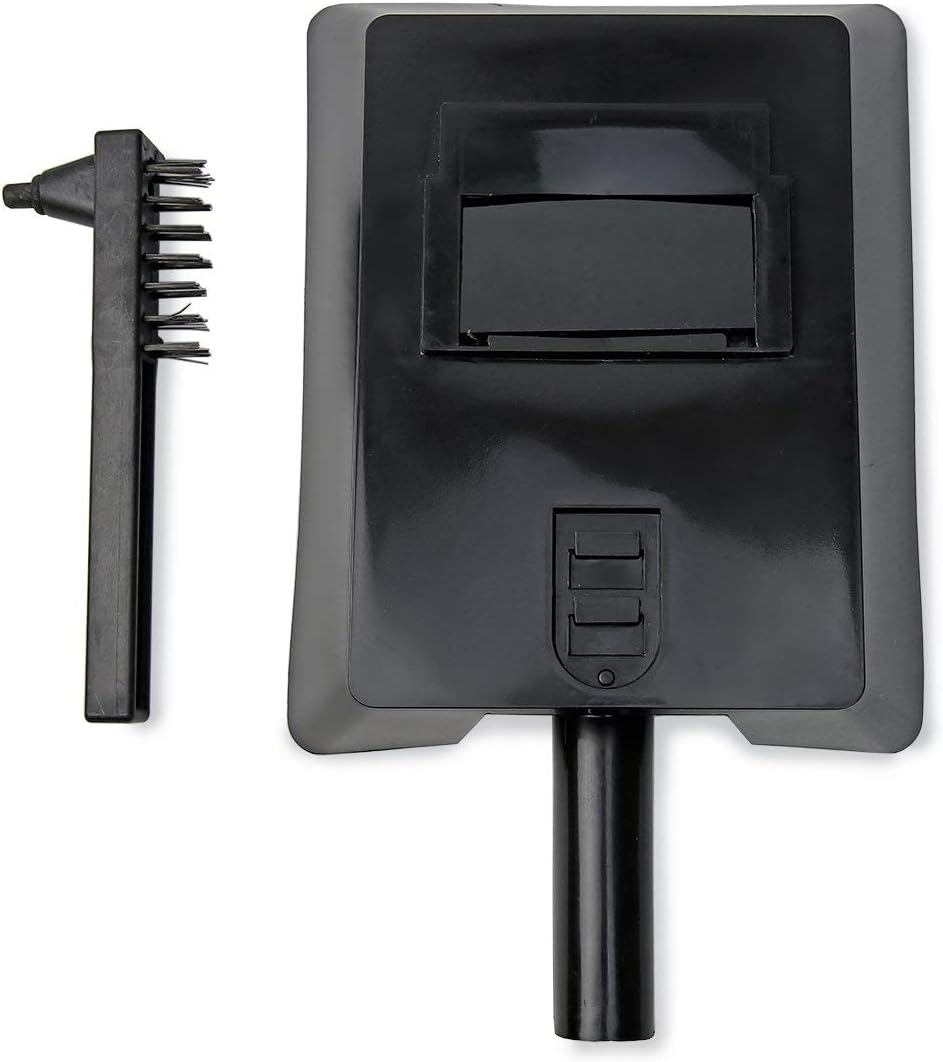
Figure 8: Included welding mask and chipping hammer with wire brush, useful for post-weld cleaning and protection.
6. Dépannage
Cette section aborde les problèmes courants que vous pourriez rencontrer pendant le fonctionnement.
| Problème | Cause possible | Solution |
|---|---|---|
| La machine n'est pas alimentée | Power switch off, circuit breaker tripped, loose power connection. | Ensure power switch is ON. Check circuit breaker. Verify power cord is securely plugged in. |
| Aucun arc électrique n'est visible lorsque la gâchette est actionnée. | Poor ground connection, incorrect polarity, wire not feeding, contact tip blocked, machine in thermal overload. | terrain propre et sécuriséamp. Check polarity. Ensure wire feeds smoothly. Clean or replace contact tip. Allow machine to cool if thermal light is on. |
| Le fil ne s'enroule pas correctement. | Wire spool tangled, wire feed tension incorrect, torch liner blocked or kinked, wrong size contact tip. | Untangle wire spool. Adjust wire feed tension. Inspect and clear torch liner. Use correct contact tip for wire diameter. |
| Poor weld quality (porosity, weak welds) | Improper settings (voltage/wire speed), dirty workpiece, incorrect travel speed, wrong wire type. | Ajuster le volumetage and wire feed speed according to material. Clean workpiece thoroughly. Practice consistent travel speed. Ensure flux core wire is suitable. |
| Machine overheats (thermal light on) | Cycle de service dépassé, ventilation insuffisante. | Stop welding and allow the machine to cool down. Ensure adequate airflow around the machine. Reduce welding time or amprage. |
7. Spécifications
| Fonctionnalité | Détail |
|---|---|
| Modèle | MIG-195 |
| Numéro de pièce | 55016 |
| Marque | XtremepowerUS |
| Source d'énergie | Électrique filaire |
| Voltage | 220 volts |
| Courant de soudage | 60-190 AMP (MIN) |
| Duty Cycle (10 min period) | 10% à 180AMP, 60% at 74 AMP, 100% at 60 AMP |
| Wire Capacity (Flux Core) | 0.047" (1.2mm), 0.023" to 0.035" (0.6-0.8mm) |
| Wire Capacity (Solid Wire) | 0.031" (0.8mm) steel & stainless steel, 0.030" to 0.039" (1.0mm) aluminum (requires external gas) |
| Poids de l'article | 30 livre (environ 13.6 kg) |
| Dimensions du produit | 27 x 17 x 18 pouces (environ 68.6 x 43.2 x 45.7 cm) |
| Matériel | Metal, Steel, Aluminum |
| Composants inclus | MIG 195 Welder, Torch, Ground Cord, Chipping Hammer/Wire Brush, Tip, Welding Mask |
8. Garantie et assistance
For warranty information, technical support, or to order replacement parts, please contact XtremepowerUS customer service. Refer to the contact information provided with your product packaging or visit the official XtremepowerUS website.
When contacting support, please have your model number (MIG-195) and part number (55016) available.
Documents connexes - MIG-195
 |
Manuel d'utilisation du poste de soudage multiprocédés Azzuno MIG-200F : Guide Manuel d'utilisation complet du poste de soudage multiprocédés Azzuno MIG-200F. Découvrez la configuration, le fonctionnement, les consignes de sécurité, le dépannage et les paramètres de soudage MIG, MMA et TIG Lift. |
 |
Guide d'utilisation du S7 MIG-200 : soudage à la baguette, MIG et TIG Guide d'utilisation complet du poste à souder S7 MIG-200, couvrant le soudage à l'électrode enrobée (ARC), le soudage MIG (fil plein de 0.8 mm avec gaz CO2, fil fourré de 0.8 mm et fil fourré de 1.0 mm) et le soudage TIG. Apprenez à configurer et à utiliser la machine pour diverses applications de soudage. |
 |
ANDELI MIG-135 PLUS 3-in-1 Welder Operator's Manual User manual for the ANDELI MIG-135 PLUS 3-in-1 welding machine. Covers MIG/MAG, Flux-Cored (FCAW), Stick (SMAW), and Lift Arc TIG (GTAW) welding. Includes setup, operation, safety, and troubleshooting for this semi-automatic inverter welder. |
 |
Manuel d'utilisation du poste de soudage multiprocédés 7 en 1 GZ GUOZHI MIG-200P Ce manuel d'utilisation guide l'utilisateur à travers le GZ GUOZHI MIG-200P, un poste à souder polyvalent 7 en 1. Il couvre la sécurité, les spécifications, l'installation et le fonctionnement des fonctions MIG/MAG, MIG/MAG à fil fourré, TIG Lift, MMA, soudage à l'électrode enrobée, soudage par points et soudage au pistolet à bobine, avec double tension.tage (110V/220V) pour diverses applications de travail des métaux. |
 |
Manuel d'instructions VEVOR MIG-145 : Guide d'utilisation de la soudeuse MIG Ce manuel d'utilisation fournit des instructions détaillées pour le fonctionnement du poste à souder VEVOR MIG-145. Il aborde les consignes de sécurité essentielles, la description générale du produit, les paramètres techniques, les détails de configuration, la structure du panneau, les procédures d'installation et d'utilisation, les précautions importantes, les recommandations d'entretien et les étapes de dépannage pour une performance et une durée de vie optimales. |
 |
Manuel d'utilisation du soudeur à fil fourré sans gaz YesWelder FLUX-135 110 V Ce manuel fournit des instructions complètes pour l'utilisation, l'installation et l'entretien en toute sécurité du poste à souder sans gaz à fil fourré YesWelder FLUX-135 110 V. Il couvre les précautions de sécurité, les spécifications techniques, les procédures opérationnelles pour le soudage à fil fourré, à l'électrode enrobée (MMA) et TIG, le dépannage et l'entretien courant. |
Ask a question about this manual
Ask about setup, troubleshooting, compatibility, parts, safety, or missing instructions. Manuals+ will review the question and use this page’s manual context to help answer it.