
Qanba Q1
Qanba Q1 PS3 & PC Joystick Instruction Manual
Modèle: Q1
1. Produit terminéview
The Qanba Q1 joystick is a high-performance arcade controller designed for use with PlayStation 3 and PC platforms. It features authentic Qanba arcade components, providing a responsive and durable gaming experience. This manual provides essential information for setting up, operating, and maintaining your Qanba Q1 joystick.
Caractéristiques principales :
- Compatible with PlayStation 3 and PC systems.
- Equipped with a Qanba joystick and 8 Qanba action buttons.
- Includes an adjustable and removable table clamp pour un montage sécurisé.
- Comes with square, circle, and hex joystick gates for customization.
- Features rubber pads on the base for non-slip use on tables or laps.

Figure 1.1 : Gros plan view of the Qanba Q1 joystick and action buttons.
2. Instructions de configuration
2.1 Connexion à un appareil
- Locate the USB cable stored in the compartment on the side of the joystick.
- Connect the USB cable from the Qanba Q1 joystick to an available USB port on your PlayStation 3 console or PC.
- The system should automatically detect the joystick. For PC, driver installation may be required, which typically occurs automatically upon first connection.
2.2 Attaching the Table Clamp
The Qanba Q1 includes an adjustable table clamp for enhanced stability during use.
- Alignez le clamp arms with the designated slots on the sides of the joystick unit.
- Faites glisser le clamp arms into place until they are securely seated.
- Place the joystick on a flat surface, such as a table or desk.
- Serrer les vis sur le clamp until the joystick is firmly secured to the surface. Do not overtighten.

Figure 2.1: Qanba Q1 joystick with the table clamp ci-joint.
2.3 Changing Joystick Gates
The Qanba Q1 comes with interchangeable joystick gates (square, circle, hex) to suit different playstyles.
- Carefully open the bottom panel of the joystick (if applicable, refer to specific model instructions for access).
- Locate the existing joystick gate.
- Gently unclip or unscrew the current gate and remove it.
- Insert the desired gate (circle or hex) into position, ensuring it clicks or screws into place securely.
- Fermez le panneau inférieur.
3. Mode d'emploi
3.1 Contrôles de base
The Qanba Q1 features a standard arcade layout with a joystick and eight primary action buttons.
- Manette: Used for directional input.
- Boutons d'action : Eight buttons for in-game actions (e.g., punches, kicks, special moves).
- Bouton d'accueil: Functions as the PlayStation button on PS3, or a system menu button on PC.
- Bouton SÉLECTIONNER : Functions as the Select button on PS3.
- Bouton Start: Functions as the Start button on PS3.
Commutateur de 3.2 modes
The joystick includes a mode switch to toggle between different input modes, typically for compatibility or specific game requirements. Refer to the labels near the switch for available modes (e.g., D-Pad, Left Analog Stick, Right Analog Stick).
3.3 Fonction Turbo
The Turbo function allows for rapid, automatic pressing of a selected button. To activate:
- Appuyez et maintenez enfoncé le TURBO bouton.
- Tout en tenant TURBO, press the desired action button you wish to apply the turbo function to.
- Relâchez les deux boutons. L'action sélectionnée se répétera désormais rapidement lorsqu'on appuiera dessus.
- To deactivate, repeat the process: hold TURBO and press the turbo-enabled action button again.
4. Entretien
4.1 Nettoyage
- Wipe the surface of the joystick with a soft, dry cloth.
- Pour les saletés tenaces, appliquez légèrementampNettoyez le chiffon avec de l'eau. Évitez d'utiliser des produits chimiques agressifs ou des nettoyants abrasifs.
- Ensure no liquids enter the internal components of the joystick.
4.2 Gestion des câbles
The Qanba Q1 features a convenient storage compartment for its USB cable.
- When not in use, carefully coil the USB cable and store it within the designated compartment to prevent damage and tangling.
- Avoid sharp bends or excessive force on the cable.
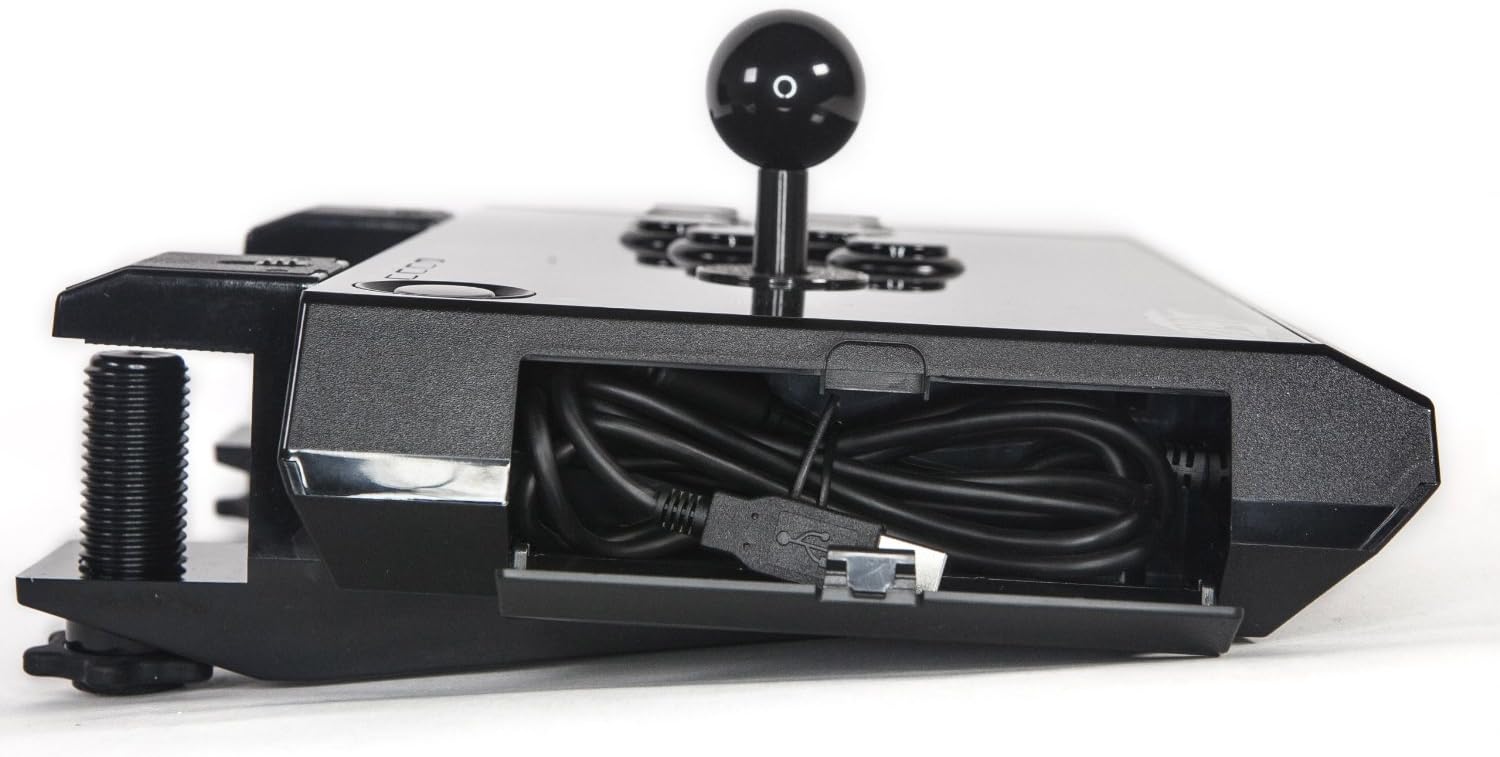
Figure 4.1: USB cable storage compartment.
5. Dépannage
5.1 Joystick Not Recognized
- Vérifiez la connexion USB : Ensure the USB cable is firmly connected to both the joystick and the console/PC. Try a different USB port.
- Redémarrer l'appareil : Restart your PlayStation 3 or PC.
- PC Drivers: For PC, ensure that necessary drivers are installed. Windows typically installs these automatically, but manual installation may be required in some cases. Check Device Manager for any unrecognized devices.
- Essayez un autre appareil : If possible, test the joystick on another compatible PS3 or PC to determine if the issue is with the joystick or the original device.
5.2 Les boutons ou le joystick ne répondent pas
- Vérifier le commutateur de mode : Ensure the mode switch is set to the correct input mode for your game or system.
- Paramètres du jeu : Verify that the game's controller settings are configured correctly for a joystick/arcade stick.
- Mise à jour du firmware: Check the Qanba official website for any available firmware updates for your Q1 model.
6. Spécifications
| Fonctionnalité | Détail |
|---|---|
| Marque | Qanba |
| Nom du modèle | Q1 |
| Appareils compatibles | PC, PlayStation 3 |
| Type de contrôleur | Manette de jeu |
| Technologie de connectivité | USB |
| Fonctionnalités supplémentaires | Ergonomique |
| Quantité de boutons | 16 (including system buttons) |
| Plateforme matérielle | PC, PS3 |
| Modèles de consoles de jeux vidéo compatibles | PlayStation 3 de Sony |
| Poids de l'article | 5 livre (environ 2.27 kg) |
| Dimensions de l'article (L x l x H) | 13.5 x 3 x 8.5 pouces (environ 34.3 x 7.6 x 21.6 cm) |
7. Garantie et assistance
For warranty information, please refer to the documentation included with your purchase or visit the official Qanba website. For technical support or further assistance, please contact Qanba customer service through their official channels.
Qanba Official Website: qanba.com
Ask a question about this manual
Ask about setup, troubleshooting, compatibility, parts, safety, or missing instructions. Manuals+ will review the question and use this page’s manual context to help answer it.