
Utilitech 358707
Manuel d'utilisation de la minuterie résidentielle mécanique Utilitech
Modèle: 358707
Introduction
This manual provides detailed instructions for the safe and efficient operation of your Utilitech Mechanical Residential Plug-In Timer. Please read this manual thoroughly before use and retain it for future reference.
The Utilitech Mechanical Residential Plug-In Timer is designed to automate the on/off cycles of electrical devices, helping to conserve energy and enhance convenience. It features up to 48 on/off settings per day and includes 4 outlets for connecting multiple devices.
Produit terminéview
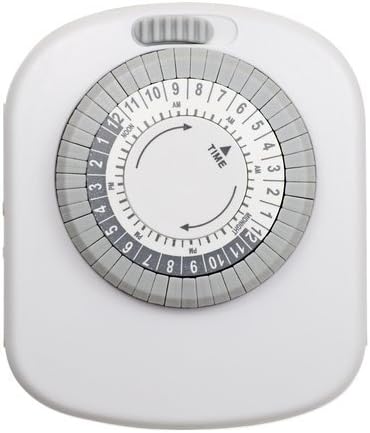
Figure 1 : Face avant view of the Utilitech Mechanical Residential Plug-In Timer, showing the central dial with time markings and surrounding pins.
The timer features a circular dial with hour markings (AM/PM) and a series of push-down pins around its circumference. These pins control the on/off cycles. A manual override switch is typically located on the top or side of the unit.
Caractéristiques principales :
- Up to 48 on/off settings per 24-hour period.
- Non-removable pins for easy programming.
- Designed for energy saving.
- Equipped with 4 outlets for multiple device connections.
- Simple plug-in installation.
Installation
La configuration initiale:
Déballez le minuteur : Retirez délicatement le minuteur de son emballage. Vérifiez qu'il n'est pas endommagé.
Brancher: Plug the timer into a standard 120V AC wall outlet. Ensure the outlet is easily accessible.
Charge Battery (if applicable): Although this model does not require batteries for operation, some timers may have an internal battery for timekeeping during power outages. If so, allow it to charge for at least 30 minutes before programming.
Définir l'heure actuelle : Rotate the entire dial clockwise until the current time aligns with the "TIME" arrow indicator on the timer's face. The dial is marked with AM and PM hours (e.g., 12 PM for Noon, 12 AM for Midnight).
Figure 2: Detail of the timer dial, highlighting the "TIME" arrow and the 24-hour markings for setting the current time.
Mode d'emploi
Programmation des heures de marche/arrêt :
The timer uses push-down pins around the dial to set the on/off intervals. Each pin represents a 30-minute segment.
Identifier les broches : Locate the small, grey pins around the outer edge of the dial. Each pin corresponds to a 30-minute interval.
Set "ON" Times: Push down the pins corresponding to the time periods you want the connected device to be ON. When a pin is pushed down, it activates the power during that 30-minute segment as the dial rotates.
Set "OFF" Times: Leave the pins in the "up" position for the time periods you want the connected device to be DÉSACTIVÉ. When a pin is in the up position, it deactivates the power during that 30-minute segment.
Figure 3 : Détaillé view of the timer's outer ring with individual pins, illustrating how to push them down for "ON" periods.
Commutateur de dérogation manuelle : The timer typically has a manual override switch (often a slider or button) located on the top or side. This switch allows you to bypass the programmed settings and keep the device either continuously ON or OFF. Ensure this switch is in the "Timer" or "Auto" position for programmed operation.
Connecter l'appareil : Plug the device you wish to control into one of the 4 outlets on the timer. Ensure the device's own power switch is set to the "ON" position.
Example Programming:
To turn a lamp on from 6:00 PM to 10:00 PM:
- Locate the 6 PM mark on the dial.
- Push down all pins from 6 PM to 10 PM.
- Ensure all other pins are in the "up" position.
- Set the current time on the dial.
- Branchez le lamp into the timer.
Entretien
The Utilitech Mechanical Residential Plug-In Timer requires minimal maintenance.
Nettoyage: Débranchez le minuteur avant de le nettoyer. Essuyez l'extérieur avec un chiffon doux et sec. N'utilisez pas de nettoyants liquides ni de produits abrasifs.
Stockage: Si vous rangez le minuteur pendant une période prolongée, assurez-vous qu'il soit propre et sec. Conservez-le dans un endroit frais et sec, à l'abri de la lumière directe du soleil et des températures extrêmes.
Inspection: Inspectez régulièrement la minuterie et son cordon pour détecter tout signe de dommage, comme des fils effilochés ou un câble fissuré.asing. Si des dommages sont constatés, cessez immédiatement l'utilisation et remplacez l'appareil.
Dépannage
| Problème | Cause possible | Solution |
|---|---|---|
| L'appareil ne s'allume/s'éteint pas comme prévu. |
|
|
| Le cadran de la minuterie ne tourne pas. |
|
|
| Timer makes a rattling or loud noise. |
|
|
Caractéristiques
| Attribut | Détail |
|---|---|
| Numéro de modèle | 358707 |
| Numéro de pièce | TM20DHBL |
| Marque | Utilitech |
| Taper | Mechanical Residential Plug-In Timer |
| Nombre de prises | 4 |
| Paramètres quotidiens | Up to 48 on/off settings (30-minute intervals) |
| Type de montage | Montage enfichable |
| Couleur | Blanc |
| Poids de l'article | 6.4 onces |
| Dimensions du colis | 6.7 x 4.1 x 2.1 pouces |
| Piles requises | Non |
| Code UPC | 070686507131 |
Consignes de sécurité
Veuillez lire et suivre toutes les consignes de sécurité afin d'éviter les blessures ou les dommages.
Utilisation en intérieur uniquement : This timer is designed for indoor use in dry locations only. Do not expose to water or moisture.
Tarif Electrique: Do not exceed the electrical rating of the timer. Overloading can cause overheating and fire.
Mise à la terre : Ensure the timer is plugged into a properly grounded outlet if applicable. This model is a 2-prong device.
Enfants et animaux domestiques : Tenir hors de portée des enfants et des animaux domestiques.
Coupure: Débranchez toujours la minuterie de la prise murale avant de la nettoyer ou lorsqu'elle n'est pas utilisée pendant une période prolongée.
Réparation: N’essayez pas d’ouvrir ou de réparer vous-même la minuterie. Confiez toute intervention à un personnel qualifié.
Garantie et assistance
For warranty information or technical support, please refer to the product packaging or contact Utilitech customer service. Keep your purchase receipt for warranty claims.
Note: Specific warranty terms and contact information may vary. Please consult the documentation included with your product.
Ask a question about this manual
Ask about setup, troubleshooting, compatibility, parts, safety, or missing instructions. Manuals+ will review the question and use this page’s manual context to help answer it.