
Introduction
This manual provides detailed instructions for the installation, operation, and maintenance of your Dual DSA1014 In-Dash Car Stereo Receiver. Please read this manual thoroughly before using the product to ensure proper operation and to prevent damage.
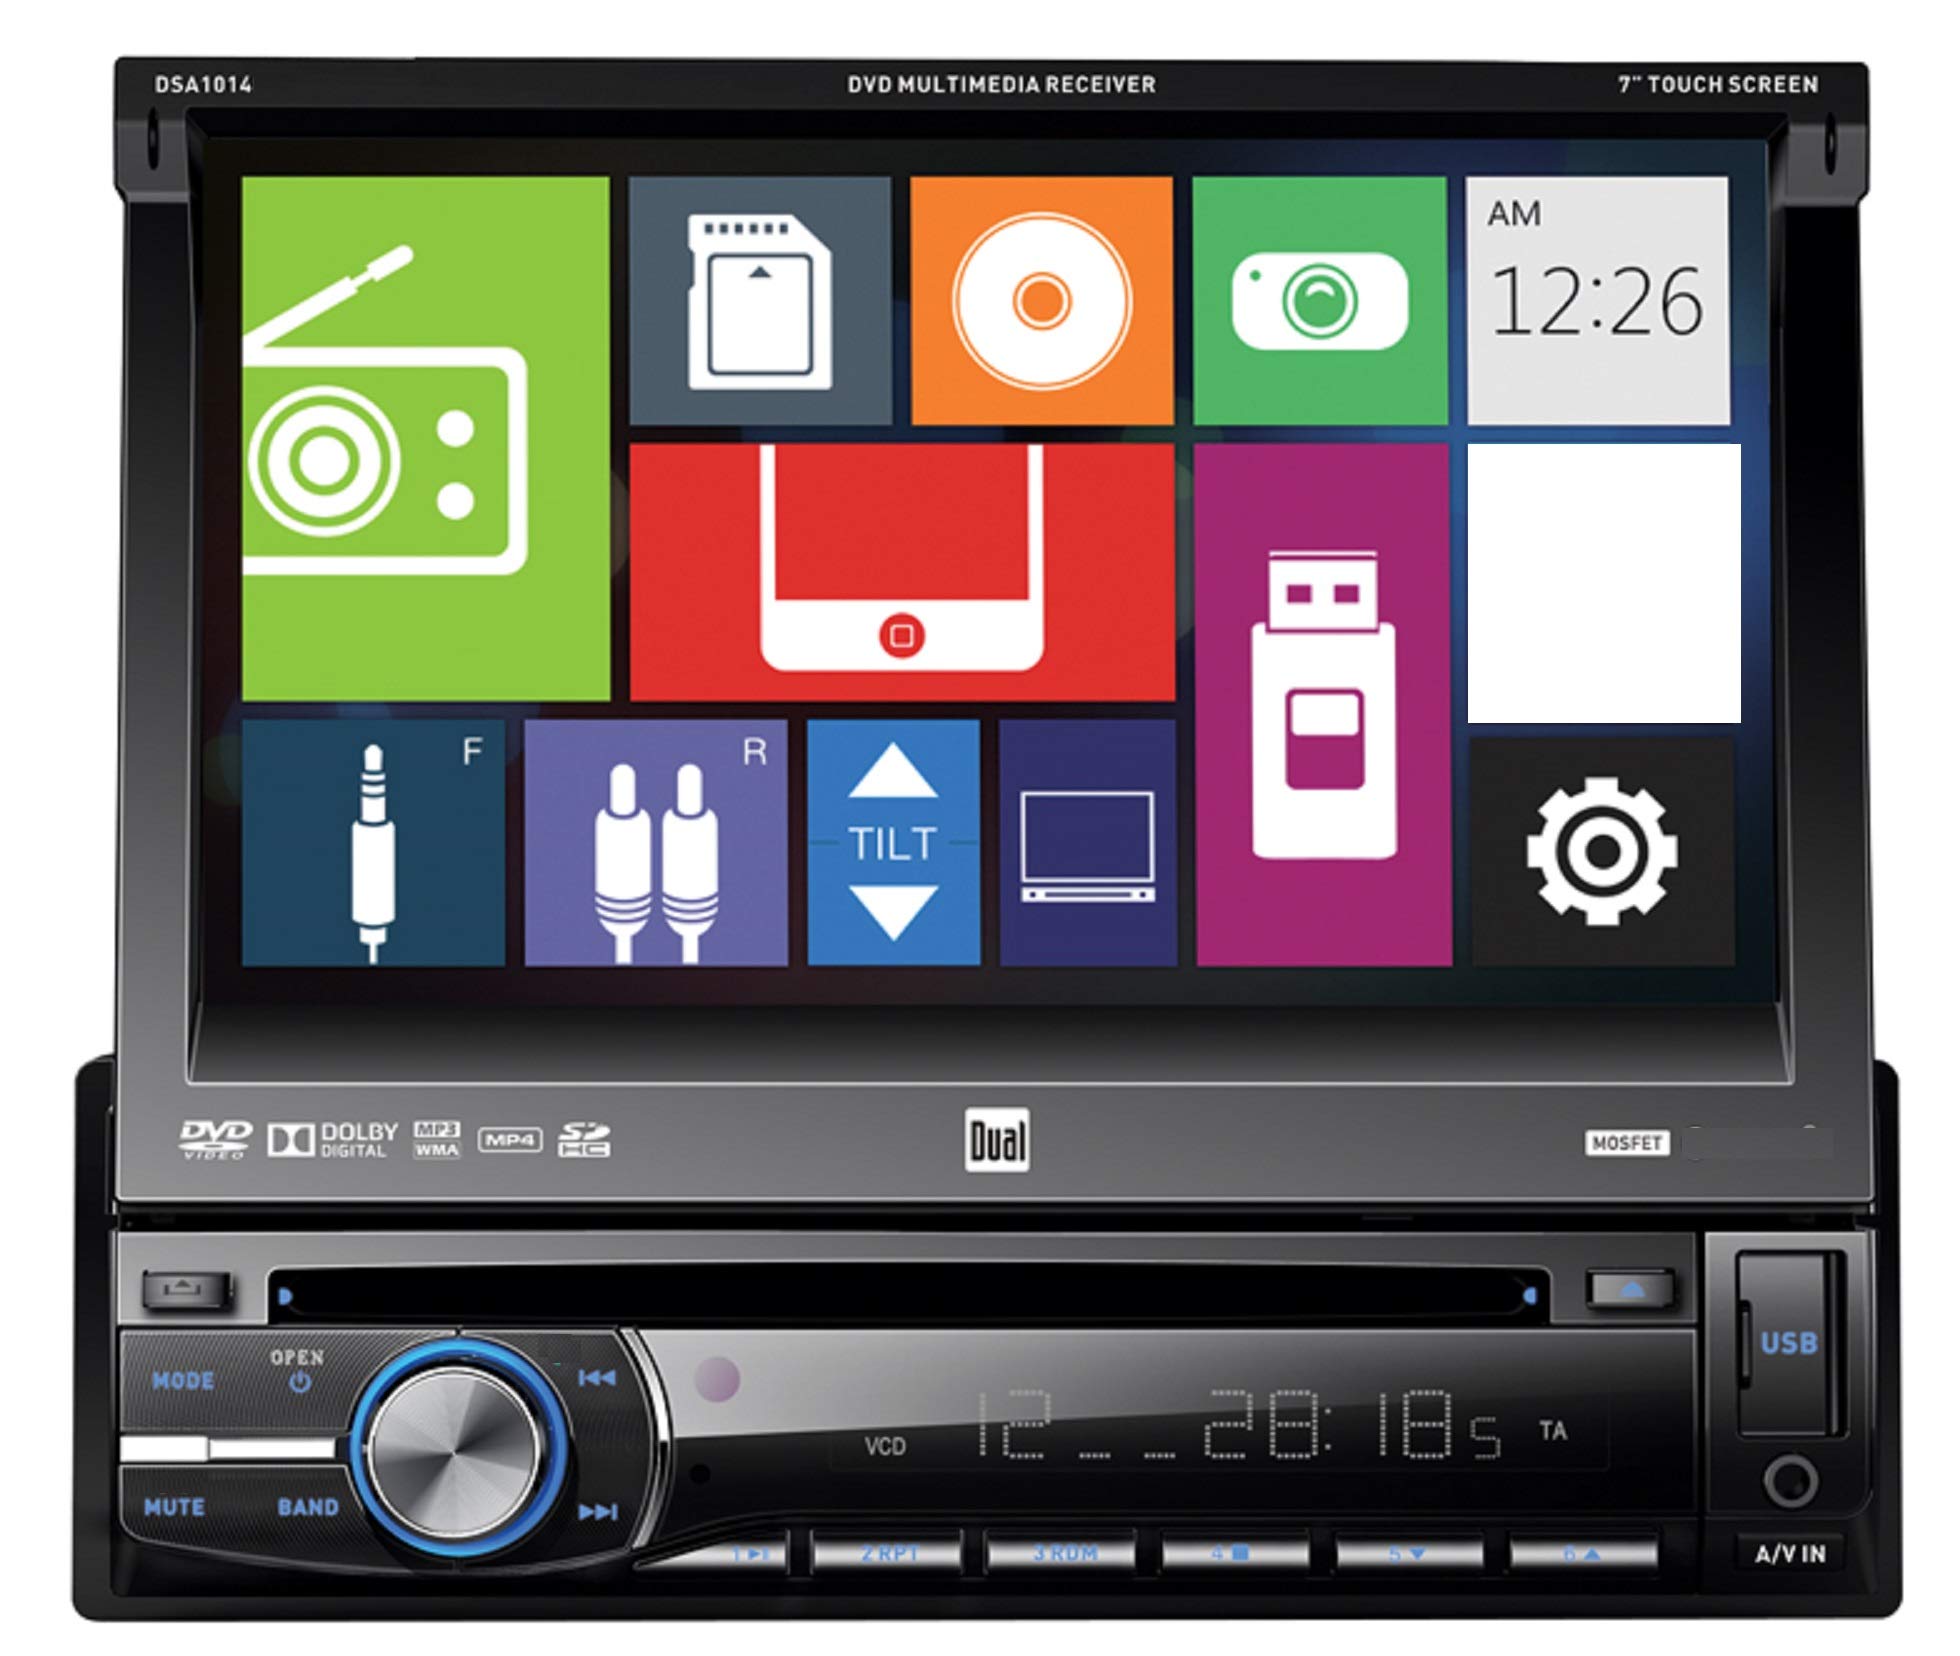
Devant view of the Dual DSA1014 In-Dash Car Stereo Receiver, showing the 7-inch touchscreen display, control buttons, volume knob, USB port, and A/V input.
Consignes de sécurité
- Always consult a qualified professional for installation to avoid damage to the unit or vehicle.
- N’utilisez pas l’appareil d’une manière qui vous distrait de la conduite.
- Assurez-vous que tous les câbles sont correctement connectés afin d'éviter les courts-circuits ou les risques électriques.
- Keep the detachable face plate clean and handle it with care.
Contenu du colis
Vérifiez que tous les éléments sont présents dans le colis :
- Dual DSA1014 In-Dash Car Stereo Receiver
- Télécommande
- Faisceau de câblage
- Matériel d'installation
- Manuel de l'utilisateur (ce document)
Caractéristiques du produit
- 7-inch Digital LED Backlit LCD Touchscreen Display (800 x 480 resolution)
- Detachable Face Plate
- CD/CD-R/RW, DVD/DVD-R/RW, MP3, and WMA Playback
- AM/FM Tuner with 24FM/12AM Presets
- Direct USB Control for iPod/iPhone (iPod and iPhone Ready)
- Front USB Input (supports up to 64GB flash drive)
- Front SD Card Slot (located behind the screen, supports up to 2GB SD card)
- Front 3.5mm A/V Auxiliary Input
- 5 Equalizer Presets: Pop, Rock, Classic, Jazz, and Flat
- Conforme à la norme CEA-2006 Amplifier: Peak 60W x 4 channels, RMS 18W x 4 channels
- CD Text Information Display and MP3 ID3 Tag Display (Title/Artist/Album)
Configuration et installation
Installation of this car stereo receiver requires technical knowledge and experience. It is highly recommended to have the unit installed by a professional car audio technician. Incorrect installation can lead to damage to the unit, vehicle, or personal injury.
Connexions de câblage
Refer to the wiring diagram provided with your unit for specific connections. Ensure all wires are securely connected and insulated to prevent short circuits. Common connections include:
- Puissance (Jaune) : 12V+ constant
- Accessoire (rouge) : Switched 12V+
- Sol (noir) : châssis du véhicule à la terre
- Sorties haut-parleurs : Branchez-le aux haut-parleurs du véhicule (assurez-vous de respecter la polarité).
- Antenne: Se connecter à l'antenne radio du véhicule.
Montage
Mount the unit securely in the vehicle's dashboard using the supplied mounting hardware. Ensure adequate clearance for the detachable face plate and disc insertion.
Mode d'emploi
Commandes de base
The DSA1014 features a 7-inch touchscreen for primary control, supplemented by physical buttons on the front panel.
- Bouton d'alimentation/mode : Press to turn the unit ON/OFF. Press briefly to cycle through available sources (Radio, Disc, USB, SD, AUX, iPod).
- Bouton de volume : Tournez pour régler le niveau de volume.
- Bouton de sourdine: Press to mute or unmute audio output.
- Bouton Bande : In Radio mode, press to switch between FM1, FM2, FM3, AM1, and AM2 bands.
- Track/Seek Buttons (◀◀ / ▶▶): Skip tracks on media, or seek radio stations.
- Bouton Ouvrir : Press to open the faceplate and access the disc slot or SD card slot.
- Port USB : Located on the front panel for USB flash drives and iPod/iPhone connection.
- A/V IN (3.5mm): Front auxiliary input for external audio/video devices.
Disc Playback (CD/DVD)
- Appuyez sur le OUVRIR button to tilt the faceplate.
- Insert a CD or DVD into the disc slot with the label side up. The unit will automatically load the disc and begin playback.
- Use the touchscreen controls or physical buttons to navigate tracks/chapters, pause, or stop playback.
Fonctionnement de la radio
- Appuyez sur le MODE button until "Radio" is selected.
- Appuyez sur le GROUPE button to select FM1, FM2, FM3, AM1, or AM2.
- Use the seek buttons (◀◀ / ▶▶) to automatically search for strong stations.
- To manually tune, use the touchscreen controls.
- To store a preset, tune to the desired station, then press and hold one of the preset numbers on the touchscreen until you hear a beep.
USB/iPod/iPhone Connectivity
- Connect your USB flash drive or iPod/iPhone to the front USB port using a compatible cable.
- The unit will automatically detect the device and switch to USB or iPod mode.
- Use the touchscreen to browse and select audio files or control your iPod/iPhone.
- The USB port also provides charging for connected devices.
Fonctionnement de la carte SD
- Appuyez sur le OUVRIR button to tilt the faceplate.
- Insert an SD card (up to 2GB) into the SD card slot.
- The unit will automatically detect the card and switch to SD mode.
- Use the touchscreen to browse and select audio files.
Entrée auxiliaire
- Connect an external audio/video device to the front 3.5mm A/V IN jack.
- Appuyez sur le MODE appuyez sur le bouton jusqu'à ce que « AUX » soit sélectionné.
- Contrôlez la lecture depuis l'appareil connecté.
Paramètres de l'égaliseur
Access the audio settings via the touchscreen to select from 5 preset equalizer curves:
- Populaire
- Rocher
- Classique
- Jazz
- Plat
Entretien
- Nettoyage de l'unité : Use a soft, dry cloth to clean the unit. For stubborn stains, damppuis le chiffon avec de l'eau. N’utilisez jamais de nettoyants ou de solvants abrasifs.
- Nettoyage de l'écran tactile : Gently wipe the touchscreen with a soft, lint-free cloth. Avoid excessive pressure.
- Façade amovible : When detached, store the face plate in its protective case to prevent scratches and damage.
- Entretien du disque : Manipulez les disques par les bords. Gardez-les propres et sans rayures.
Dépannage
| Problème | Cause possible | Solution |
|---|---|---|
| Pas de courant | Câblage incorrect ; fusible grillé ; batterie du véhicule faible. | Check power and ground connections; Replace fuse; Check vehicle battery. |
| Pas de son | Volume too low; Mute activated; Speaker wires disconnected; Incorrect audio source. | Augmenter le volume ; désactiver la fonction muet ; vérifier les connexions des haut-parleurs ; sélectionner la source audio appropriée. |
| Erreur de disque | Disc dirty or scratched; Incorrect disc format; Disc inserted incorrectly. | Clean or replace disc; Ensure disc is compatible (CD/DVD); Reinsert disc correctly. |
| USB/SD Not Recognized | Incompatible format; Device not properly connected; SD card capacity exceeded. | Assurer files are MP3/WMA; Reconnect device; Use SD card up to 2GB; Check USB flash drive format. |
| La télécommande ne fonctionne pas | Dead battery; Obstruction; Not pointing at receiver. | Replace battery; Remove obstruction; Point remote directly at the unit. |
Caractéristiques
| Fonctionnalité | Détail |
|---|---|
| Numéro de modèle | DSA1014 |
| Afficher | 7" Digital LED Backlit LCD Touchscreen (800 x 480) |
| Puissance de sortie (crête) | 60 watts x 4 canaux |
| Puissance de sortie (RMS) | 18 Watts x 4 channels (CEA-2006 compliant) |
| Lecture multimédia | CD/CD-R/RW, DVD/DVD-R/RW, MP3, WMA |
| Tuner | AM/FM with 24FM/12AM presets |
| Entrée USB | Front, supports up to 64GB flash drive, iPod/iPhone direct control and charging |
| Emplacement pour carte SD | Front (behind faceplate), supports up to 2GB SD card |
| Entrée auxiliaire | Front 3.5mm A/V |
| Égaliseur | 5 Presets (Pop, Rock, Classic, Jazz, Flat) |
| Taille du châssis | DIN simple |
| Poids de l'article | 2.2 livre (environ 1 kg) |
| Dimensions du produit | 7 x 7 x 2 pouces |
Garantie et assistance
Dual Electronics provides a limited warranty for this product. The warranty period is typically 1 year from the date of purchase. For specific warranty terms, conditions, and to register your product, please refer to the warranty card included in your package or visit the official Dual Electronics website.
For technical support, troubleshooting assistance, or service inquiries, please contact Dual Electronics customer support. Contact information can usually be found on the manufacturer's website ou dans l'emballage du produit.
Ressources en ligne : www.dualav.com