1. Introduction
This manual provides instructions for the setup, operation, maintenance, and troubleshooting of your Produplicator 1 to 5 CD DVD Duplicator. This standalone unit is designed for efficient and reliable duplication of CDs and DVDs without the need for a computer.
The Produplicator 1 to 5 model features one source drive and five target drives, allowing for simultaneous copying of up to five discs from a single master disc.
2. Consignes de sécurité
- Do not turn off the unit while it is actively copying, testing, or performing any other operation. Interrupting these processes can lead to data corruption or damage to the discs and the unit.
- This machine is designed for duplicating unprotected media. It will not copy discs with copy protection or encryption, such as retail DVDs or rental discs.
- Veillez à placer l'appareil sur une surface stable et plane, bien ventilée. Ne bloquez pas les ouvertures de ventilation.
- Keep the unit away from water, moisture, and excessive heat.
- Utilisez uniquement le cordon d'alimentation fourni avec l'appareil.
- N’essayez pas d’ouvrir ou de réparer l’appareil vous-même. Confiez toute réparation à un personnel qualifié.
3. Contenu du colis
Vérifiez que tous les éléments sont présents dans le colis :
- Produplicator 1 to 5 CD DVD Duplicator Unit
- Câble d'alimentation
- Manuel de l'utilisateur (ce document)
4. Produit terminéview
Familiarize yourself with the components and controls of your duplicator.

Figure 4.1 : Face avant view of the Produplicator 1 to 5 CD DVD Duplicator.
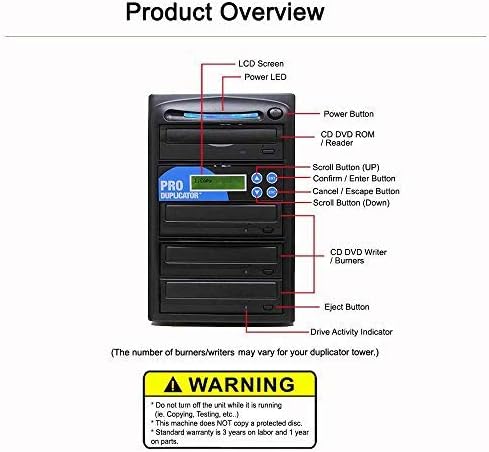
Figure 4.2 : Composants du panneau avant
- Écran LCD : Displays menu options, status, and error messages.
- Voyant d'alimentation : Indique l'état de l'alimentation.
- Bouton d'alimentation : Allume ou éteint l'appareil.
- CD DVD ROM / Reader (Top Drive): This is the source drive where the master disc is inserted.
- Scroll Button (UP): Permet de naviguer dans les options du menu.
- Confirm / Enter Button: Selects menu options or confirms actions.
- Cancel / Escape Button: Quitte le menu actuel ou annule une opération.
- Scroll Button (Down): Permet de naviguer dans les options du menu.
- CD DVD Writer / Burners (Lower Drives): These are the target drives where blank discs are inserted for duplication.
- Bouton d'éjection : Opens or closes disc trays.
- Drive Activity Indicator: Lights indicate drive activity (reading or writing).
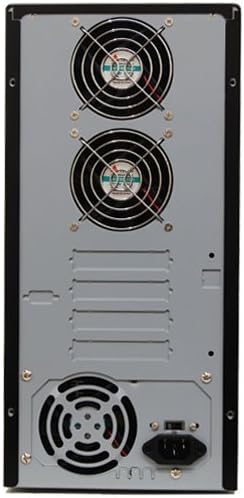
Figure 4.3: Rear Panel Components (Power input and cooling fans)
5. Installation
- Déballer l'appareil : Carefully remove the duplicator from its packaging.
- Placement: Place the unit on a flat, stable surface. Ensure there is sufficient space around the unit for proper ventilation, especially at the rear where the cooling fans are located.
- Connecter l'alimentation : Connect the provided power cable to the power input on the rear of the duplicator (refer to Figure 4.3) and then plug it into a standard electrical outlet.
- Mise sous tension : Press the Power Button on the front panel (refer to Figure 4.2). The LCD screen will illuminate, and the unit will perform a self-test.
6. Mode d'emploi
The Produplicator is a standalone unit, requiring no computer or software for operation. It features automatic master disc recognition.
6.1 Formats de disques pris en charge
- DVD: 4.7GB DVD-R/RW and DVD+R/RW, 8.5GB DVD-R DL Dual Layer and DVD+R DL Double Layer, Mini DVD.
- CD: 80min/700MB CD-R, 74min/650MB CD-RW, CD-TEXT, Video CD, 3" Mini CD-R, Photo CD (Single & Multi-session), Business Card CD-R.
6.2 Basic Duplication Process
- Mise sous tension : Ensure the duplicator is powered on and has completed its startup sequence.
- Insert Master Disc: Press the Eject button on the top drive (CD DVD ROM / Reader) to open the tray. Place your master disc (the disc you want to copy) onto the tray, label side up. Close the tray.
- Insert Blank Discs: Press the Eject buttons on the lower drives (CD DVD Writer / Burners) to open the trays. Place blank discs onto each tray, label side up. Close all trays.
- Sélectionnez la fonction Copier : The unit will automatically detect the master disc. Use the Scroll Up/Down buttons to navigate the menu on the LCD screen. Select the "Copy" or "Disc Copy" option.
- Start Duplication: Press the Confirm / Enter button to begin the duplication process. The LCD screen will display the progress, often showing bytes copied and percentage complete. Drive Activity Indicators will light up during the process.
- Achèvement: Once duplication is complete, the unit will typically eject the copied discs and display a completion message. Remove the discs.
6.3 Creating a Mix CD
The duplicator allows you to collect and edit tracks from multiple CD source discs to compile your own custom mix CD. Refer to the on-screen menu options for detailed steps on how to access and utilize the Mix CD feature. This typically involves selecting tracks from various source CDs and then burning them to a single blank CD.
7. Entretien
Proper maintenance ensures the longevity and optimal performance of your duplicator.
- Nettoyage: Regularly wipe the exterior of the unit with a soft, dry cloth. Do not use liquid cleaners or abrasive materials.
- Gestion de la poussière : The unit incorporates an anti-dust design to minimize dust accumulation within the drives. However, it is recommended to keep the operating environment as dust-free as possible. Avoid operating in excessively dusty areas.
- Disc Trays: Keep disc trays clean and free of debris. Gently clean them with a soft, lint-free cloth if necessary.
- Ventilation: Ensure the rear cooling fans and vents remain unobstructed to prevent overheating.

Figure 7.1: Anti-Dust Design Feature.
8. Dépannage
If you encounter issues with your duplicator, refer to the following common problems and solutions:
- L'appareil ne s'allume pas :
- Check if the power cable is securely connected to both the duplicator and the electrical outlet.
- Vérifiez que la prise électrique est fonctionnelle.
- Duplication Fails / Error Message:
- Ensure the master disc is clean and free of scratches or damage.
- Verify that the blank discs are compatible with the duplicator and are of good quality.
- Confirm that the master disc is not copy-protected. The unit cannot duplicate protected media.
- Try using a different brand of blank media.
- Clean the disc trays and optical lenses (if accessible and with appropriate cleaning tools).
- Discs Not Ejecting:
- Ensure the duplication process has fully completed.
- Press the Eject button firmly.
- If a disc is stuck, power off the unit, wait a few seconds, then power it back on. This may reset the drive and allow ejection.
- Slow Duplication Speed:
- Duplication speed can vary based on the type and quality of the master and blank discs.
- Ensure the drives are clean and free of dust.
Si le problème persiste après avoir essayé ces solutions, veuillez contacter le service client.
9. Spécifications
| Fonctionnalité | Détail |
|---|---|
| Marque | Produplicator |
| Numéro de modèle | PDE22X05 |
| Série | PDE22X05 |
| Plateforme matérielle | PC (Standalone operation) |
| Système opérateur | N/A (Standalone) |
| Poids de l'article | 0.01 ounces (Note: This value may be a placeholder or incorrect, actual weight is higher for a tower unit) |
| Dimensions du produit (L x l x H) | 16.25 x 15.75 x 11.25 pouces |
| Interface du disque dur | Serial ATA (Internal drive connections) |
| Vitesse d'écriture du stockage optique | 24X |
| Vitesse de lecture du stockage optique | 24X |
| Dossier spécial | External USB Connection Option, Hard Drive OR Flash Memory Slot Upgrade (Optional, not included) |
| Interface matérielle | CD-RW, DVD-R, Mini DVD |
10. Garantie et assistance
10.1 Informations sur la garantie
Your Produplicator unit comes with a standard warranty:
- Parties: 1 an
- Travail: 3 ans
Cette garantie couvre les défauts de matériaux et de fabrication dans des conditions normales d'utilisation. Veuillez conserver votre preuve d'achat pour toute réclamation au titre de la garantie.
10.2 Assistance technique
Produplicator offers lifetime technical support for this product. For assistance with setup, operation, troubleshooting, or warranty claims, please contact Produplicator customer service. Refer to the contact information provided with your purchase or on the official Produplicator website.