Introduction
Thank you for choosing the Technoline WT 182 Radio-Controlled Alarm Clock. This manual provides detailed instructions for the setup, operation, and maintenance of your new device. Please read this manual thoroughly before use and keep it for future reference. The WT 182 is designed to provide accurate time, indoor temperature, date, and day of the week, along with a reliable alarm function.
Consignes de sécurité
- N’exposez pas l’appareil à des températures extrêmes, à la lumière directe du soleil ou à une forte humidité.
- Évitez de laisser tomber ou de soumettre l'appareil à des impacts violents.
- Ne mélangez pas des piles anciennes et neuves, ou différents types de piles.
- Retirez rapidement les piles épuisées pour éviter toute fuite.
- Jetez les piles conformément aux réglementations locales.
- N’essayez pas de démonter ou de réparer l’appareil vous-même. Confiez toute intervention à un personnel qualifié.
Contenu du colis
Veuillez vérifier que tous les articles sont présents et en bon état :
- Technoline WT 182 Radio-Controlled Alarm Clock Unit
- Manuel de l'utilisateur (ce document)
Note: 2 x AA Mignon LR06 batteries are required and are not included in the package.
Produit terminéview
The Technoline WT 182 features a clear digital display showing time, date, day of the week, and indoor temperature. It includes an alarm with a snooze function and a backlight for easy viewdans des conditions de faible luminosité.

Figure 1 : Face avant view of the Technoline WT 182 alarm clock, displaying the current time, date, day of the week, and indoor temperature. The 'RADIO CONTROLLED' text is visible at the top, and 'techno line' branding is at the bottom.

Figure 2 : Face supérieure view of the alarm clock, highlighting the 'SNOOZE LIGHT' button located on the top edge of the device. This button is used to activate the backlight and the snooze function.

Figure 3 : Arrière view of the alarm clock, showing the battery compartment cover and the product information label. The label includes manufacturer details and the model number WT 182.
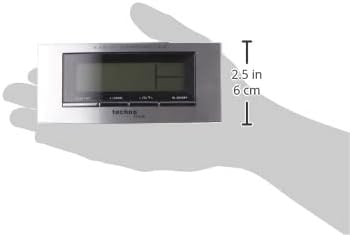
Figure 4: The alarm clock held in a hand, providing a visual reference for its compact dimensions (approximately 14 cm wide and 6 cm high).
Installation
1. Installation de la batterie
- Open the battery compartment cover on the back of the unit (refer to Figure 3).
- Insert 2 new AA Mignon LR06 batteries, observing the correct polarity (+ and - markings).
- Fermez soigneusement le couvercle du compartiment à piles.
2. Initial Setup and Radio Control
Upon battery insertion, the clock will automatically start searching for the DCF-77 radio signal. This process can take several minutes. During this time, the radio control icon will flash on the display. Once the signal is received, the exact time will be set automatically, and the icon will become steady.
- Placez l'horloge près d'une fenêtre pour une meilleure réception du signal.
- Évitez de le placer à proximité d'appareils électroniques susceptibles de provoquer des interférences.
3. Manual Time and Date Setting (if radio signal is unavailable)
If the radio signal cannot be received, or if you wish to set the time manually:
- Press and hold the 'MODE' button (usually located on the front or side) for a few seconds until the time display starts flashing.
- Use the '+' or '-' buttons (often labeled 'ADJ' or similar) to adjust the hour, then press 'MODE' to confirm and move to minutes.
- Répétez l'opération pour les minutes, l'année, le mois et le jour.
- Press 'MODE' again to exit the setting mode.
4. Réglage du fuseau horaire
The clock allows for a time zone adjustment of ± 12 hours. This is useful if you are in a region where the DCF-77 signal is received but the local time zone differs from Central European Time.
- In normal time display mode, press and hold the 'ADJ' or similar button until the time zone offset starts flashing.
- Use the '+' or '-' buttons to adjust the offset.
- Press the 'ADJ' button again to confirm and exit.
Opérationnel
1. Time Display (12/24 Hour Format)
The clock can display time in either 12-hour (with AM/PM indicator) or 24-hour format.
- To switch between formats, briefly press the 'ADJ' or a dedicated 12/24H button.
2. Date and Day of the Week Display
The display shows the current date (Month-Day) and the day of the week. The day of the week can be displayed in 5 different languages.
- To change the day of the week language, press the 'MODE' button repeatedly until the language setting flashes, then use '+' or '-' to select.
3. Indoor Temperature Display
The clock continuously measures and displays the indoor temperature.
- The temperature is typically displayed in Celsius. There might be an option to switch to Fahrenheit by pressing a specific button (e.g., 'C/F' or 'ADJ' in temperature mode).
4. Réglage de l'alarme
The WT 182 features a single alarm.
- Press the 'ALARM' button once to display the current alarm time.
- Maintenez le bouton « ALARME » enfoncé jusqu'à ce que l'heure de l'alarme commence à clignoter.
- Use the '+' or '-' buttons to set the desired alarm hour, then press 'ALARM' to confirm and move to minutes.
- Use the '+' or '-' buttons to set the desired alarm minutes, then press 'ALARM' to confirm and exit.
- To activate/deactivate the alarm, briefly press the 'ALARM ON/OFF' or 'ALARM' button. An alarm icon will appear/disappear on the display.
5. Fonction Snooze et rétroéclairage
Lorsque l'alarme retentit :
- Press the 'SNOOZE/LIGHT' button (located on top, refer to Figure 2) to activate the snooze function. The alarm will pause for approximately 5 minutes and then sound again.
- To stop the alarm completely, press any other button (e.g., 'ALARM' or 'MODE'). The alarm will reset for the next day.
- To activate the backlight at any time, briefly press the 'SNOOZE/LIGHT' button. The backlight will illuminate for a few seconds.
Entretien
Nettoyage
Essuyez l'appareil avec un chiffon doux, damp chiffon. N’utilisez pas de nettoyants abrasifs ni de solvants, car ils pourraient endommager l’écran ou le câble.asing.
Remplacement de la batterie
When the display becomes dim or the clock functions erratically, it is time to replace the batteries. Follow the battery installation steps in the 'Setup' section.
Dépannage
| Problème | Cause possible | Solution |
|---|---|---|
| Aucun affichage ou affichage faible | Les piles sont épuisées ou mal insérées. | Remplacez les piles par des neuves en respectant la polarité. |
| Heure affichée incorrecte | Poor radio signal reception or manual setting error. | Relocate the clock to an area with better signal. Perform manual time setting if radio signal is consistently poor. Check time zone setting. |
| L'alarme ne sonne pas | L'alarme n'est pas activée ou est mal réglée. | Vérifiez que l'icône d'alarme est visible à l'écran. Revérifiez les paramètres de l'heure de l'alarme. |
| Le rétro-éclairage ne fonctionne pas | Batteries are low or exhausted. | Remplacer les piles. |
Caractéristiques
- Numéro de modèle :
- WT 182 (SMADH)
- Dimensions (L x l x H) :
- 140 x 35 x 63 mm (5.5 x 1.4 x 2.5 pouces)
- Poids:
- 150 grammes
- Source d'alimentation :
- 2 x AA Mignon LR06 batteries (not included)
- Type d'affichage :
- Numérique
- Format de l'heure :
- 12/24 heures sélectionnable
- Affichage de la température:
- Température intérieure
- Caractéristiques spéciales :
- Radio-controlled time (DCF-77), Date and Day of Week display (5 languages), Alarm with Snooze, Backlight
- Matériel:
- Plastique
- Couleur:
- Argent/Noir
- Mode de fonctionnement:
- Numérique
- Type de mouvement :
- Quartz
- Utilisation intérieure/extérieure :
- Intérieur
- Fabricant:
- PK
- Pays d'origine :
- Chine
Garantie et assistance
Technoline products are manufactured to high-quality standards. For information regarding warranty terms and conditions, please refer to the warranty card included with your purchase or visit the official Technoline website. For technical support or service inquiries, please contact your retailer or the manufacturer directly.
You can find more information and contact details on the official Technoline website: www.technoline.de