DeVilbiss 802342
Manuel d'utilisation du kit de pistolet à peinture à gravité HVLP DeVilbiss 802342 StartingLine
Model: 802342 | Brand: DeVilbiss
Introduction
The DeVilbiss 802342 StartingLine HVLP Gravity Spray Gun Kit is a comprehensive system designed for auto painting and touch-up applications. This kit includes a full-size HVLP spray gun with a 1.3mm fluid tip, a mini HVLP detail gun with a 1.0mm fluid tip, an air adjusting valve, and a 1.8mm primer set-up. All components are conveniently organized within a durable molded case, providing a complete solution for various painting needs.
Consignes de sécurité
Always prioritize safety when operating spray painting equipment. Failure to follow safety guidelines can result in serious injury or property damage.
- Ventilation: Use in a well-ventilated area to prevent the accumulation of hazardous fumes. If adequate ventilation is not available, use appropriate respiratory protection.
- Équipement de protection individuelle (EPI) : Always wear appropriate PPE, including safety glasses or goggles, gloves, and a respirator suitable for paint fumes.
- Matériaux inflammables : Many paints and solvents are flammable. Keep away from open flames, sparks, and other ignition sources. Do not smoke while operating the spray gun.
- Sécurité sous pression : Never exceed the maximum recommended air pressure for the spray gun. Always release air pressure from the system before performing maintenance or cleaning.
- Exposition aux produits chimiques : Ce produit peut vous exposer à des produits chimiques, notamment au plomb, qui est reconnu par l'État de Californie comme étant à l'origine de cancers, de malformations congénitales ou d'autres troubles de la reproduction. Pour plus d'informations, consultez www.P65Warnings.ca.gov.
- Sécurité électrique : Ensure all electrical connections for air compressors or other equipment are properly grounded and in good condition.
- Enfants et animaux domestiques : Tenez les enfants et les animaux domestiques éloignés de la zone de travail et des équipements.
Produit terminéview et composants
The DeVilbiss 802342 kit provides a versatile set of tools for various painting tasks. Familiarize yourself with the components before use.

Figure 1: DeVilbiss 802342 StartingLine HVLP Gravity Spray Gun Kit, showing the full-size HVLP spray gun, mini HVLP detail gun, air adjusting valve, and various cleaning accessories neatly organized in a molded case.
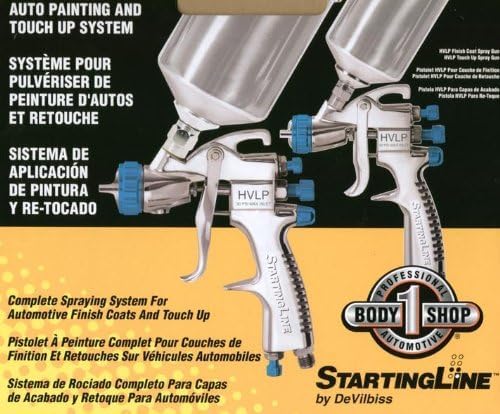
Figure 2: Contents of the DeVilbiss StartingLine Spray Gun Kit, including two spray guns, fluid cups, and cleaning tools.
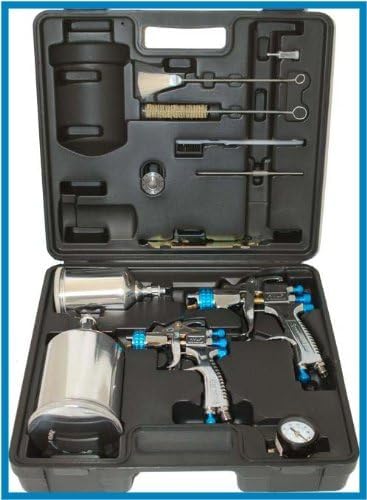
Figure 3 : Un autre view of the DeVilbiss StartingLine Spray Gun Kit components, highlighting the full-size and mini spray guns along with accessories.
Contenu du kit :
- Full-Size HVLP Gravity Spray Gun: Equipped with a 1.3mm fluid tip, suitable for general painting applications.
- Mini HVLP Detail Gun: Features a 1.0mm fluid tip, ideal for touch-ups and fine detail work.
- Air Adjusting Valve: For precise control over air pressure at the gun.
- 1.8mm Primer Set-up: An additional fluid tip and needle for spraying thicker materials like primers.
- Molded Case: Provides organized storage and protection for the kit components.
- Accessoires de nettoyage : Various brushes and tools for proper maintenance.
Installation
- Déballer les composants : Carefully remove all items from the molded case and inspect for any damage.
- Select Fluid Tip: Choose the appropriate fluid tip (1.0mm, 1.3mm, or 1.8mm) based on the viscosity of the material you intend to spray. Ensure the corresponding needle and air cap are installed.
- Attach Fluid Cup: Securely attach the gravity-feed fluid cup to the top of the spray gun.
- Raccordement de l'alimentation en air : Connect the air adjusting valve to the spray gun's air inlet, then connect your air hose from the compressor to the air adjusting valve. Ensure all connections are tight to prevent air leaks.
- Premier nettoyage : Before first use, clean the spray gun thoroughly with an appropriate cleaning solvent to remove any manufacturing residues.
Mode d'emploi
- Préparer le matériel : Mix and thin your paint or coating material according to the manufacturer's instructions. Strain the material to remove any particles that could clog the gun.
- Fill Fluid Cup: Pour the prepared material into the gravity-feed fluid cup. Do not overfill.
- Régler la pression d'air : With the air adjusting valve, set the air pressure at the gun to the recommended PSI for your material. For HVLP guns, this is typically between 10-30 PSI (Maximum Pressure: 30 PSI).
- Ajuster le jet de pulvérisation :
- Fan Control Knob: Adjust this knob to change the width of the spray pattern, from a narrow round pattern to a wide fan.
- Bouton de commande des fluides : Controls the amount of material flowing through the gun. Turn clockwise to decrease flow, counter-clockwise to increase.
- Essai de pulvérisation : Always perform a test spray on a piece of scrap material to verify the spray pattern and material atomization before applying to your actual workpiece. Adjust settings as needed.
- Technique de pulvérisation :
- Maintenez une distance constante (généralement de 6 à 8 pouces) par rapport à la surface.
- Move the gun at a steady, even speed, overlapping each pass by about 50%.
- Trigger the gun fully at the beginning of each pass and release at the end to avoid excessive material buildup.
Entretien
Proper cleaning and maintenance are essential for the longevity and optimal performance of your spray guns.
- Nettoyage immédiat : Clean the spray gun immediately after each use. Do not allow paint to dry inside the gun.
- Gobelet vide pour liquide : Vider tout résidu de liquide du récipient.
- Flush Gun: Pour a small amount of appropriate cleaning solvent into the cup and spray it through the gun until clear solvent emerges.
- Démontage et nettoyage :
- Remove the air cap, fluid tip, and needle.
- Use the provided cleaning brushes and solvent to thoroughly clean all internal and external parts. Pay special attention to the air cap holes and fluid passages.
- Do not use metal objects to clean the fluid tip or air cap holes, as this can damage them.
- Lubrification: Lightly lubricate the needle packing and air valve packing with a non-silicone lubricant designed for spray guns.
- Réassemblage et rangement : Reassemble the gun carefully. Store the clean and dry spray gun in its molded case to protect it from dust and damage.
Dépannage
Cette section aborde les problèmes courants que vous pourriez rencontrer et propose des solutions potentielles.
| Problème | Cause possible | Solution |
|---|---|---|
| Pulsating Spray / Inconsistent Flow |
|
|
| Poor Atomization / Orange Peel Finish |
|
|
| Fan Pattern Distorted (Heavy Top/Bottom) |
|
|
| Leaks from Fluid Tip |
|
|
Caractéristiques
| Fonctionnalité | Détail |
|---|---|
| Marque | DeVilbiss |
| Nom du modèle | StartingLine |
| Numéro de modèle de l'article | 802342 |
| Type de produit | Auto Accessory / HVLP Gravity Spray Gun Kit |
| Fluid Tip Sizes Included | 1.0mm (Mini Gun), 1.3mm (Full-Size Gun), 1.8mm (Primer Set-up) |
| Pression maximale | 30 PSI (livre par pouce carré) |
| Source d'énergie | External Air Compressor |
| Poids de l'article | 5.01 livre (environ 2.27 kg) |
| Dimensions du colis | 12.19 L x 30 W x 31.6 H (Cm) |
| Matériel | Solid construction (chrome finish) |
| Utilisations recommandées | Painting (Automotive Finish Coats and Touch Up) |
| Origine | Fabriqué à Taiwan |
Garantie et assistance
For detailed warranty information, technical support, or to purchase replacement parts, please refer to the official DeVilbiss website ou contactez leur service client.
An official Installation Manual (PDF) is available for further reference: